Quantcast
Channel: Accessibility

Concentrate throughout the day with Background Sounds

$
0
0

When you need a little bit of a push to concentrate or go to sleep, use Background Sounds.

Perhaps the most prominent new feature of iOS 15 and iPadOS 15 is Focus, an enhanced Do Not Disturb tool that makes it possible to schedule which type of notifications you receive depending on the time of day. It's just the latest in a series of features Apple has added to its products over the years to help users better concentrate, relax, and sleep.

Background Sounds is another wellness feature in iOS/iPadOS 15. As its name suggests, the tool provides sounds to help you relax. Use the feature on all of the best iPhones and best iPads. Here's more about it.

Setting up Background Sounds

You'll find the new Background Sounds feature in the Accessibility section of iOS/iPadOS. To activate:

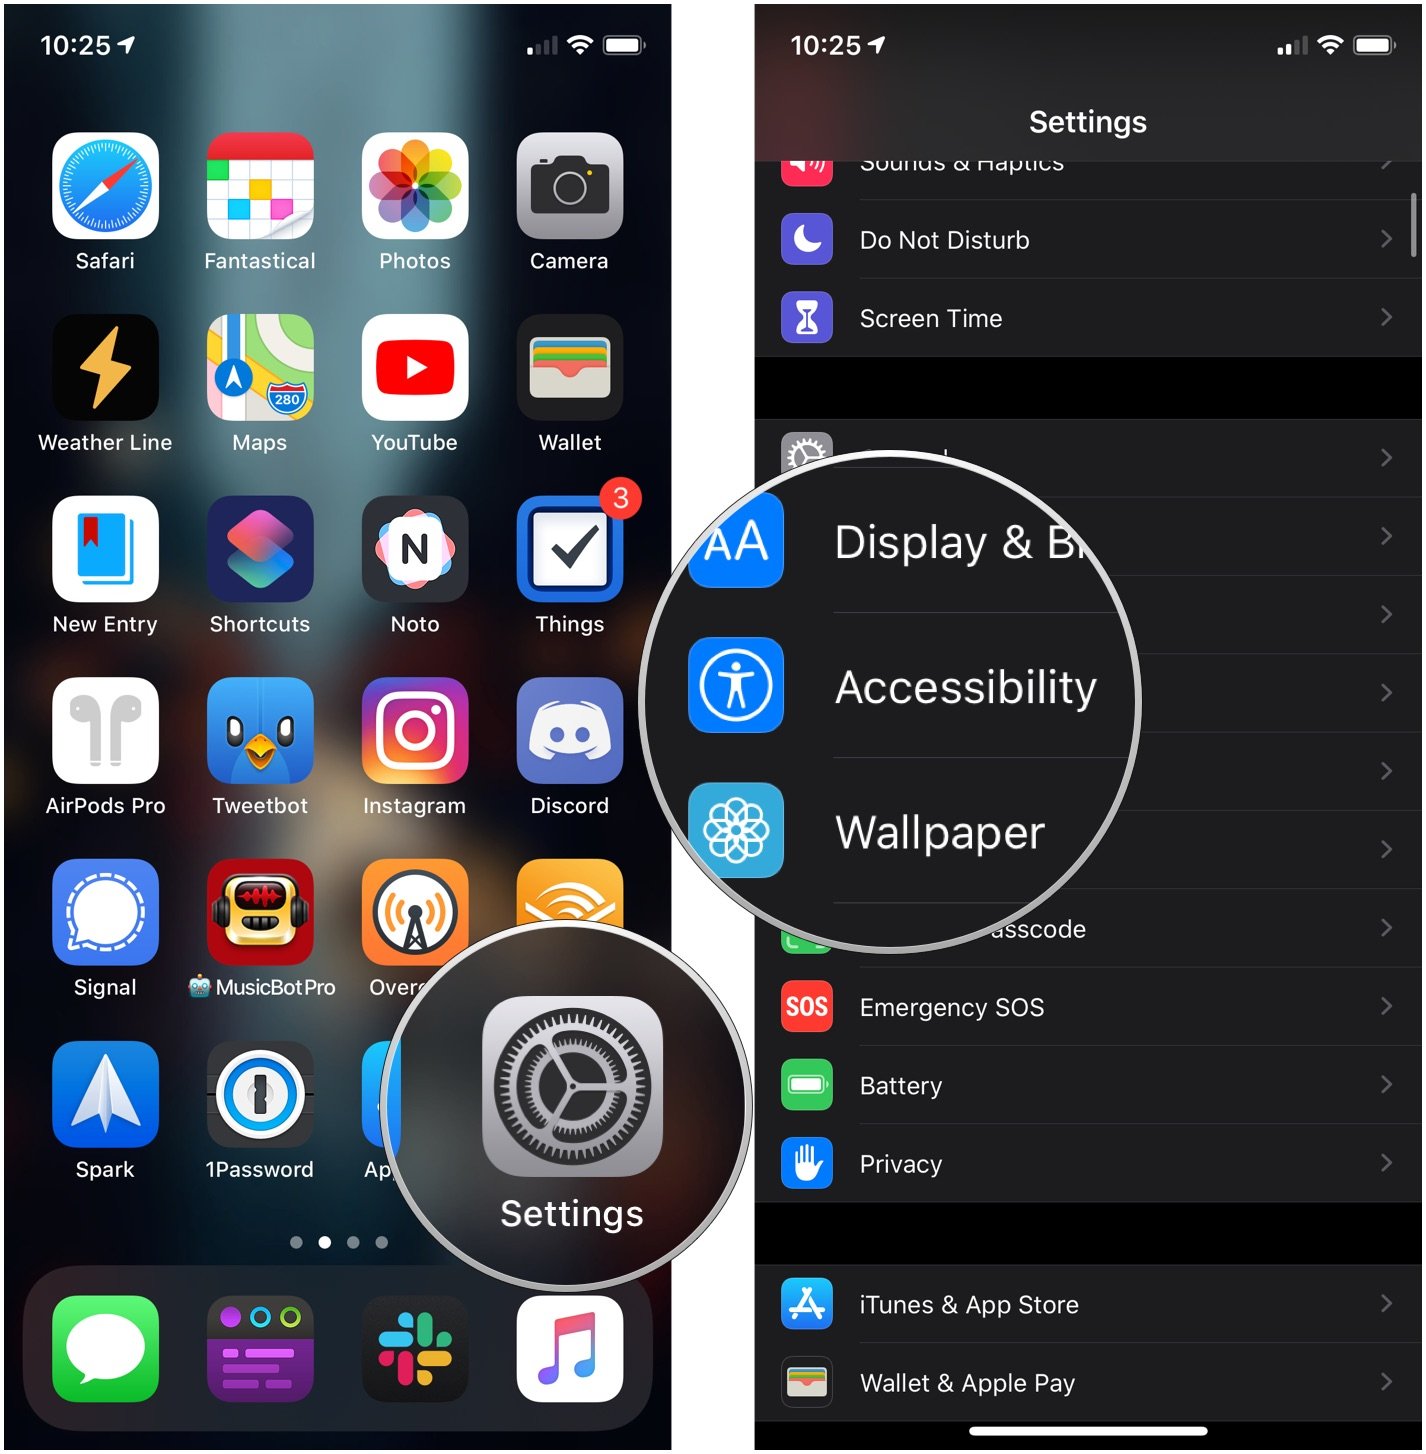
  1. Tap the Settings app on the Home screen.
  2. Scroll down, choose Accessibility.
  3. Scroll down, select Audio/Visual.

  4. Tap Background Sounds.
  5. Toggle on Background Sounds.
  6. Choose Sound.

  7. Select a sound among the choices. The options include Balanced Noise, Bright Noise, Dark Noise, Ocean, Rain, and Stream. The sound gets downloaded to your device the first time it's selected.
  8. Tap Back after making your selection.
  9. Change the ** Volume** using the slider as needed.

Using with other media

You can have the assigned Background Sound continue to play even with other audio. On the same Background Sounds page:

  1. Toggle on Use When Media is Playing.
  2. Change the Volume using the slider as needed.
  3. Toggle on Stop Sounds When Locked to stop the Background Sounds from playing automatically whenever the device is locked.

Using Background Sounds with Control Center

The easiest way to turn Background Sounds on/off is through Control Center. You must first add the Hearing tile to Control Center to do so:

  1. Tap the Settings app on the Home screen.
  2. Scroll down, select Control Center.
  3. Click the + in the front of Hearing under More Controls.

  4. Open Control Center.
  5. Tap the Hearing tile.
  6. Select Background Sounds at the bottom of the screen to turn on Background Sounds.
  7. To turn off Background Sounds repeat the steps.

When Background Sounds are on, you can adjust the sound and the Volume from the same location.

Questions?

Do you have any questions about Background Sounds and iOS/iPadOS 15? Let us know in the comments below.


Tweak your headphone settings on iPhone using these steps

$
0
0

In iOS and iPadOS, you can amplify soft sounds and adjust specific frequencies for select headphones.

Beginning with iOS 14 and continuing with iOS 15, you can amplify soft sounds and adjust specific frequencies for your hearing needs. Headphone Accommodations is available on iPhone and iPad with select audio devices. Here's how it works on the best iPhones and best iPads.

Supported audio products

Headphone Accommodations are available for the following Apple and Beats audio products:

  • AirPods Max
  • Apple EarPods (with 3.5 mm Headphone Plug or Lightning Connector)
  • AirPods (2nd generation)
  • AirPods Pro
  • Powerbeats
  • Powerbeats Pro
  • Beats Solo Pro

Setting up Headphone Accommodations

You can set up Headphone Accommodations by following these steps:

  1. Tap the Settings app on your device, making sure your supported device is connected.
  2. Select Accessibility.
  3. Scroll down, choose Audio/Visual under Hearing.

  4. Choose Headphone Accommodations at the top.
  5. Toggle on Headphone Accommodations.
  6. Choose how you want to apply your custom audio settings. You can turn on Phone to apply these settings to phone calls, FaceTime calls, and any third-party video call apps or turn on Media to apply these settings to music, movies, podcasts, audiobooks, Siri, voicemail, and Live Listen.

Customizing audio

The first step with Headphone Accommodations is performing headphone audio customization. On the same page as noted above:

  1. Tap Custom Audio Setup.
  2. Choose Continue.
  3. Select Don't Use Audiogram.

  4. Tap Continue.
  5. Follow the on-screen directions to test your hearing.

  6. Choose Use Custom Settings or Use Standard Settings, depending on the recommended settings on the screen.
  7. Tap Done.

Manually adjust

You can also manually adjust the audio settings at any time.

  1. Tap the Settings app on your device, making sure your supported device is connected.
  2. Select Accessibility.
  3. Scroll down, choose Audio/Visual under Hearing.
  4. Adjust the Balance slider.

Those are the steps to adjust Headphone Accommodations for select Apple and Beats products. When activated, they should make your music listening even better.

Change the display or text based on the app in iOS 15

$
0
0

You can adjust accessibility settings based on the app in iOS 15 and iPadOS 15.

Beginning with iOS 15 and iPadOS 15, you can adjust display and text size accessibility settings per app. These include the ability to bold or enlarge text, increase contrast, invert colors, add color filters, and more. Here's how to make changes on all of the best iPhones and best iPads.

Change accessibility settings per app

To change accessibility settings per app:

  1. Tap the Settings app on your device's Home screen.
  2. Choose Accessibility.
  3. Scroll down, select Per-App Settings.

  4. Tap Add App under App Customization.
  5. Choose your app to customize.
  6. Select the app you just selected from the list.

  7. Make the accessibility changes you want for the app. For example, there are various display and text size settings you can adjust. Remember, these changes only affect the chosen app.
  8. Tap Per-App Settings when finished.
  9. Repeat Steps 4 through Steps 8 to adjust accessibility settings per app for other titles.

Adjust text size when using an app

You can also adjust the text size on the fly when using an app on iPhone and iPad. To do so:

  1. Select the app you wish to change the text size.
  2. Open Control Center.
  3. Tap aA. If the choice isn't there, add it to Control Center.

  4. Drag the slider up or down to increase or decrease the text size.
  5. Exit Control Center.

To change the text size for all apps, tap All Apps at the bottom of the same screen.

For more information on accessibility on iPhone and iPad, be sure to check out our ultimate guide. It provides a lengthy list of how-tos on the subject.

It's great to see Apple has finally made it possible to adjust accessibility settings per app in iOS 15. It will be interesting to see how the new tool develops in subsequent OS releases.

AssistiveTouch is the newest accessibility feature on Apple Watch

$
0
0

The AssistiveTouch feature in watchOS 8 aims to help those with limb differences. Here's how to get it set up.

With AssistiveTouch on Apple Watch, you can control apps and navigate through menus without touching the screen. The tool uses the Apple Watch's gyroscope, accelerometer, and optical heart rate sensor. It's designed for people with limb differences, although anyone can use it. The feature is part of the watchOS 8 update and works with the best Apple Watch.

How to set up AssistiveTouch on Apple Watch

The use AssistiveTouch, be sure to have watchOS 8 or later installed on your wearable device and iOS 15 or later on your best iPhone.

  1. Tap on the Apple Watch app on iPhone.
  2. Choose Accessibility.
  3. Select AssistiveTouch under the Motor section.
  4. Toggle on AssistiveTouch and confirm your setting, if applicable.

How to adjust hand gestures for AssistiveTouch on Apple Watch

  1. Tap on the Apple Watch app on iPhone.
  2. Choose Accessibility.
  3. Select AssistiveTouch under the Motor section.

  4. Choose Hand Gestures under Inputs. This toggle is turned on my default.
  5. Change the settings for Pinch, Double Pinch, Clench, and Double Clench under Customize Gestures to your liking. The defaults are Forwards, Backwards, Tap, and Active Menu, respectively.

How to adjust the motion pointer for AssistiveTouch on Apple Watch

With the motion pointer in AssistiveTouch on Apple Watch, you can navigate your Apple Watch by tilting it.

  1. Tap on the Apple Watch app on iPhone.
  2. Choose Accessibility.
  3. Select AssistiveTouch under the Motor section.

  4. Choose Motion Pointer under the Motor section.
  5. Adjust Sensitivity, Activation Time, and Movement Tolerance, when applicable.
  6. Change Top, Bottom, Left, and RIght under Hot Edges. The defaults are Swipe Up, Swipe Down, Swipe Left, and Swipe Right, respectively.

How to adjust the appearance for AssistiveTouch on Apple Watch

  1. Tap on the Apple Watch app on iPhone.
  2. Choose Accessibility.
  3. Select AssistiveTouch under the Motor section.

  4. Toggle High Contrast under Appearance, if applicable.
  5. Tap Color.
  6. Choose a new color from the list of options. The default is blue.

You can now use AssistiveTouch on Apple Watch using the hand gestures and motion pointer settings you selected above.

Summary

It's terrific seeing Apple continue with its commitment to accessibility on mobile devices. Thanks to the watchOS 8, those who are limb different can now access all the benefits of the Apple Watch.

These are ladies' choice when it comes to the best running shoes for women

$
0
0

We know that ladies have different needs when it comes to choosing the best running shoes for women, but there are a few things that can be considered unanimous across the board: cushion and comfort. Running is an extremely meditative sport. You get to block out all distractions and connect with your deeper self. That's why we want to keep you running in comfort and style. Whether you're running on the road or the trails, these are the best running shoes for women and why you'll love them.

Cushion for Pushin'

Hoka One One Bondi 6

Staff Favorite

The most cushioned shoe in the Hoka road lineup. These deliver a consistent ride via the full-EVA midsole, breathable upper, and Meta-Rocker technology.

From $178 at Amazon

Smooth as Butter

Hoka One One Clifton 6

These shoes are ultra-lightweight, have a seamless SpeedFrame, and breathable fabric lining. They provide a consistent, smooth-as-butter ride.

From $140 at Amazon

Great Value

Asics Gel Venture 7

Made for running outdoors and on trails, this shoe comes complete with a trail-specific outsole, a high-abrasion rubber for traction, and a no-slip grip.

From $46 at Amazon

Protect the Environment

Brooks Launch 7

This shoe is perfect for runners who want a streamlined, race-ready shoe that still has enough cushioning for everyday training. Plus, they're eco-friendly!

From $100 at Amazon

Funky Fresh

Saloman XR Mission

These all-terrain shoes give a lightweight feel with stability to provide a comfortable running experience. Made for short-middle distance runs.

$97 at Amazon

The Minimalist

JOOMRA Barefoot Shoes

The overall structure compliments the anatomy of the foot and provides the foot greater opportunity to strengthen. Removable insoles for arch support included.

From $10 at Amazon

Versatility

Under Armour Charged Intake 4

For runners who need flexibility, cushioning, and versatility, these shoes use a molded, cushioned ankle, and heel collar for added comfort and support.

From $60 at Amazon

Running on Clouds

Adidas Cloudfoam Pure

A dreamy aesthetic and a cloudfoam memory sock liner that molds directly to the foot will have you feeling like you're running on clouds.

From $17 at Amazon

Budget Friendly

New Balance Arishi V3

This shoe features fresh foam midsole technology that is precision-engineered to deliver an ultra-cushioned, lightweight ride. Bold looks and comfy construction help these shoes rock fashion and function.

From $42 at Amazon

Old School Gone New

Saucony Cohesion 13

Designed to wear "every day in every way," these provide grid supportive cushioning, durable rubber outsoles, and supportive upper overlays.

From $50 at Amazon

Belle of the Ball

Nike Roshe One PRM

Crafted with a combination mesh and synthetic upper, they also feature a padded collar, full-length injected unit sole, and a modified waffle outsole pattern.

From $86 at Amazon

Ladies' choice

Running is wonderful, but the impact is tough on your joints, that's why we felt it important to find the best running shoes for women out there. We love the Hoka One One Bondi 6 for the wonderfully cushioned, extremely comfortable ride. This game-changing shoe is the most cushioned in the Hoka One One lineup. Providing Hoka's most advanced technology, these shoes give a smooth, balanced ride delivered by the full-EVA midsole, the comfortable and breathable upper, and their "Meta-Rocker" technology. They deliver a consistent ride for all distances and quite literally feel like you're running on clouds.

If you're looking for something a little less padded but still comfortable, try the Asics Gel Venture 7. Or maybe something flashy and fashionable is more your speed? The Saloman XR Mission and the Nike Roshe One will steal the show.

No matter what your running needs are, these top contenders are the best running shoes for women when considering aesthetics, comfort, and cutting-edge technology, enabling you to look and feel your absolute best when hitting the trails or the pavement.

Apple passes $3 trillion market cap

$
0
0

It only broke $2.5 trillion earlier this year...

What you need to know

  • Apple has just passed a $3 trillion market cap valuation.
  • Shares are trading up at 182.86.
  • Apple is now the largest S&P 500 stock by some margin.

Apple's share price has just passed the $182.86 mark, giving the company a valuation of $3 trillion.

The company only broke the $2.5 trillion threshold back in July. Falling in October, Apple's stock market dominance was briefly eclipsed by Microsoft which passed it to become the world's most valuable company, with a valuation at the time of $2.44 trillion.

Analysts tipped Apple to pass the $3 trillion mark as early as January of 2021. Analyst Gene Munster stating "I think for 2021, the performance is going to come again from Apple. It may seem tone-deaf for a company to lead FAANG for three straight years, but I think that in fact will happen. I think this has a track to $200 [per share]."

At its most recent earnings call in October Apple posted revenue of $83.4 billion, CEO Tim Cook stating:

"This year we launched our most powerful products ever, from M1-powered Macs to an iPhone 13 lineup that is setting a new standard for performance and empowering our customers to create and connect in new ways. We are infusing our values into everything we make — moving closer to our 2030 goal of being carbon neutral up and down our supply chain and across the lifecycle of our products, and ever-advancing our mission to build a more equitable future."

Apple has successfully launched the iPhone 13, Apple Watch Series 7, a slew of new iPads and the new MacBook Pro (2021) with its spicy M1 Pro and M1 Max Apple silicon. Looking ahead, the company has another bumper year of releases on the cards in 2022 featuring a new iPhone SE and possibly a new mini-LED MacBook Air.

Get the lighting right with an external flash or LED light for your iPhone

$
0
0

The iPhone has one of the best cameras in the industry, and the built-in flash is good enough for most things, but it doesn't cast a wide light, and it isn't adjustable. When you need a little more creative freedom, you want one of today's best external flashes and LEDs. These lights work universally with everything from the newest iPhone 13 Pro Max to older model phones.

Best flash

Anker iPhone LED flash - External flash

Staff Pick

If you want a proper flash, add this tiny MFi certified LED light cube to your cart now. The Anker is up to four times brighter and has twice the range of the iPhone's built-in flash, and it can sync up and fire when you hit the shutter on your phone. There are two light modes: flash mode and continuous light. The Anker works with all iPhones, the battery lasts more than 10,000 shots, and it recharges in just 75 minutes.

$35 at Amazon$50 at Best Buy

Best value

QIAYA selfie light ring

This year, we named the QIAYA one of the best ring lights for selfies. It's a clip-on LED with 36 lamp beads, and it's controlled by a touch-sensitive switch. This little ring light recharges with a USB cable and puts you in a proper glow day or night.

$14 at Amazon$24 at Walmart$14 at QIAYA

Pro lighting

Profoto 901380 C1 Plus smartphone studio light

The Profoto mobile light syncs over Bluetooth with your iPhone's shutter. Twenty LEDs in the C1 Plus mimic natural light, giving you perfect exposure with every snap. The C1 senses your environment, adjusts automatically, and fires with your iPhone when you click the shutter. There's nothing simpler.

$299 at Amazon$299 at Adorama$299 at Moment

Best panel light

Lume Cube Bicolor Panel

I've used this Lume Cube panel for more than a year with a mirrorless camera and, most recently, my iPhone 13. The battery lasts a full 14 hours and recharges in less than two hours. You select the light temperature and brightness, then direct the light to your subject matter. Easy peasy.

$60 at Amazon$60 at B&H$60 at Lume Cube

For iPhone 12 users

LuMee Halo by Case-Mate

If your daily driver is an iPhone 12 or iPhone 12 Pro, you're going to love the LuMee Halo. It's a durable case with halo lights on the back for forward-facing pictures and illuminated edges on the front for selfies. There's even a dimmer switch, so you can go for the muted look or use a full-on floodlight.

$70 at Amazon

Our favorite ring light

UBeesize 10" selfie ring light

If you need to illuminate your subject with a steady stream of light, this 10-inch selfie ring and tripod kit from UBeesize is fantastic. It has a Bluetooth remote, allowing you to control the light's intensity from a distance, and a tripod that's extendable to 50-inches. If you do live streams or YouTube videos, this is your best option.

$36 at Amazon$40 at Walmart

Best waterproof light

Joby Beamo - External LED

The Joby Beamo is a waterproof mini LED small enough to tuck in your pocket, yet it gives off enough light to film or snap photos in the dark. With five brightness levels and 1500 lumens, you can create anywhere with this portable powerhouse. Even cooler, the Beamo is magnetic. Stick it on a mount of your choosing, on the ground, or to anything metal. The Beamo is waterproof down to 100 feet.

$70 at Amazon$70 at Best Buy$70 at B&H

Best kit

Lume Cube 2.0 portable lighting kit

The six-piece portable lighting kit from Lume Cube comes with one waterproof 5600K LED cube, one mod frame, a warming gel, a softening diffuser, and a mount. The light is waterproof up to 30 feet and brightness-adjustable, allowing you to work with everything from an intense beam of light to a subtle glow. The Lume Cube 2.0 works with iPhone, drones, and today's best digital cameras.

$90 at Amazon

Steady your shot

IVISII G2 pocket RGB camera light

The IVISII G2 is a pocket LED light, tripod, and selfie stick in one. The steady lighting works as a fill light and is hue adjustable, so it's perfect for mood lighting or getting more accurate colors out of your photos. The G2 has a rechargeable battery that lasts for three hours.

$70 at Amazon

Look at these accessories

Movo smartphone vloggig kit V7

This vlogging kit from Movo made our list of the best video rigs for iPhone this year. This full setup comes with a grip rig, stereo microphone, LED light, and a wireless remote. If you shoot video with your iPhone and need all the bells and whistles, scoop this deal up now.

$120 at Amazon$150 at Adorama$150 at B&H

A simple fill light

Itech universal clip-on mini LED

The pocketable clip-on LED from Itech clamps over the top of your iPhone and serves as a steady-stream fill light. Clip it to the front of your phone for selfies or the back for group or landscape shots. The six LED bulbs add just the right amount of gentle light to highlight your subject without casting shadows.

$15 at Amazon$22 at Walmart

Go flash someone

iPhone's onboard flash is pretty good, but sometimes you need a little more oomph, and that's why I recommend and use external flashes and LEDs. My favorite model is Anker iPhone LED flash. It has a long battery life, syncs with the flash settings on your iPhone, and recharges quickly.

When you want continuous light, the Lume Cube Bicolor Panel is the one I travel with. The battery holds out 14 hours and the LEDs are temperature and brightness controllable with a switch on the side of the panel.

And if you'd prefer not to carry extra equipment, grab the LuMee Halo by Case-Mate. It has front and back-facing LED lights, and it's also a sturdy phone case.

Make navigating your iPhone and iPad easier with button shapes and labels

$
0
0

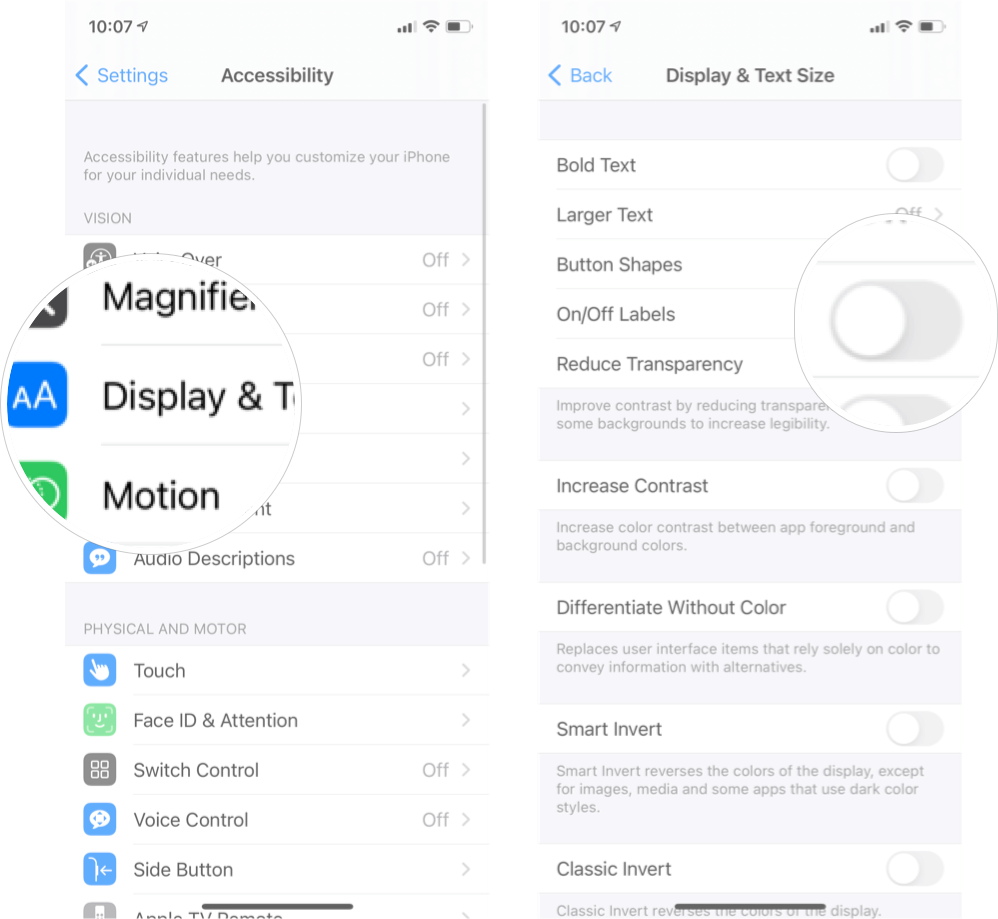
How do you make buttons easier to see and hit? You bring back their outlines!

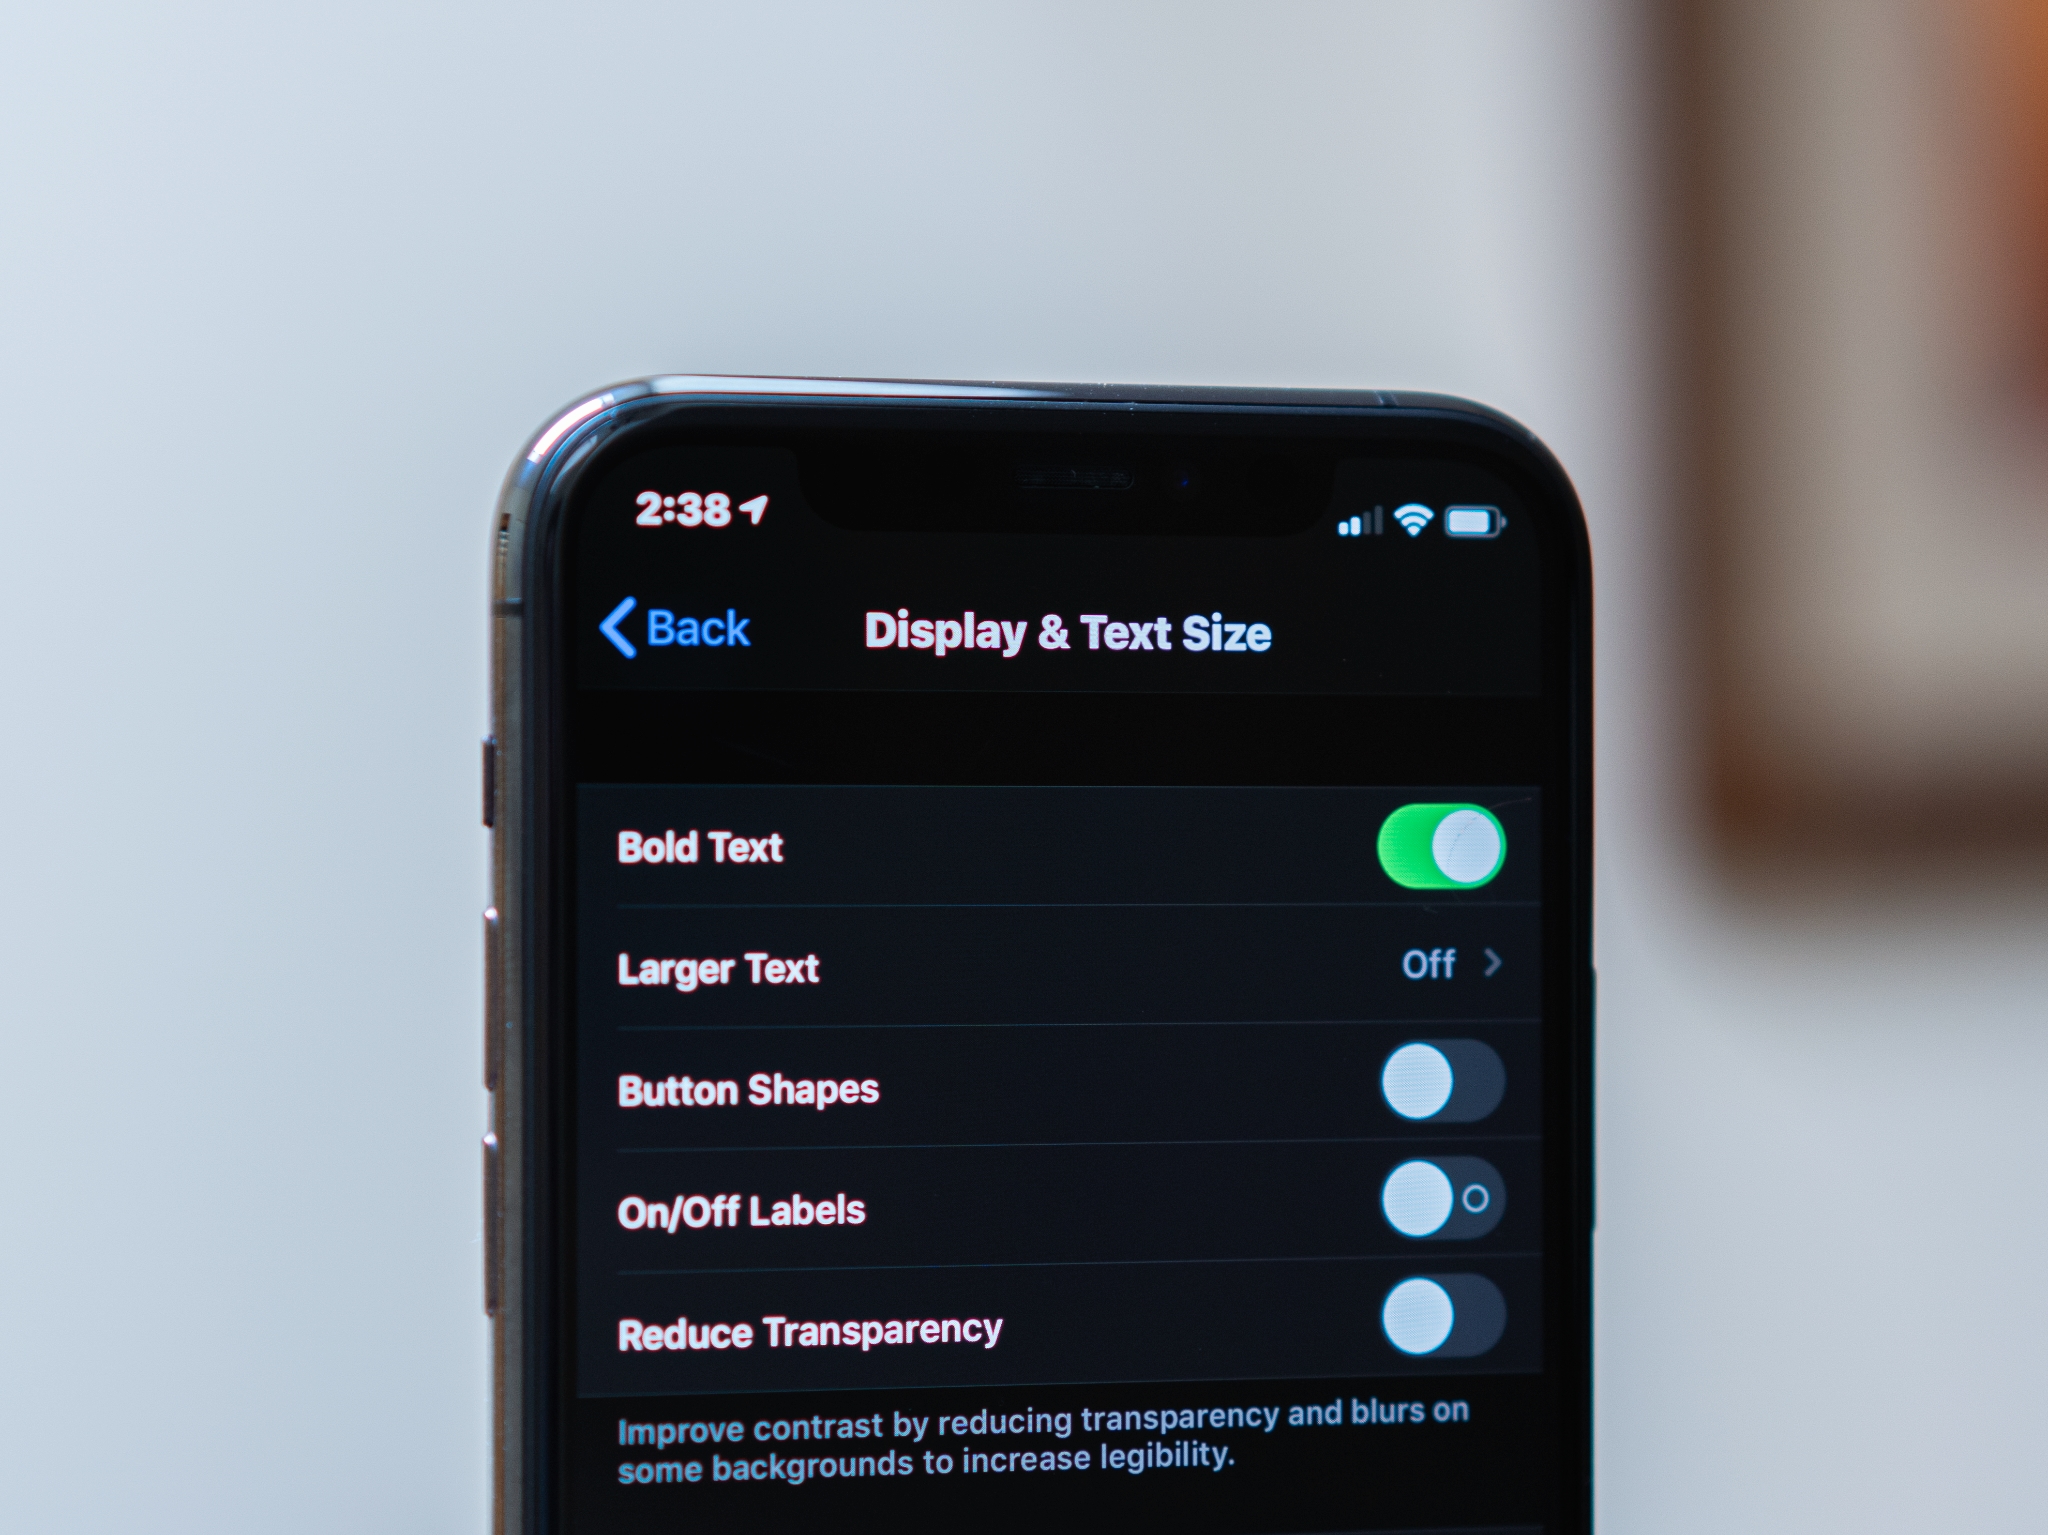
In iOS 15, Apple no longer uses on-screen buttons, preferring borderless text. For those who can't quite see the text to read it, backing out of settings or tapping calendar dates might be a bit difficult. The Accessibility menu in the Settings app will be your best friend if you're looking to improve readability.

Apple has made it easy to enable button shapes and use labels on your iPhone and iPad to let you know where buttons are on your screen. Here's how to enable button shapes and label in iOS 15.

How to enable button shapes

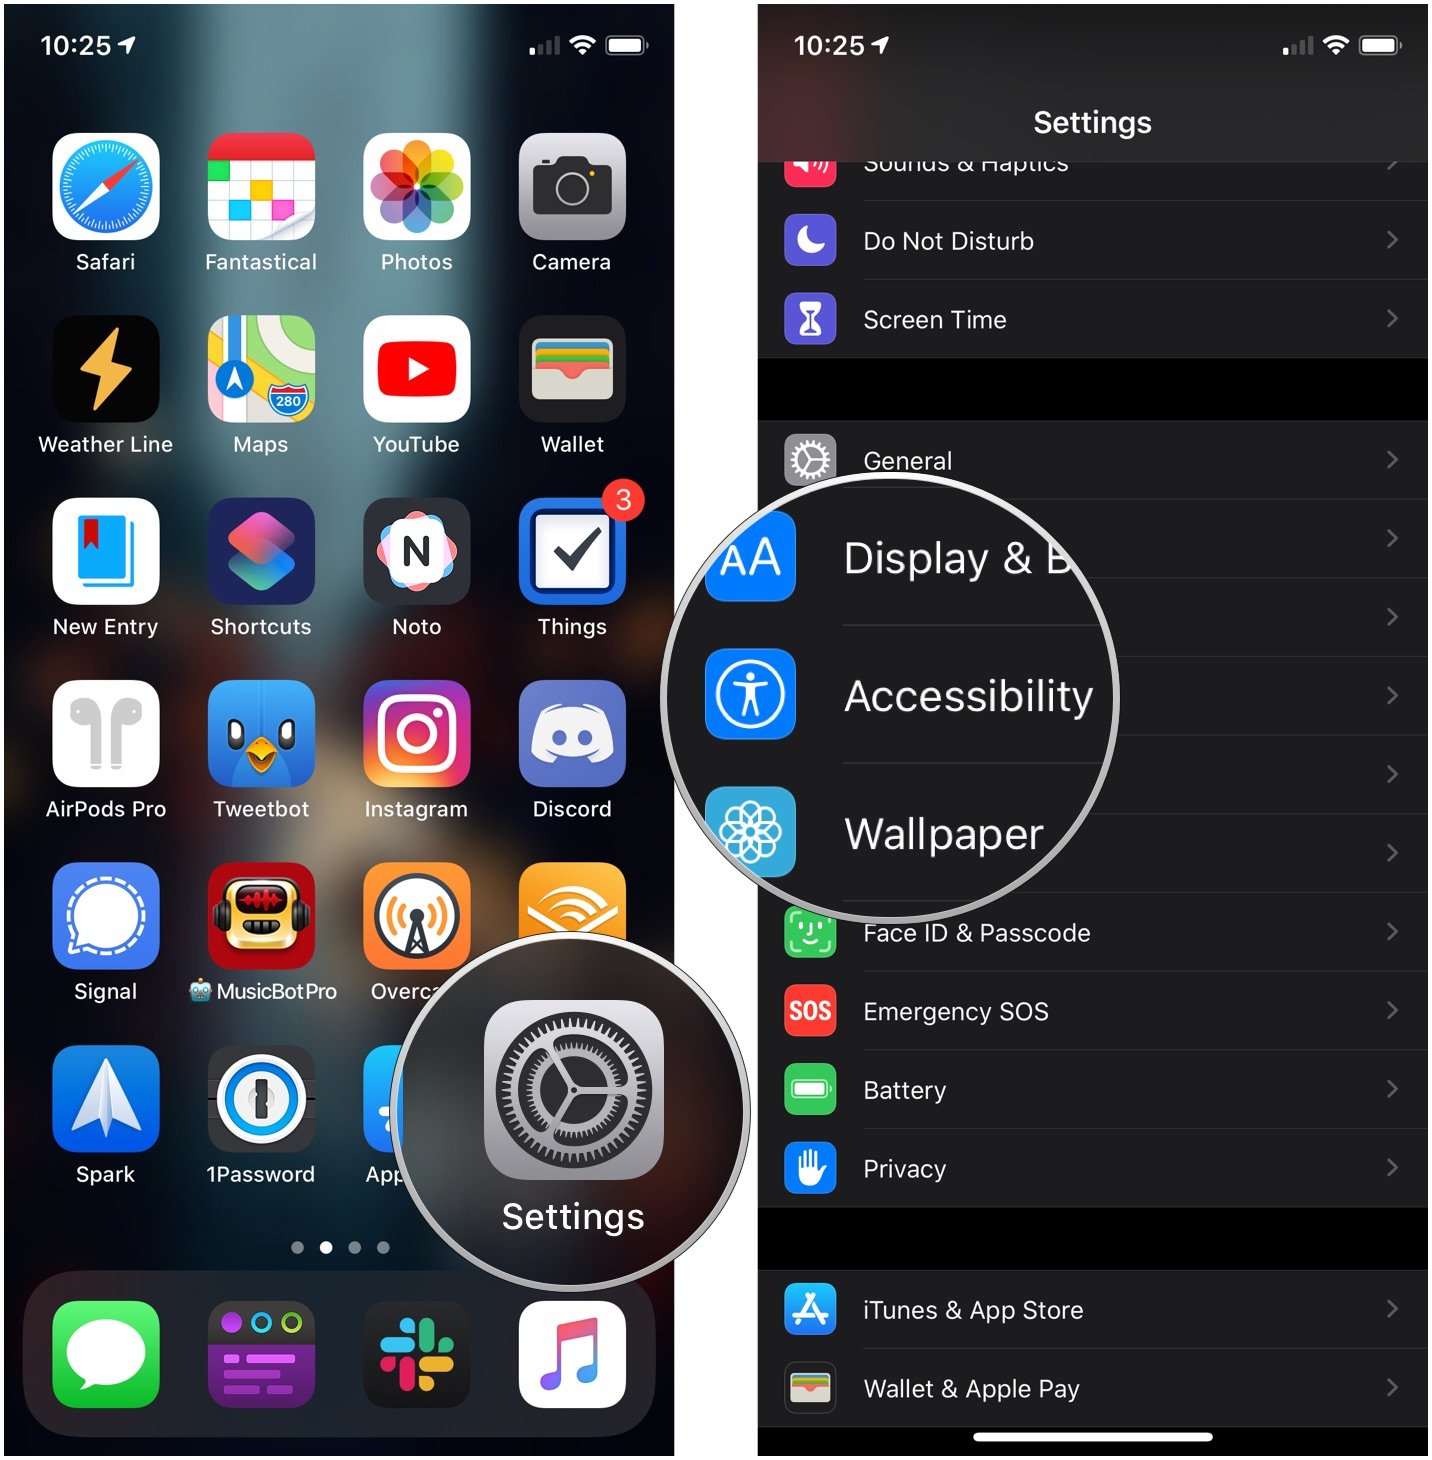
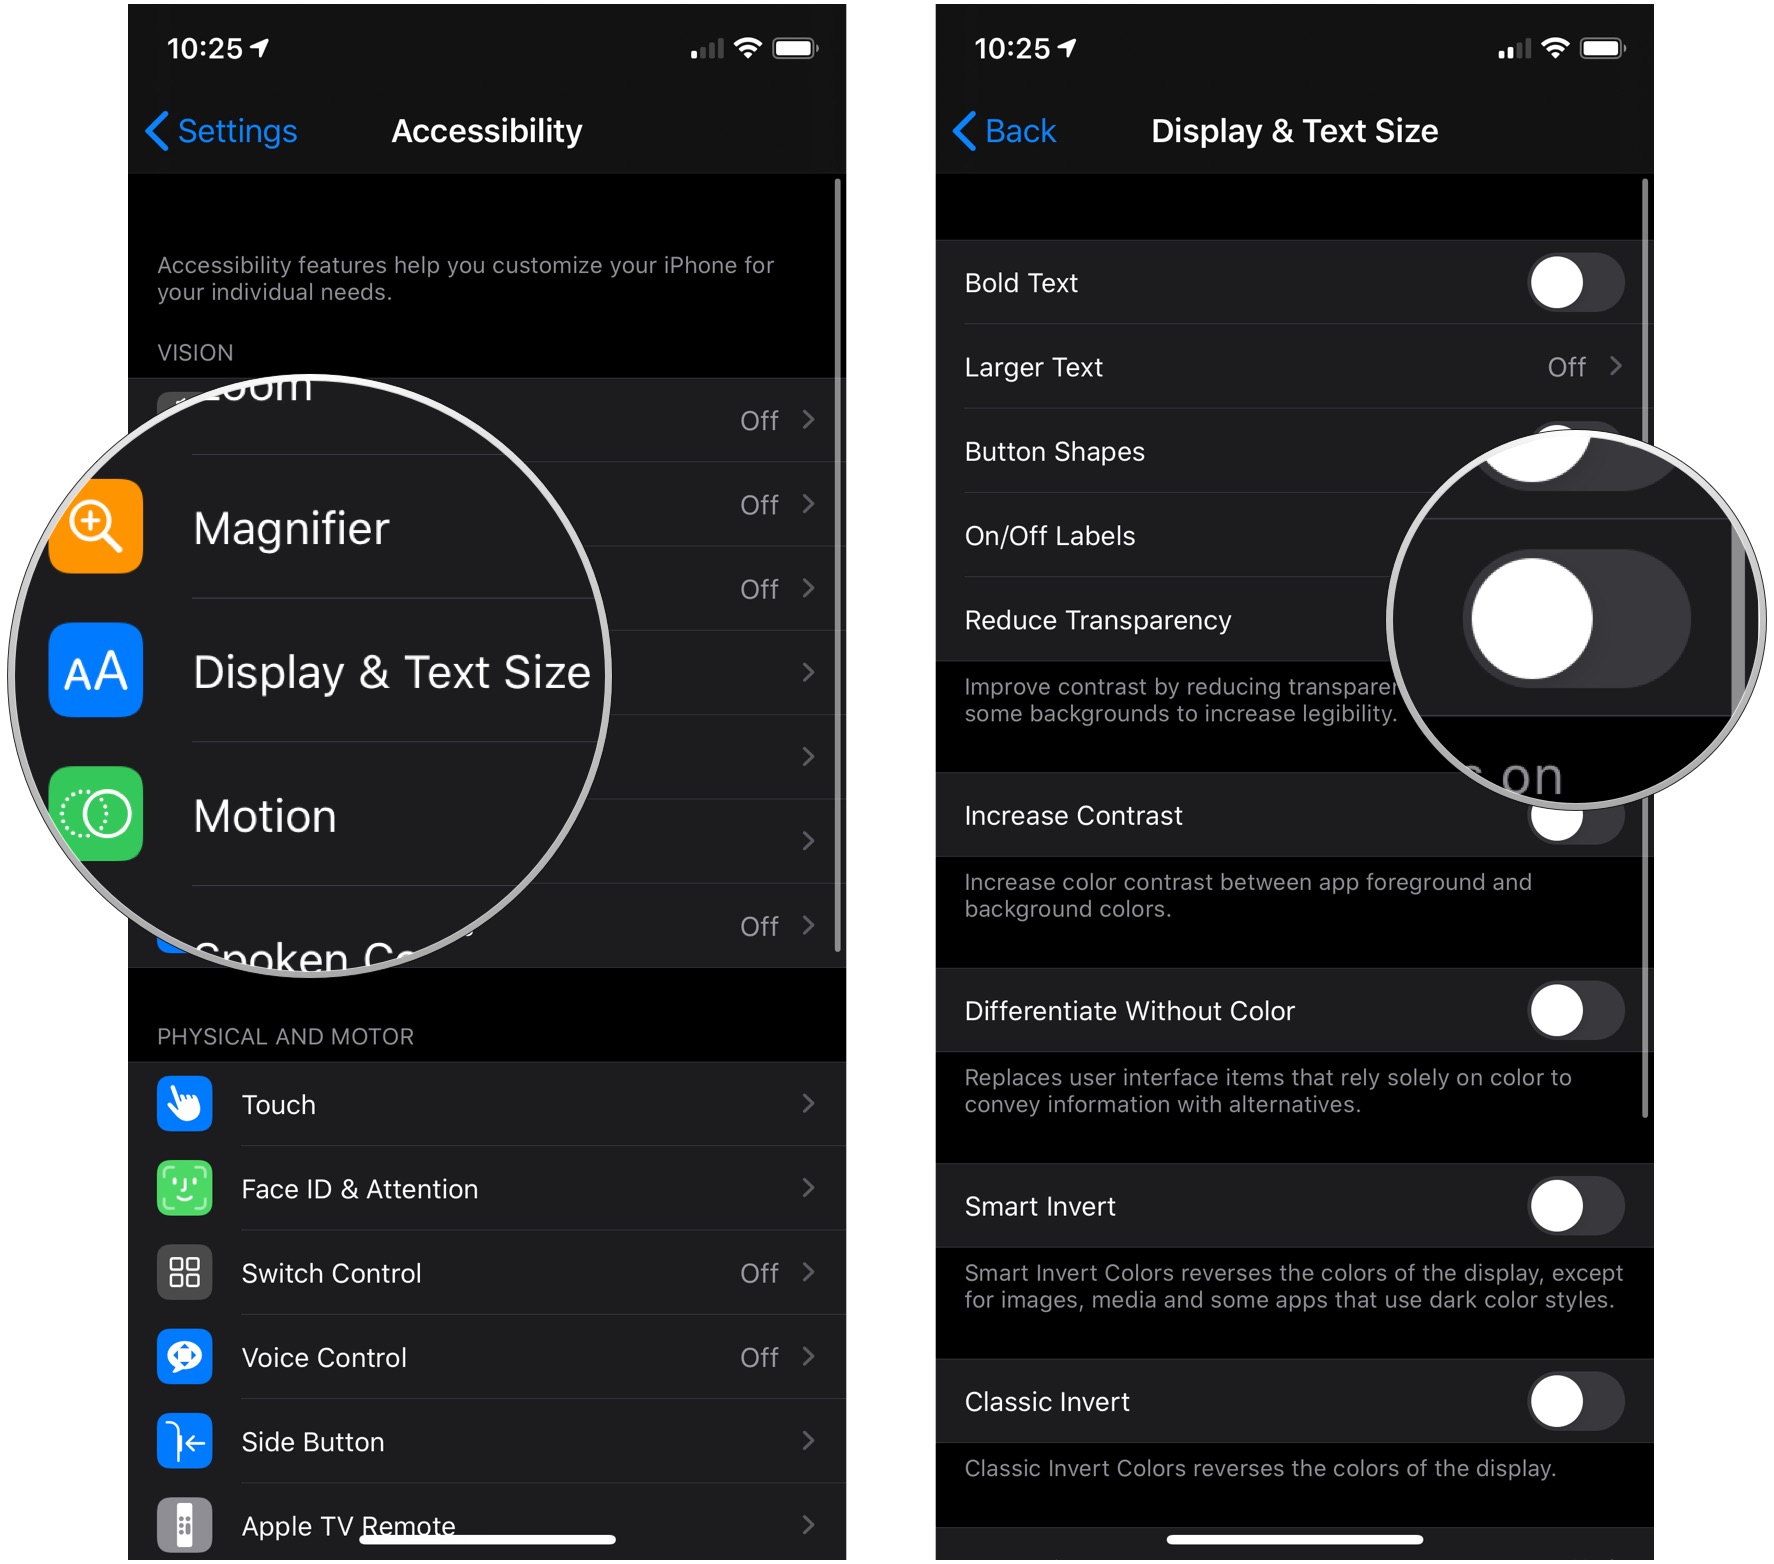
  1. Launch Settings from your Home screen.
  2. Tap Accessibility.

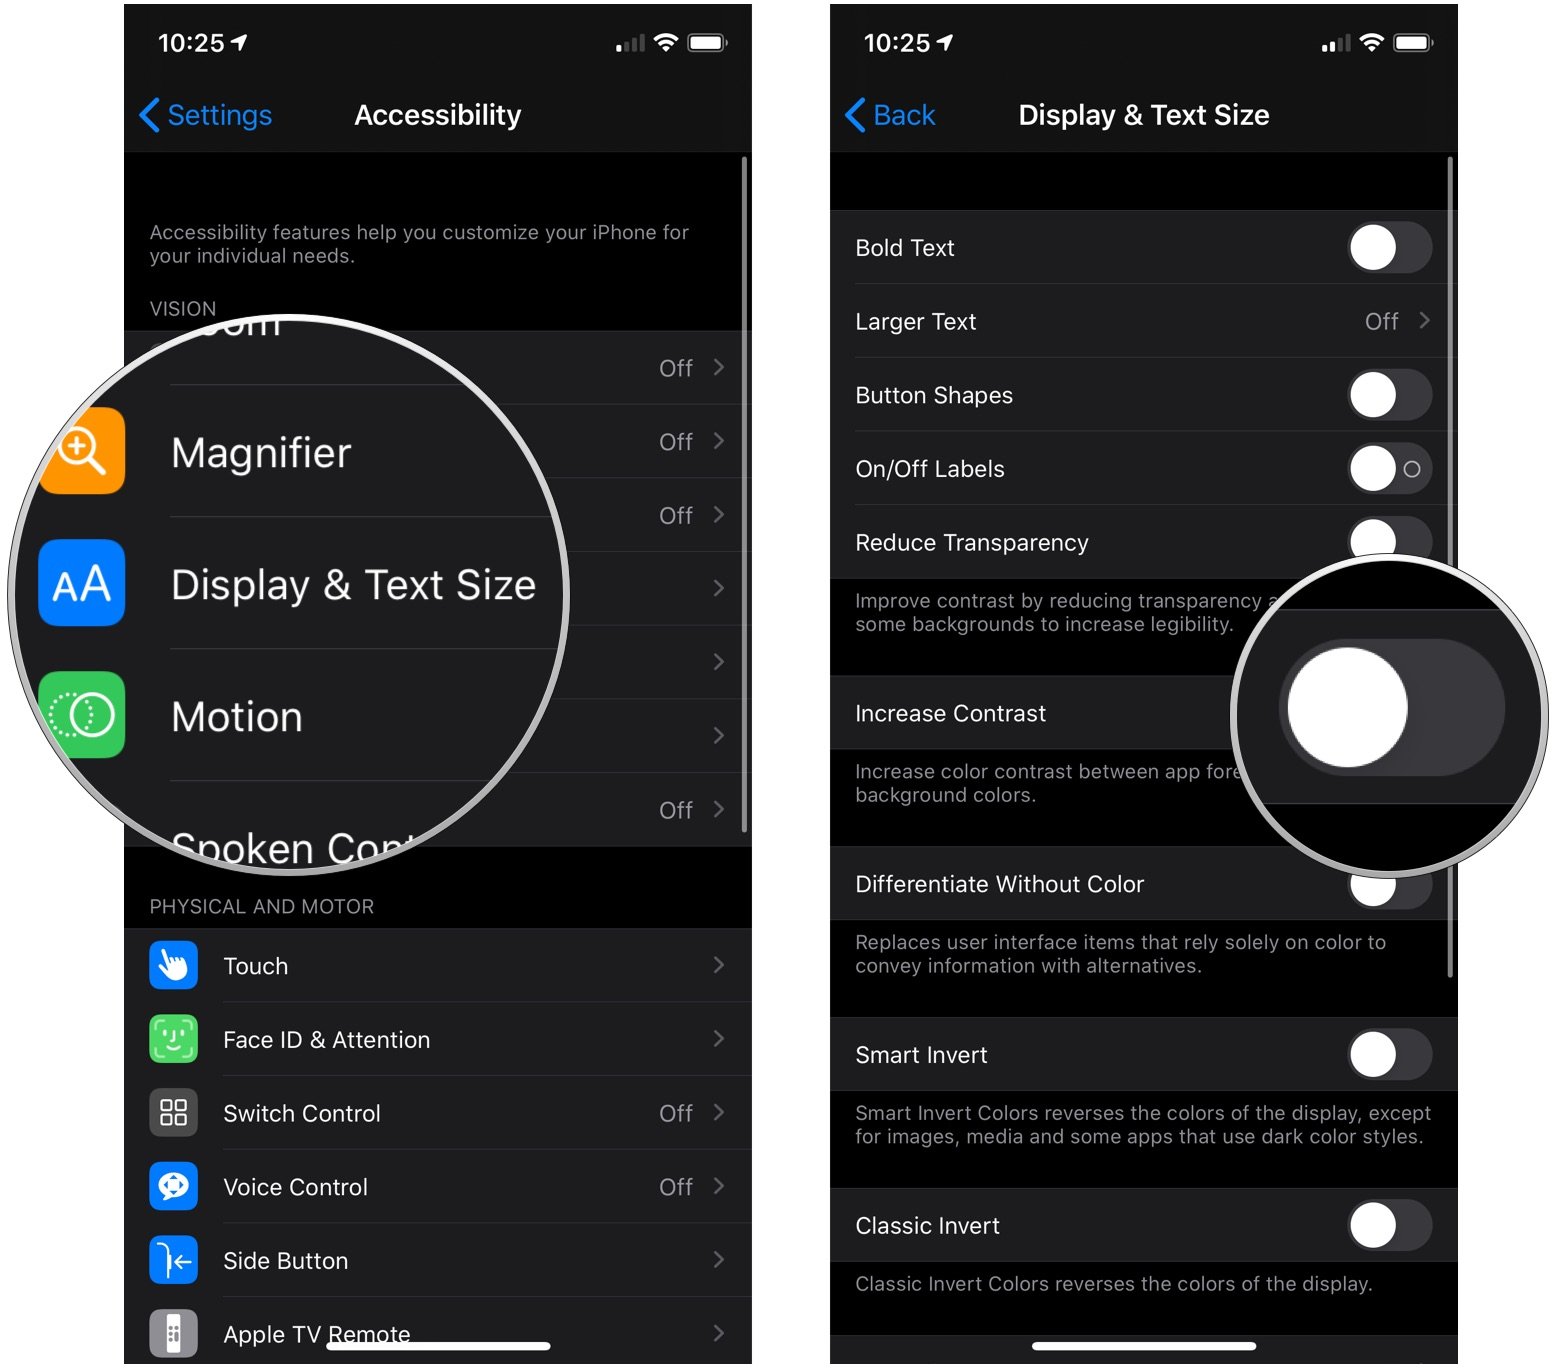
  3. TapDisplay & Text Size.
  4. Tap the switch next to Button Shapes.

Now the buttons will all be underlined and bolder, allowing you to see the navigation actions at the top of your screen much more clearly.

How to enable labels

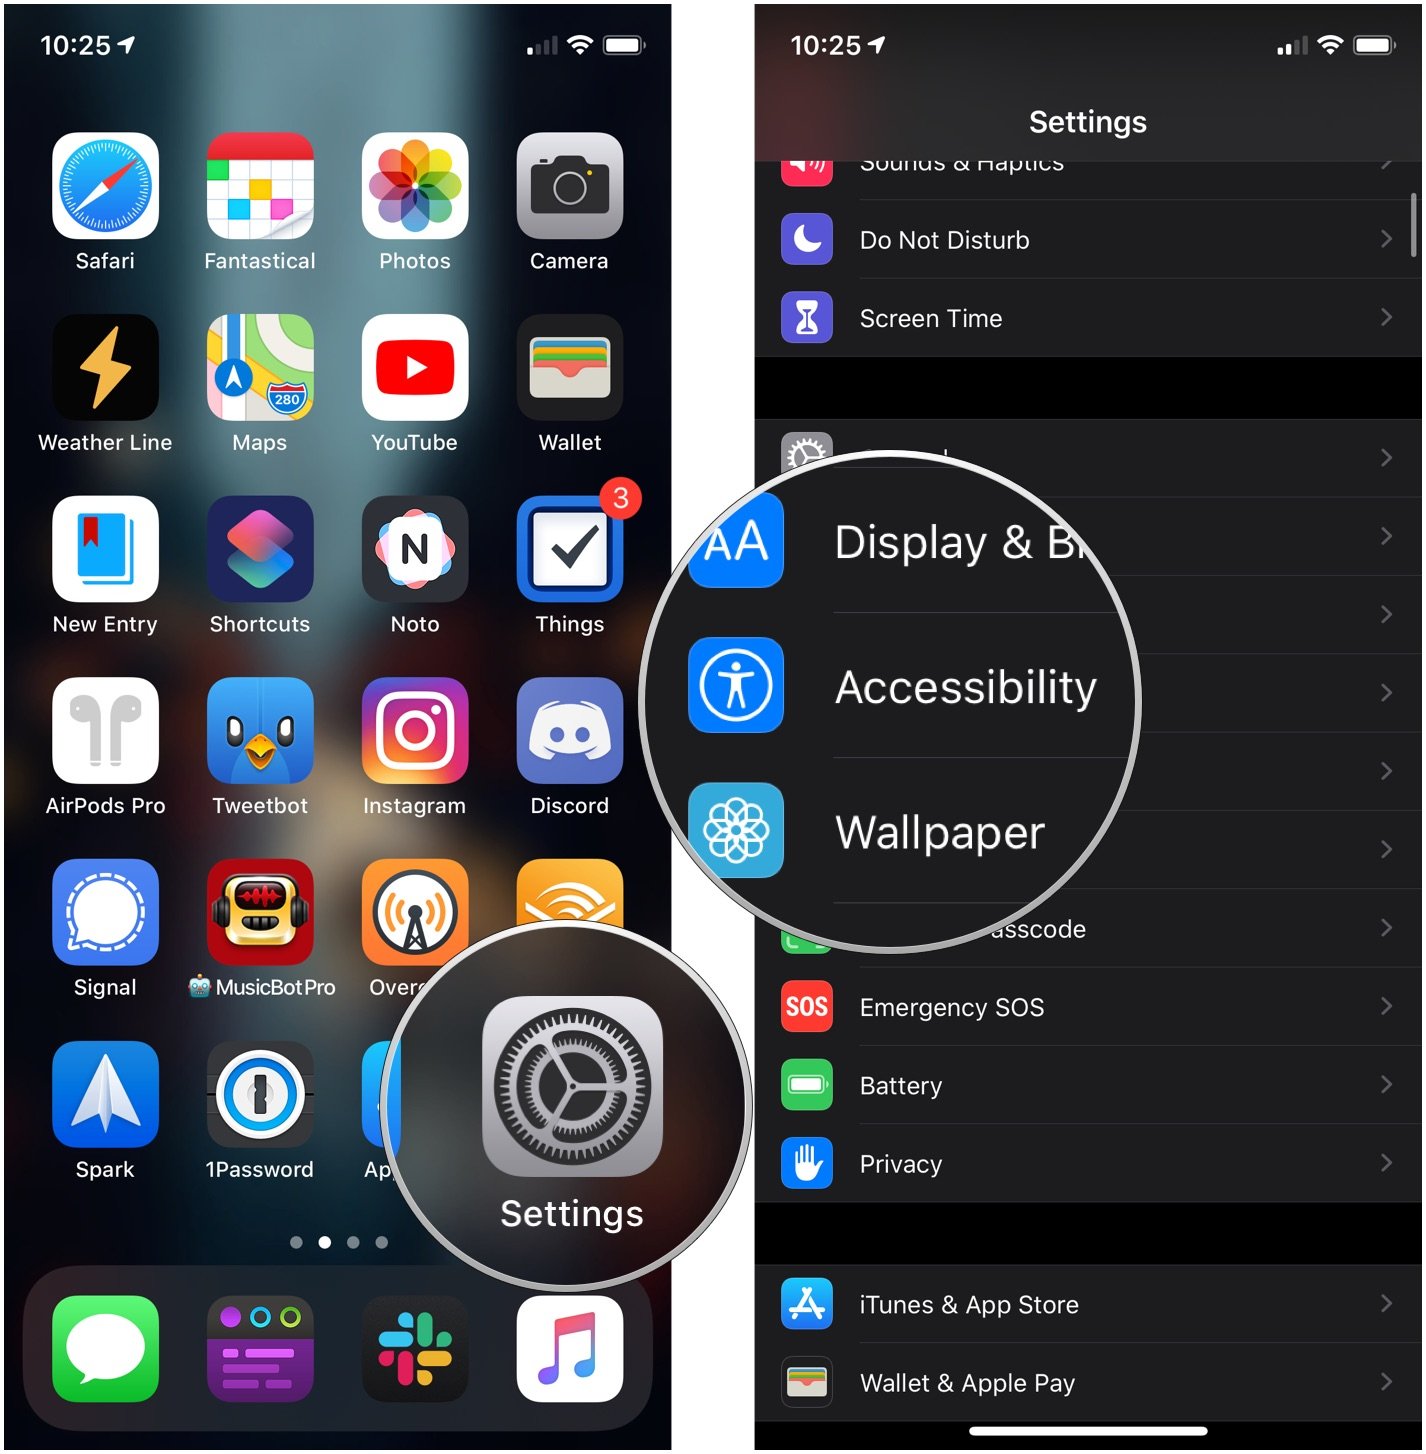
  1. Launch Settings from your Home screen.
  2. Tap Accessibility.

  3. TapDisplay & Text Size.
  4. Tap the switch next to On/Off Labels.

When enabled, you'll see the 'I' or 'O' on each side of a switch to let you know whether it's on or off. 'I' is on; 'O' is off.

Need more help reading your iPhone?

Your iPhone can't be the best iPhone if you can't navigate it with ease. If you still need more help reading what's on your screen, learning how to change the text size in your favorite apps can be a big help!

Updated February 2022: Updated for the latest version of iOS 15 and iPadOS 15.


Make life easier with the Accessibility Shortcut and Back Tap gestures

$
0
0

Did you know that you can triple-click the Home or Side buttons on your iPhone or iPad for a useful Accessibility Shortcut? Here's how!

Accessibility is always important, as it makes devices easier to use for those who have visual or audio impairments. Apple always does a great job with accessibility, and you'll find plenty of accessibility options on your iPhone or iPad to make life easier. Perhaps you need to have more sound on one side of your favorite headphones, or you just need to make text easier to read. No matter what you need, iOS 15 and iPadOS 15 are very inclusive, so you won't feel left behind. And to make it even easier to access your favorite accessibility tools, there is the Accessibility Shortcut on your favorite iPhone or iPad.

Here's how to customize the Accessibility Shortcut on the best iPhone and iPad to make it work for you.

How to enable and use the Accessibility Shortcut on iPhone and iPad

  1. Launch the Settings app on your iPhone or iPad.
  2. Tap on Accessibility.
  3. Tap on Accessibility Shortcut— it's all the way at the bottom.

  4. Tap the action you'd like to perform when you triple-click the Home or Side button, so that a blue checkmark appears next to it. You can assign multiple functions to the shortcut.
  5. If you want to reorder the options, just drag-and-drop using the handle on the right side for each option.
  6. Triple-click your Home button (Touch ID devices) or Side button (Face ID devices) to perform the action you've assigned to the shortcut.
  7. If you assigned multiple options, just choose the action that you want to perform from the menu.

Here's a brief description of the options you have and what they are:

  • AssistiveTouch: Adds the ability to access many common hardware buttons and gesture controls with single taps — a useful feature for those with motor impairments.
  • Background Sounds: A new feature in iOS 15, Background Sounds lets you play soothing white noise to help you concentrate. Using the Accessibility Shortcut toggles your selected sound — make sure to set up your Background Sounds first.
  • Classic Invert Colors: A great option for anyone with a visual impairment such as color blindness. All colors across iOS will be inverted.
  • Color Filters: Changes the color layout of the screen for those with color blindness.
  • Full Keyboard Access: This allows you to navigate the iOS interface without using touch input. A physical keyboard is required to use this feature.
  • Increase Contrast: This will increase the contrast of visual elements screen, making it easier to see and read text.
  • Left/Right Balance: This turns on your custom audio balance setting if you have one set up. For example, if you want more sound on the left or right side of your earbuds or headphones, you'll want to adjust that audio balance. Turning this off will go back to the default setting.
  • Magnifier: Triggers a camera-style viewfinder with sharp zoom controls so you can see small text. You will need to have Magnifier enabled to have this option available.
  • People Detection: With People Detection, your iPhone 12 or iPhone 13 uses Machine Learning with the LiDAR scanner to determine if an object in the camera is a person or not a person. You'll receive audio feedback to help you determine how far away or close a person is to you.
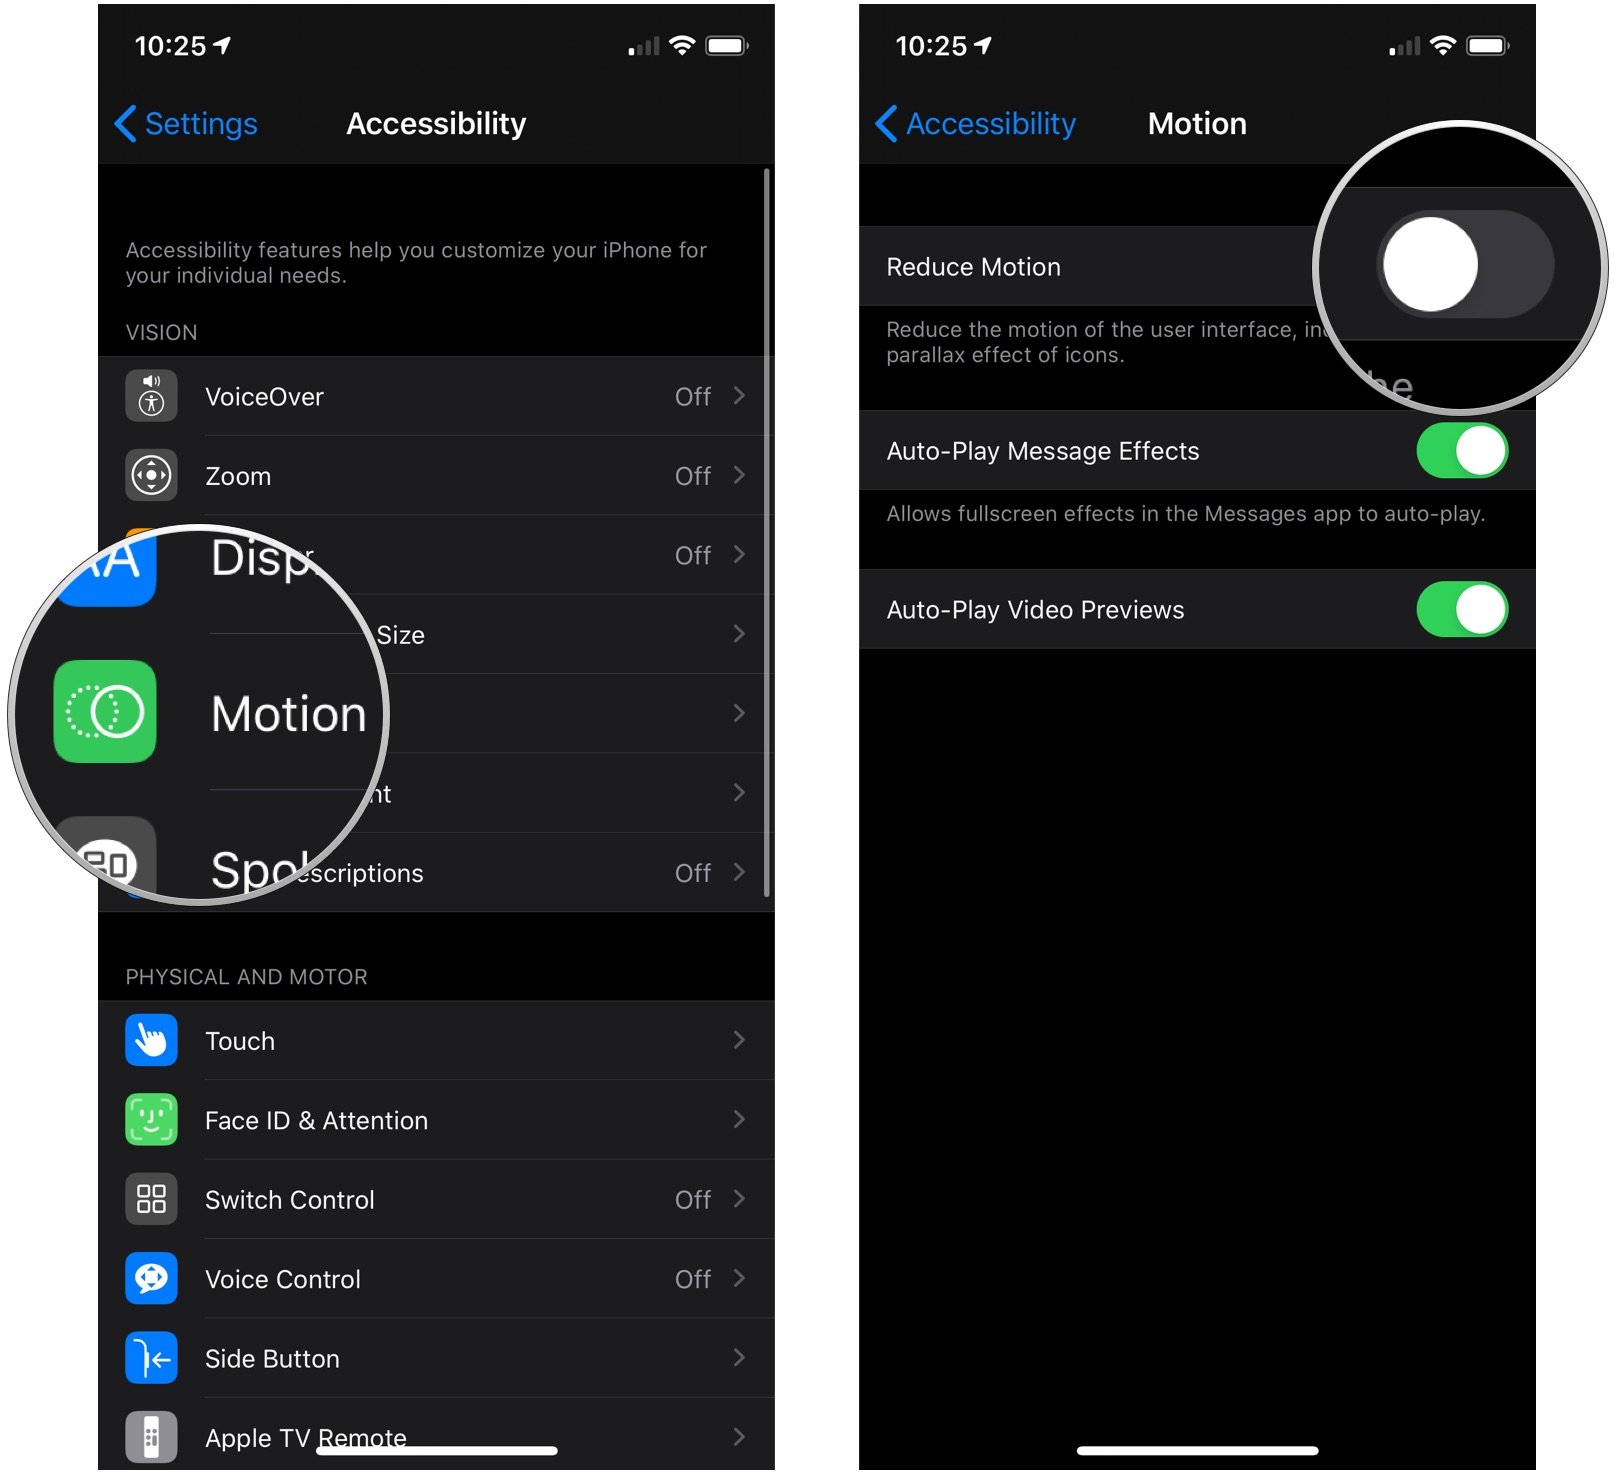
  • Reduce Motion: This turns on the Reduce Motion setting, which reduces motion in the user interface, including the parallax with app icons. This can also help conserve some battery power.
  • Reduce Transparency: This reduces the amount of transparency used in apps and websites, including blurred backgrounds. Having this on improves the legibility of text.
  • Reduce White Point: Reduces the intensity of bright colors for those with sensitivities or color blindness.
  • Smart Invert Colors: Same as Classic Invert Colors, except it doesn't change photos, media, and some apps.
  • Switch Control: Lets you use external switches, or the screen itself, as a switch for motor accessibility.
  • Voice Control: Lets you speak commands to your iPhone or iPad. For a full list of everything that you can do with Voice Control, check out our comprehensive Voice Control guide.
  • VoiceOver: Allows your iPhone or iPad to speak to you when enabled. Commonly used by folks with visual impairments.
  • Zoom: Allows you to zoom the Home screen and all other content for better visibility. You can then use two and three-finger gestures to tap and pan around.
  • Guided Access: When you're in an app, it keeps the iPhone in a single app and allows you to control which features are available. You need to have the Guided Access feature enabled before it is available as an Accessibility Shortcut option.

Once you've made your selection for the Accessibility Shortcut on iPhone and iPad, you can simply triple-click the Home button or the Side button on iPhones and iPads with Face ID from anywhere, not just from Settings, and your iPhone or iPad will enable the function you've selected. To disable it, just triple-click the button again. If you have multiple functions assigned, just tap the option you want to use.

Make use of the Back Tap gesture

iOS 14 added a new Back Tap gesture. With the Back Tap, you're able to double-tap or even triple-tap the back of your iPhone for quicker access to some commonly-used actions, such as accessing the Notification Center or Control Center. You can also use the Back Tap gesture to launch Shortcuts that you've created, opening up a whole new world of possibilities.

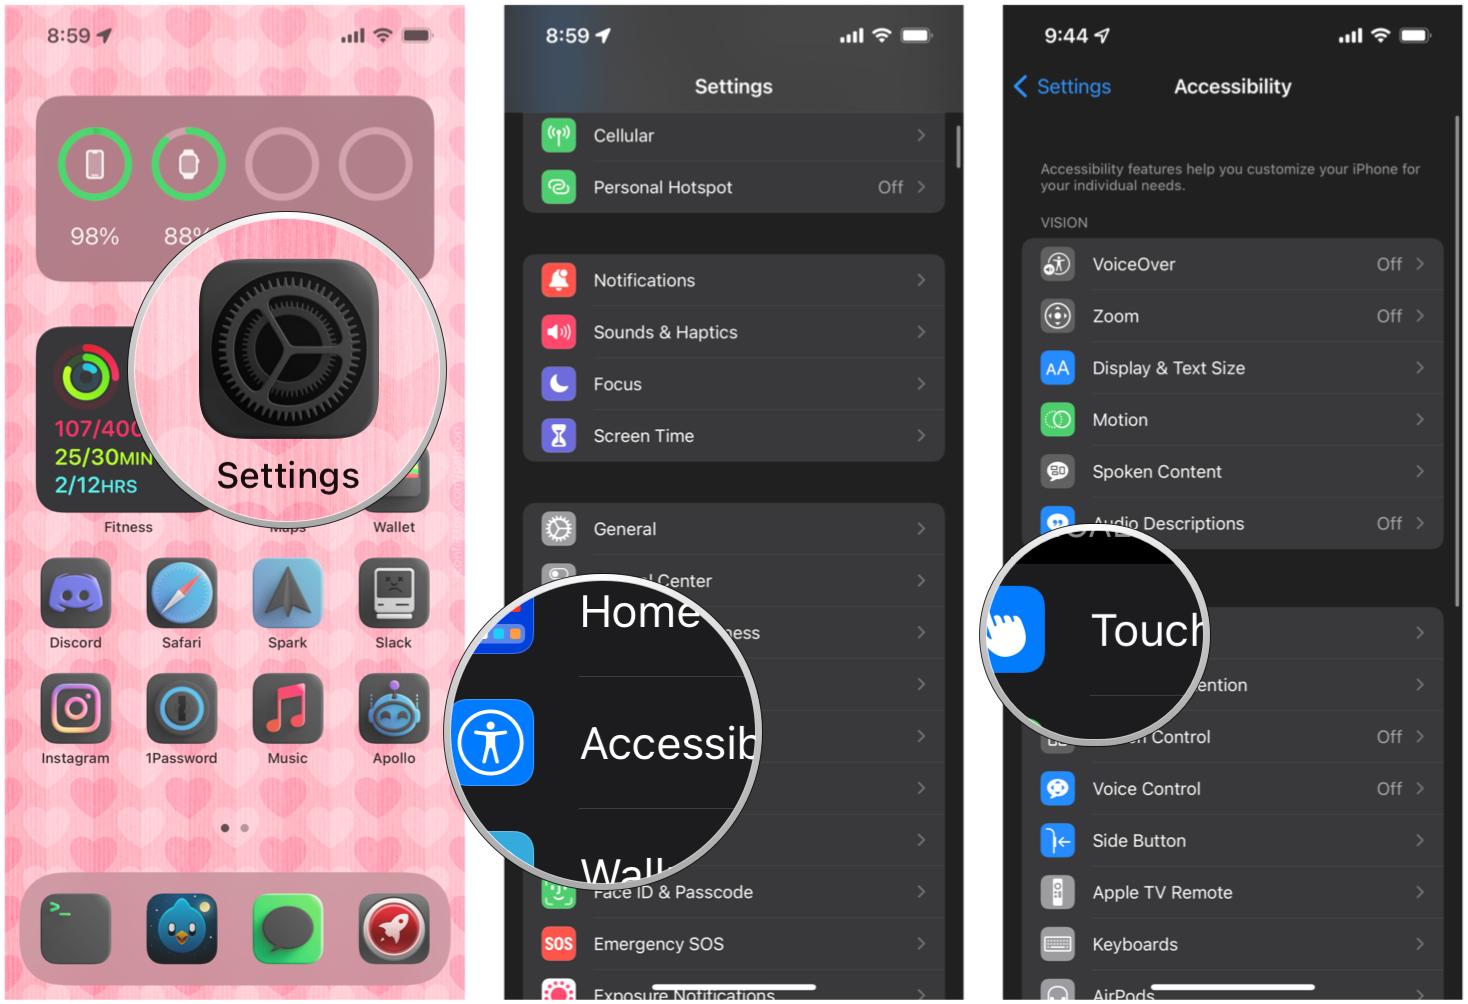
  1. Launch Settings on your iPhone or iPad.
  2. Tap Accessibility.
  3. Tap Touch.

  4. Tap Back Tap at the bottom.
  5. Tap Double Tap or Triple Tap to choose an action.

  6. Select an action for your chosen Back Tap. Options include the Accessibility Shortcut that we just created, or you can choose from System, Accessibility, Scroll Gestures, or your own Shortcuts actions.

Get quick access with Accessibility Shortcuts

As you can see, having an Accessibility Shortcut and Back Tap gestures can really make your life easier. It adds another layer of customization to your device, and you don't need to go and fiddle around in the settings every time to get to certain Accessibility actions. Even if you're not visually or hearing impaired, these accessibility features are just handy to have for everyone.

January 2022: Updated with the latest features in iOS 15.

Is typing on your Mac hard? These keyboard accessibility features can help!

$
0
0

How do I use my keyboard for accessibility with my Mac? That's just our type of question (sorry)!

If you have trouble using a keyboard with your Mac, some keyboard accessibility features can help make things significantly more manageable for you. With these specific options enabled, you won't be accidentally typing when you don't intend to, and you also won't need to hold down modifier keys while holding another key down — this can be difficult to do for some. Enabling these keyboard accessibility features is pretty straightforward and will open up a whole new world to those who require it.

Here's how to set up your keyboard so that it's just your type— accessible! #sorrynotsorry

Keyboard accessibility on macOS: How to enable Sticky Keys

Enabling Sticky Keys with macOS Monterey on one of the best Mac desktops allows you to type certain things that would typically require you to press multiple keys simultaneously by typing them in succession instead.

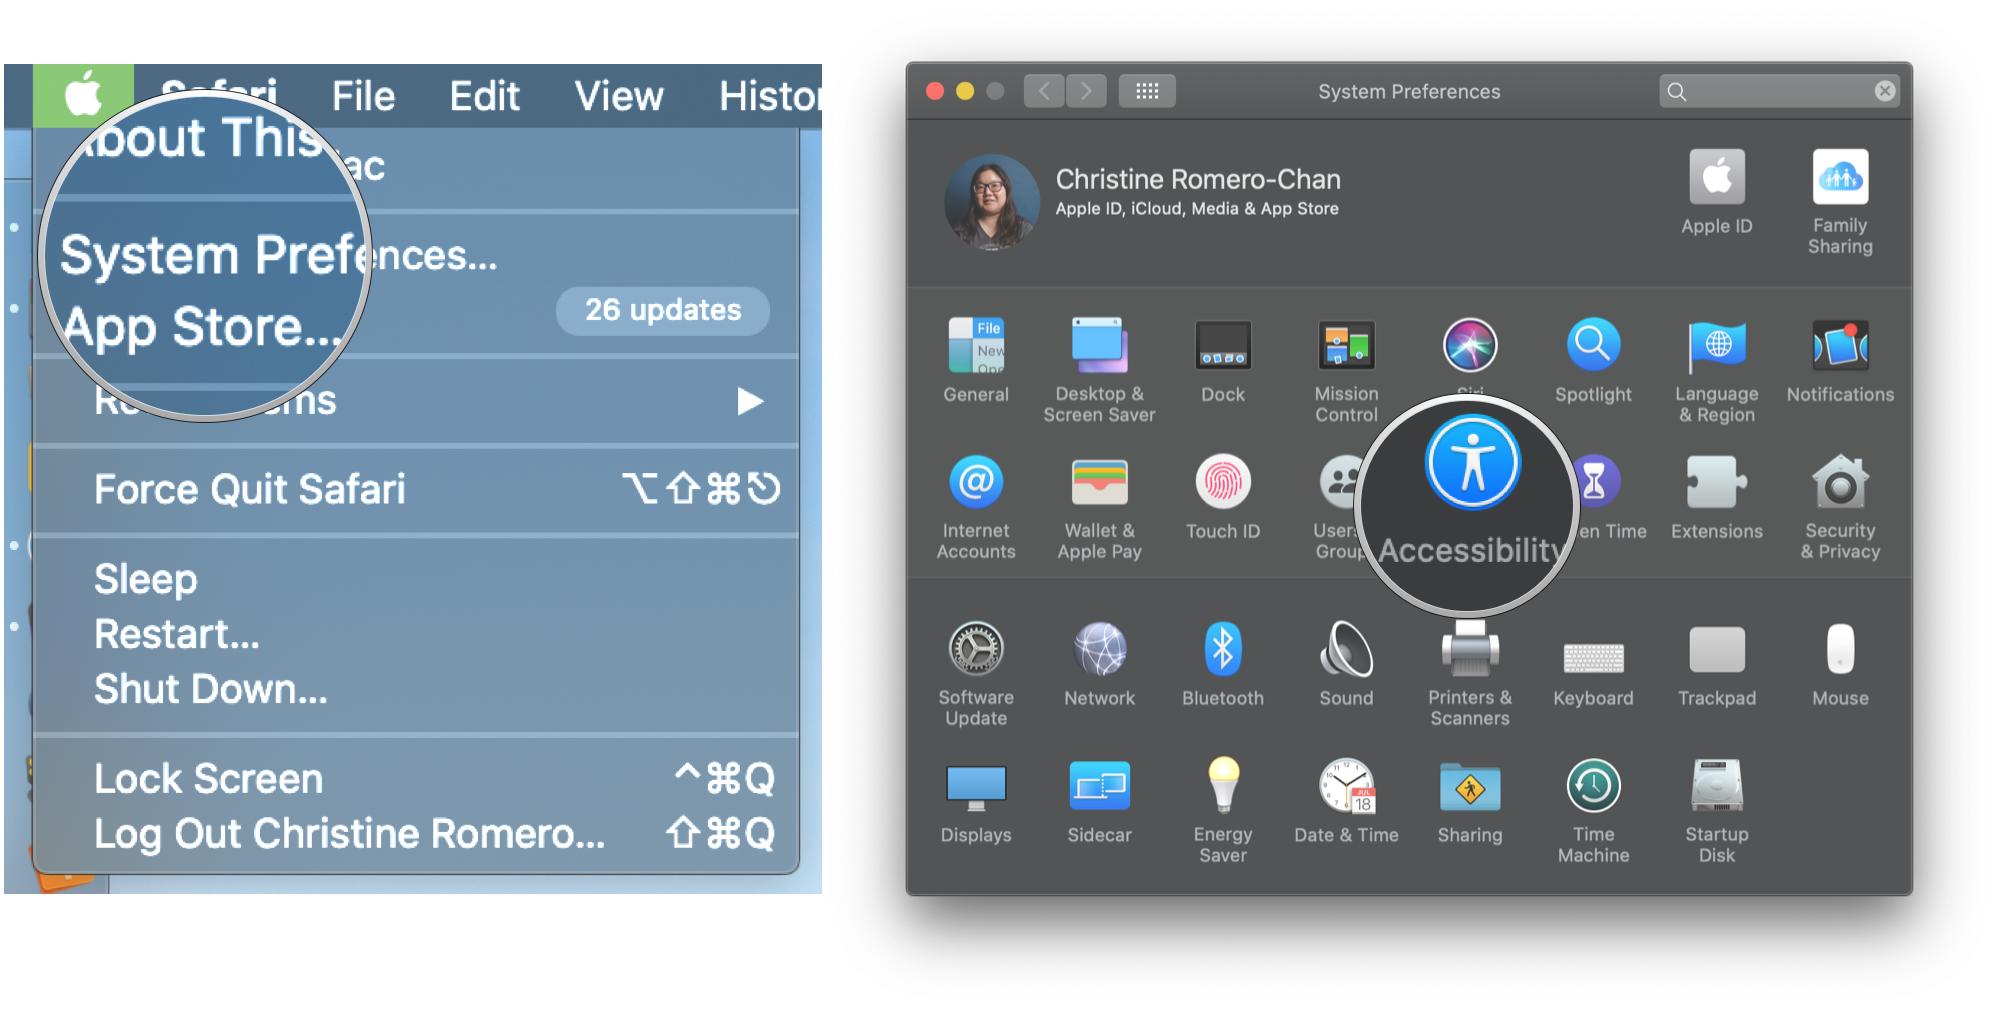
  1. Click the Apple menu button on the top left of your screen.
  2. Click System Preferences.
  3. Click Accessibility.

  4. Click Keyboard in the menu on the left.
  5. Choose the Hardware tab at the top right.
  6. Click the checkbox next to Enable Sticky Keys.

  7. Click Options next to Enable Sticky Keys.
  8. Click the checkbox next to each setting to enable/disable it.
  9. Click the dropdown menu next to Display pressed keys on screen.
  10. Click a location where the pressed keys will be displayed.
  11. Tap OK.

Keyboard accessibility on macOS: How to enable Slow Keys

If you have tremors or other impairments that might cause you to press the keys on your keyboard multiple times when you only mean to press them once, you can enable Slow Keys so that each key must be pressed for a certain length of time before it registers.

  1. Click the Apple menu button on the top left of your screen.
  2. Click System Preferences.
  3. Click Accessibility.

  4. Click Keyboard in the menu on the left.
  5. Choose the Hardware tab at the top right.
  6. Click the checkbox next to Enable Slow Keys.

  7. Click Options next to Enable Slow Keys.
  8. Click the checkbox next to Use click key sounds (super helpful).
  9. Click and drag the slider to increase or decrease the keypress delay. Left is shorter while right is a longer wait.
  10. Tap OK.

Keyboard accessibility on macOS: How to enable the accessibility keyboard

The accessibility keyboard is an on-screen keyboard that lets you type and perform other actions on macOS without using your Mac's hardware keyboard.

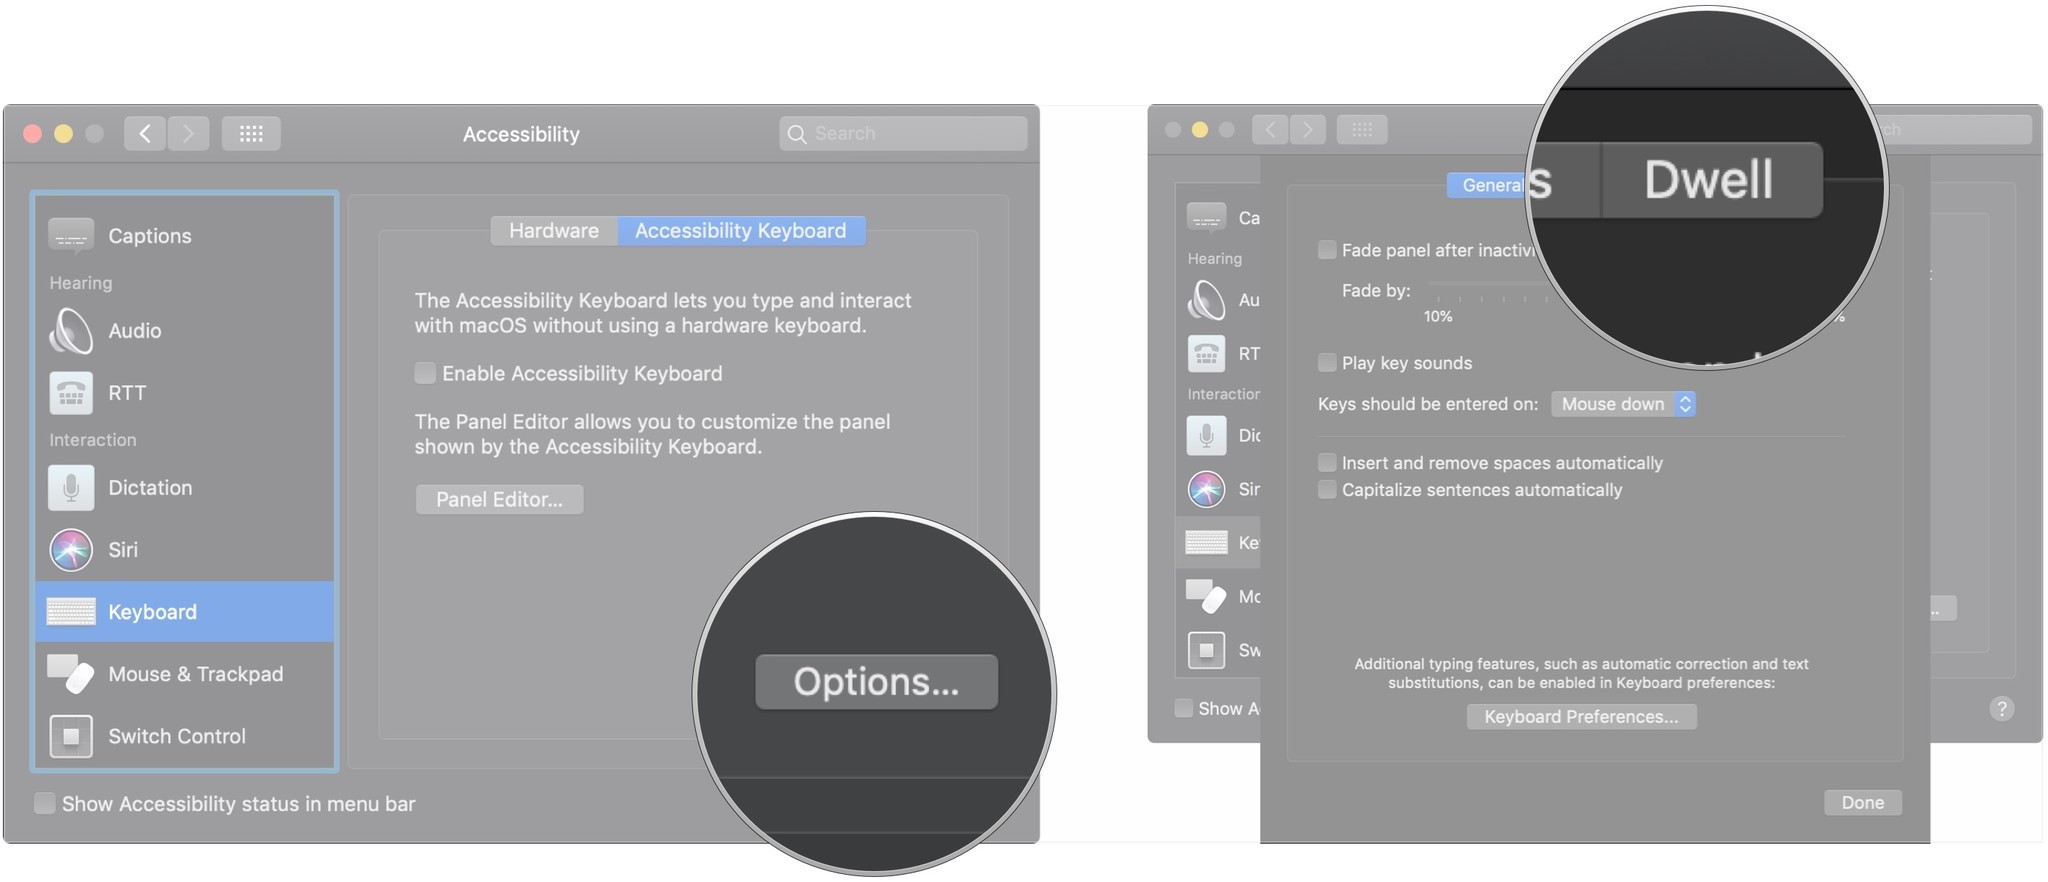
  1. Open System Preferences.
  2. Click Accessibility.

  3. Click Keyboard in the menu on the left.
  4. Choose the Viewer tab at the top right.
  5. Check the Accessibility Keyboard box.

Keyboard accessibility on macOS: How to manage options for the accessibility keyboard

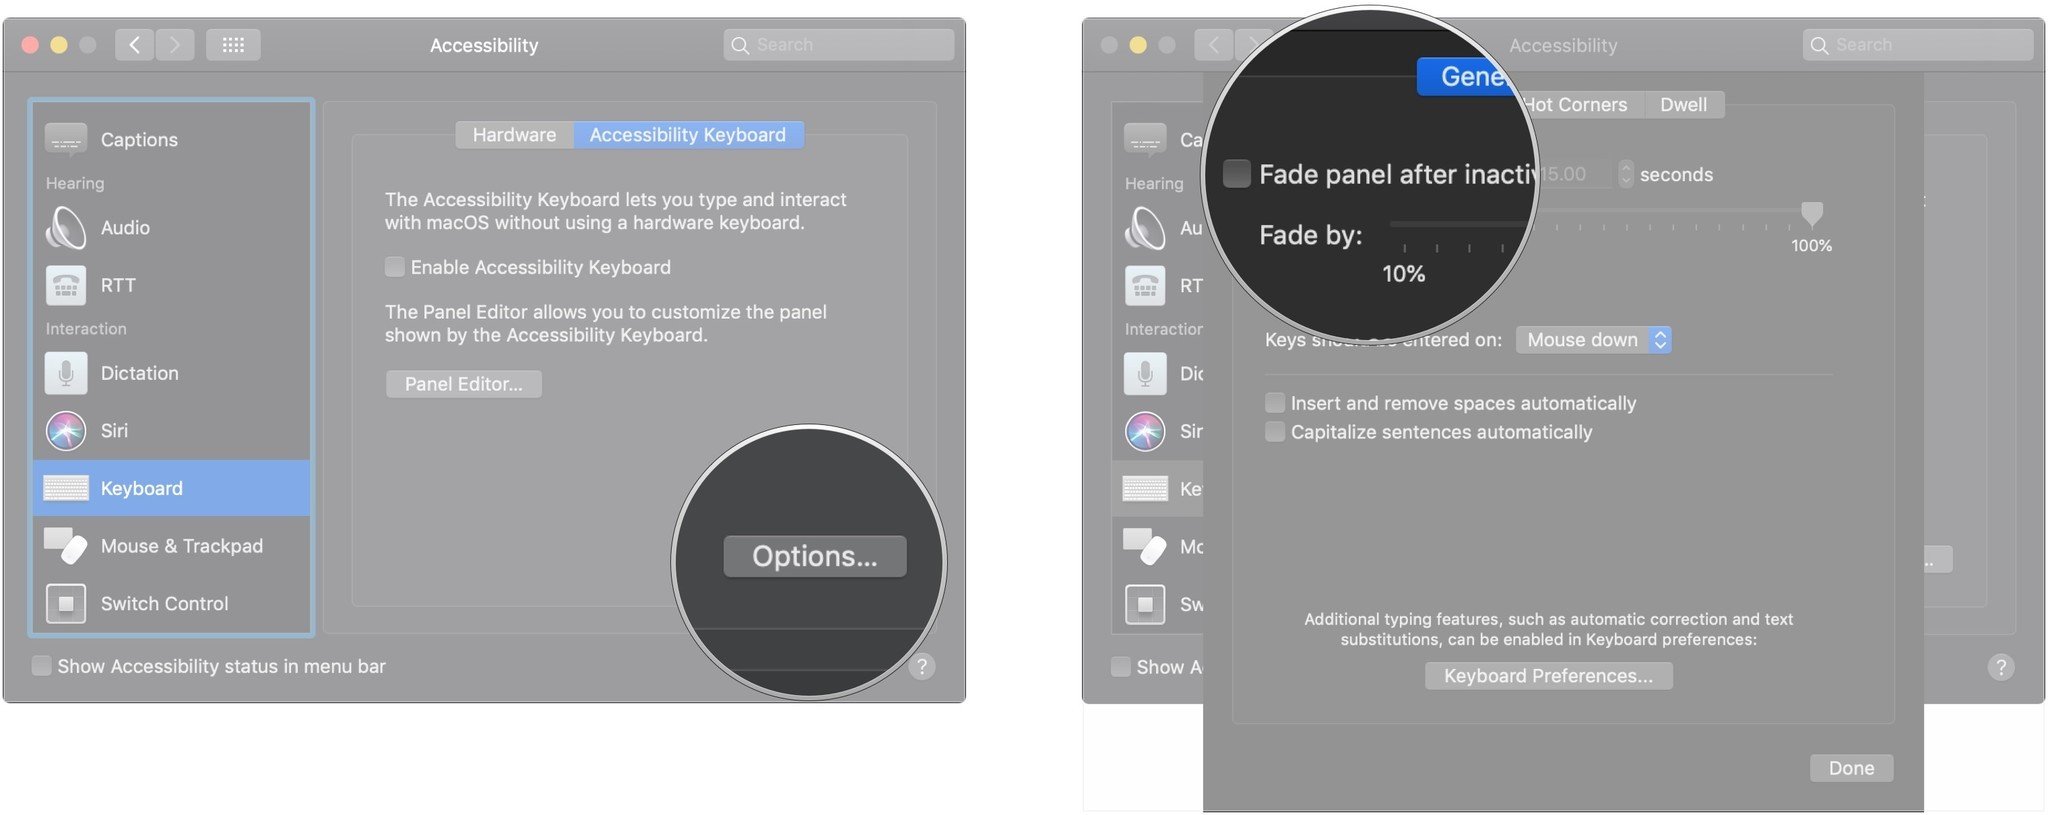
To make adjustments via Options:

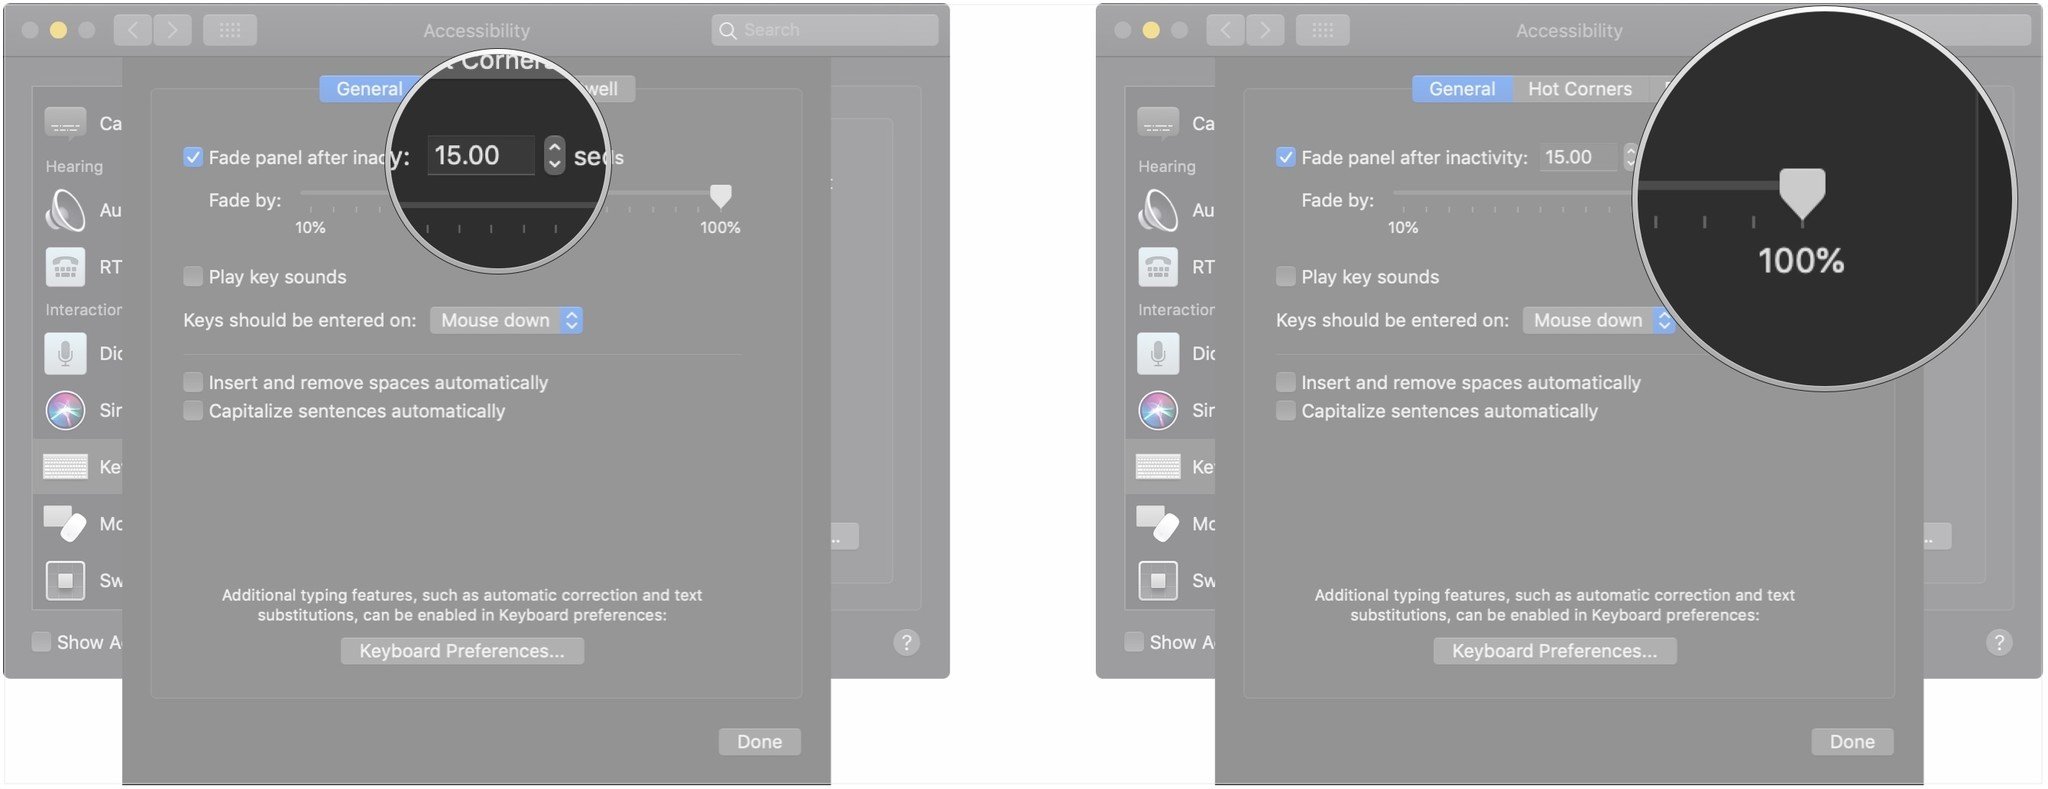
  1. Click the checkbox next to Fade panel after inactivity if you want the keyboard to fade out when you're not using it.

  2. Click the arrows to determine the number of seconds that should pass before that happens.
  3. Drag the slider to determine how much the keyboard should fade.

  4. Click the checkbox to enable keyboard sounds when using the accessibility keyboard.
  5. Click the drop-down to set when keys on the keyboard should register as "pressed."

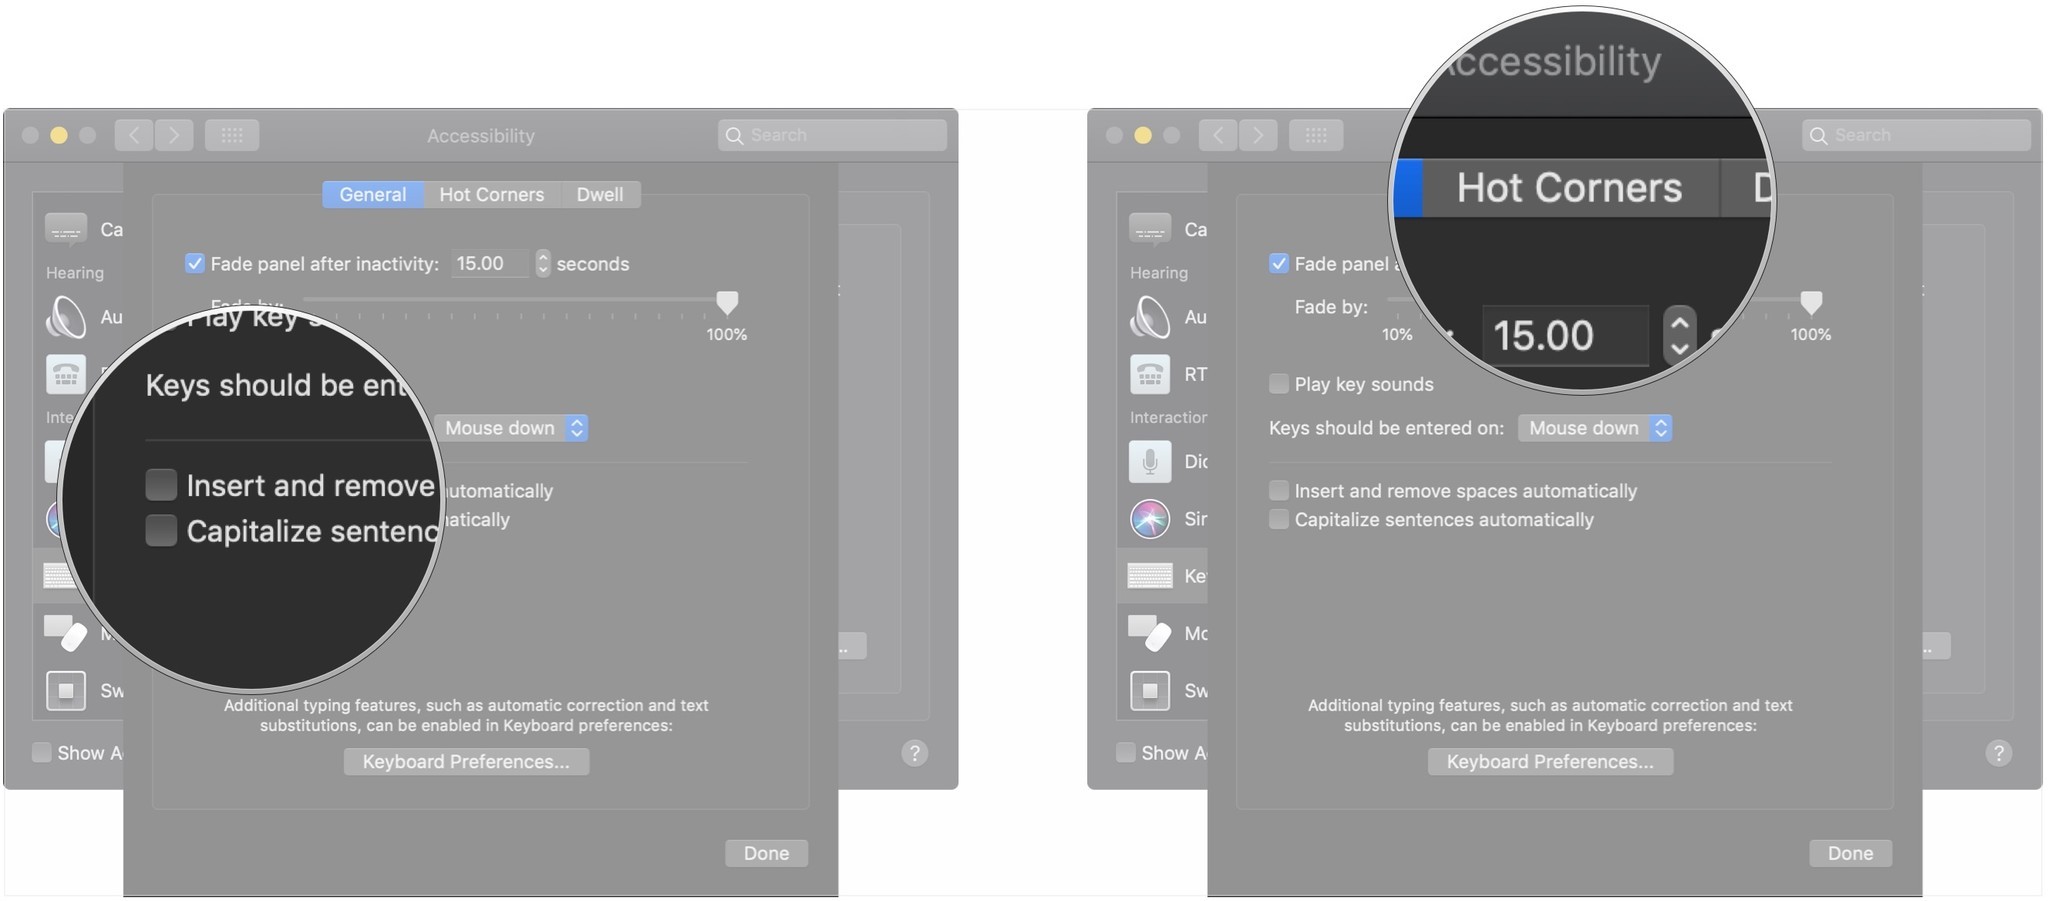
  6. Click the checkboxes to allow the Accessibility Keyboard to insert and remove spaces and capitalize sentences automatically.
  7. Click Hot Corners.

  8. Click the drop-downs to select what should happen when you activate any of the hot corners.
  9. Click the checkbox to determine your preference for whether the panel should follow Hide or Show for the Home panel.

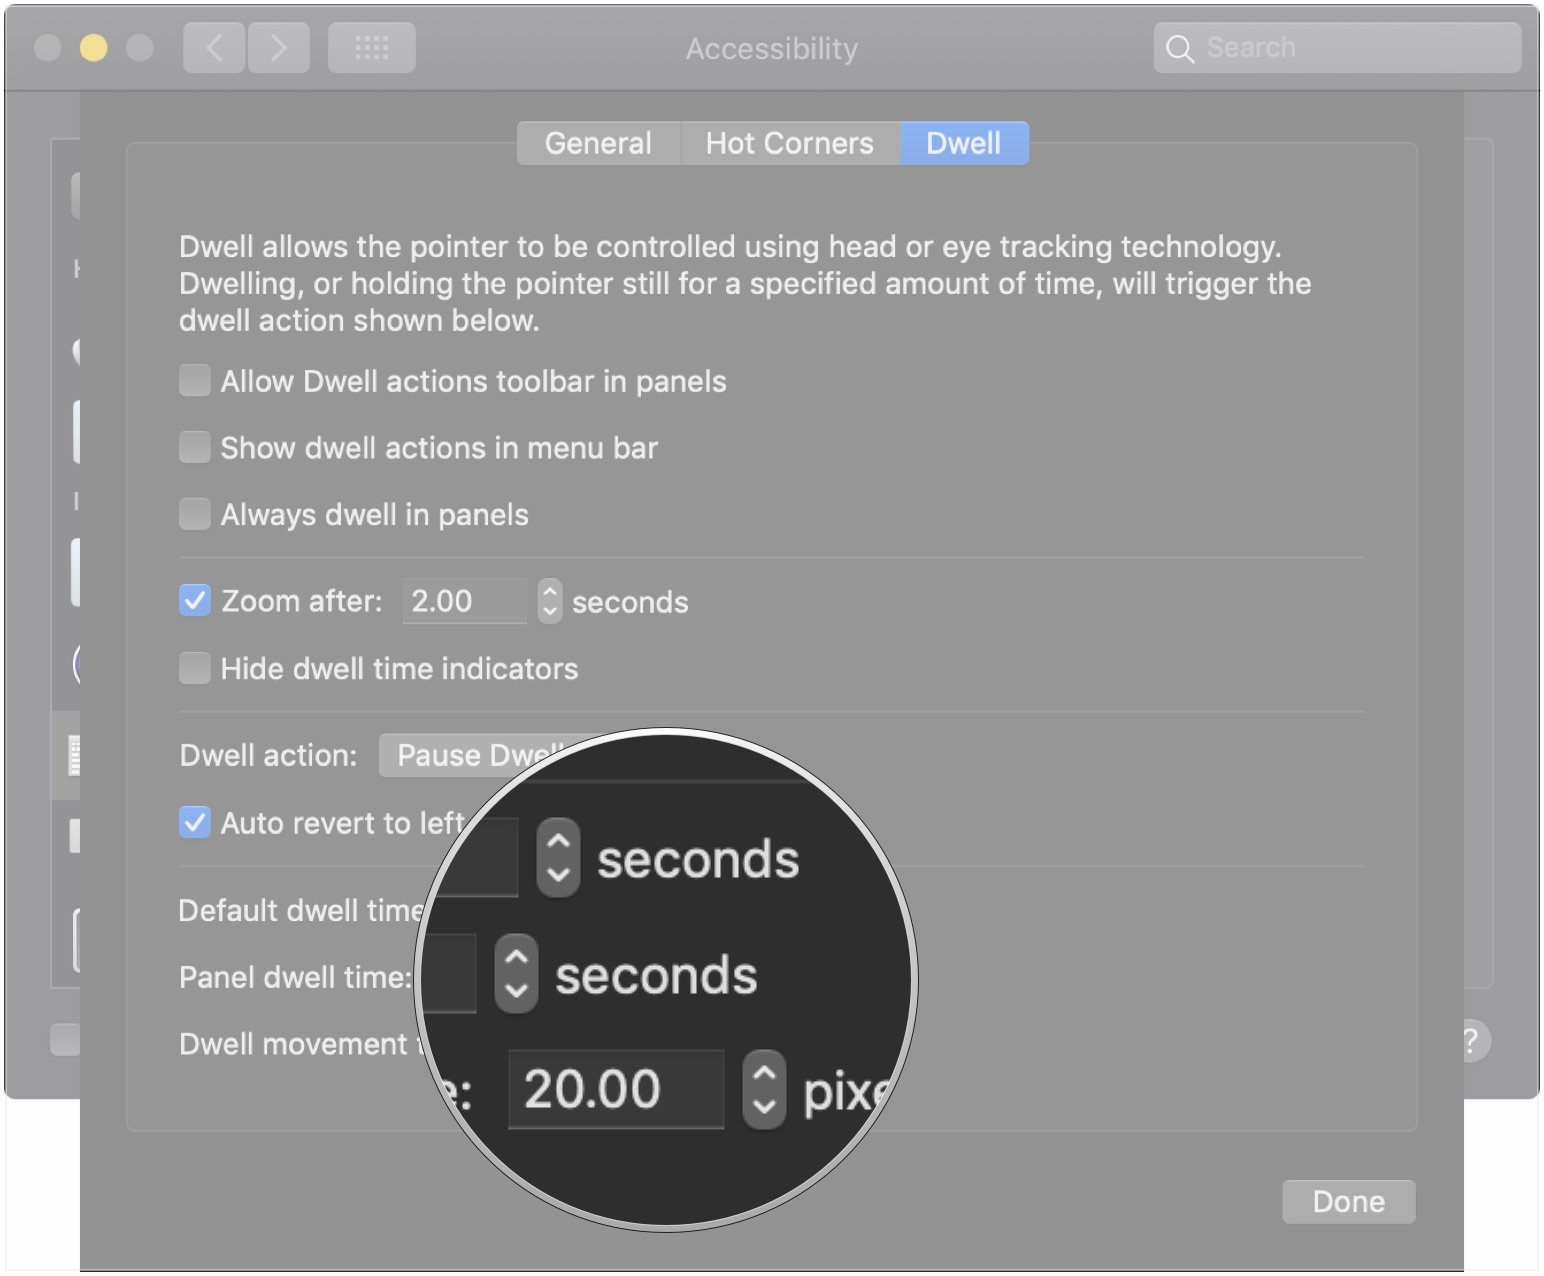
Keyboard accessibility on macOS: How to use Dwell with the accessibility keyboard

Dwell is a feature that allows your pointer to be controlled with head or eye-tracking technology.

  1. Open System Preferences.
  2. Click Accessibility.

  3. Click Keyboard in the menu on the left.
  4. Choose the Viewer tab at the top right.
  5. Click Options

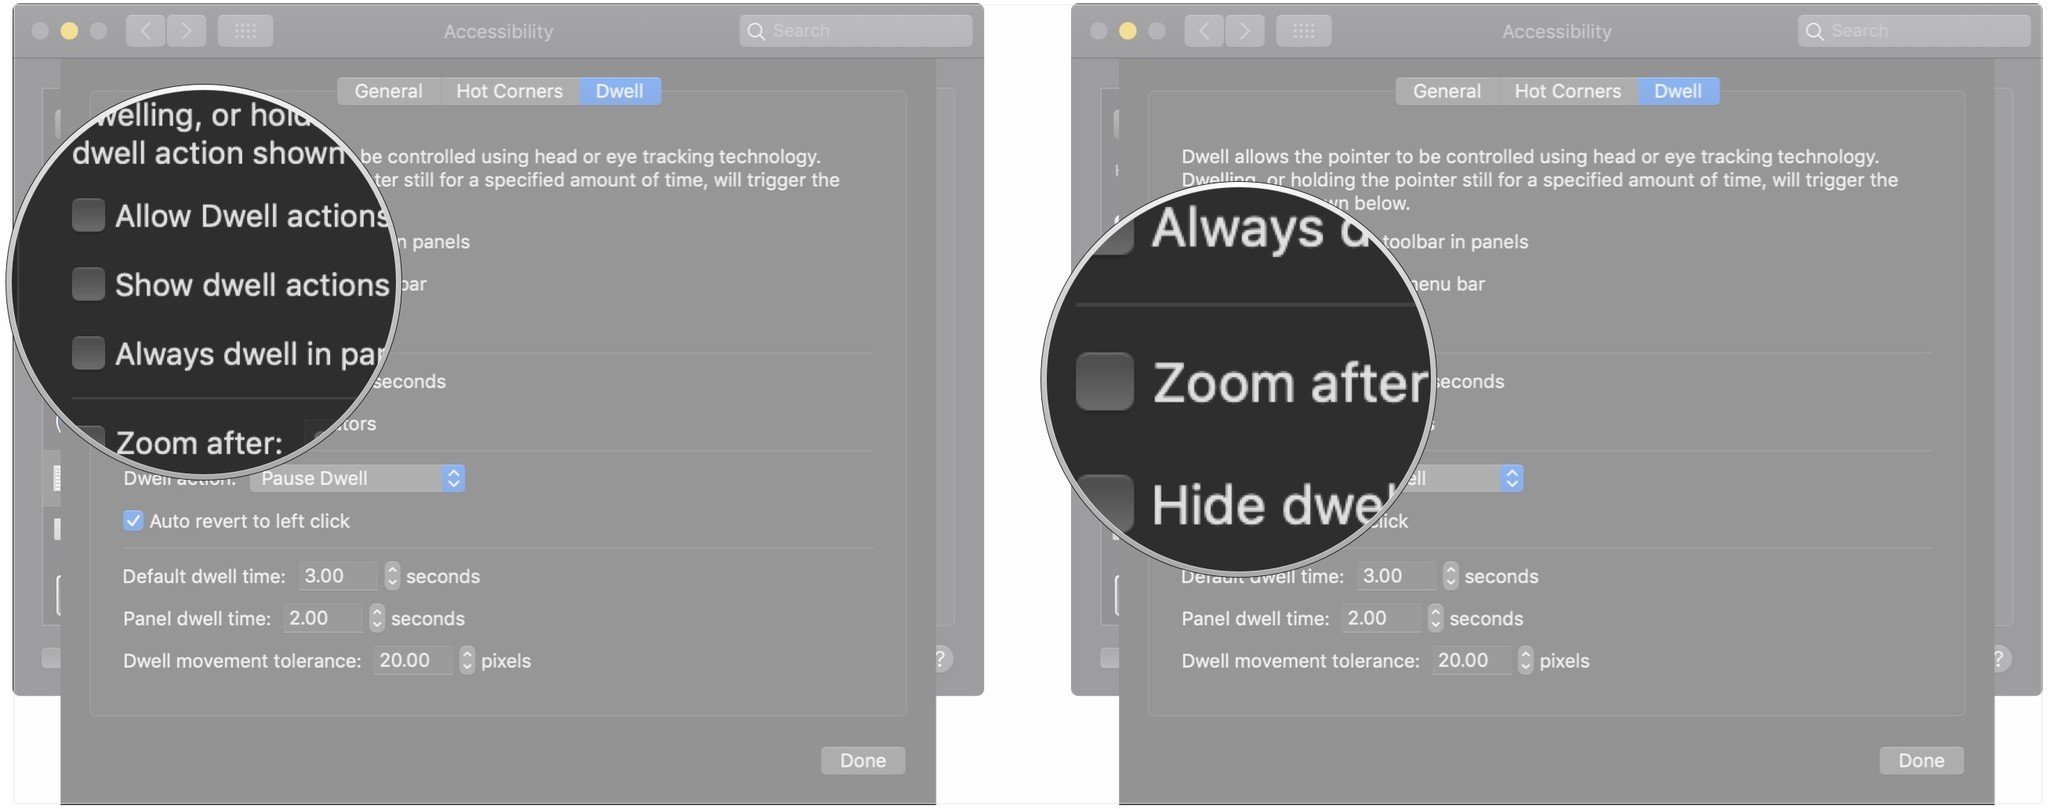
  6. Click Dwell.

  7. Click the checkboxes to allow dwell action toolbars in panels, show dwell actions in the Menu bar, and to always dwell in panels.
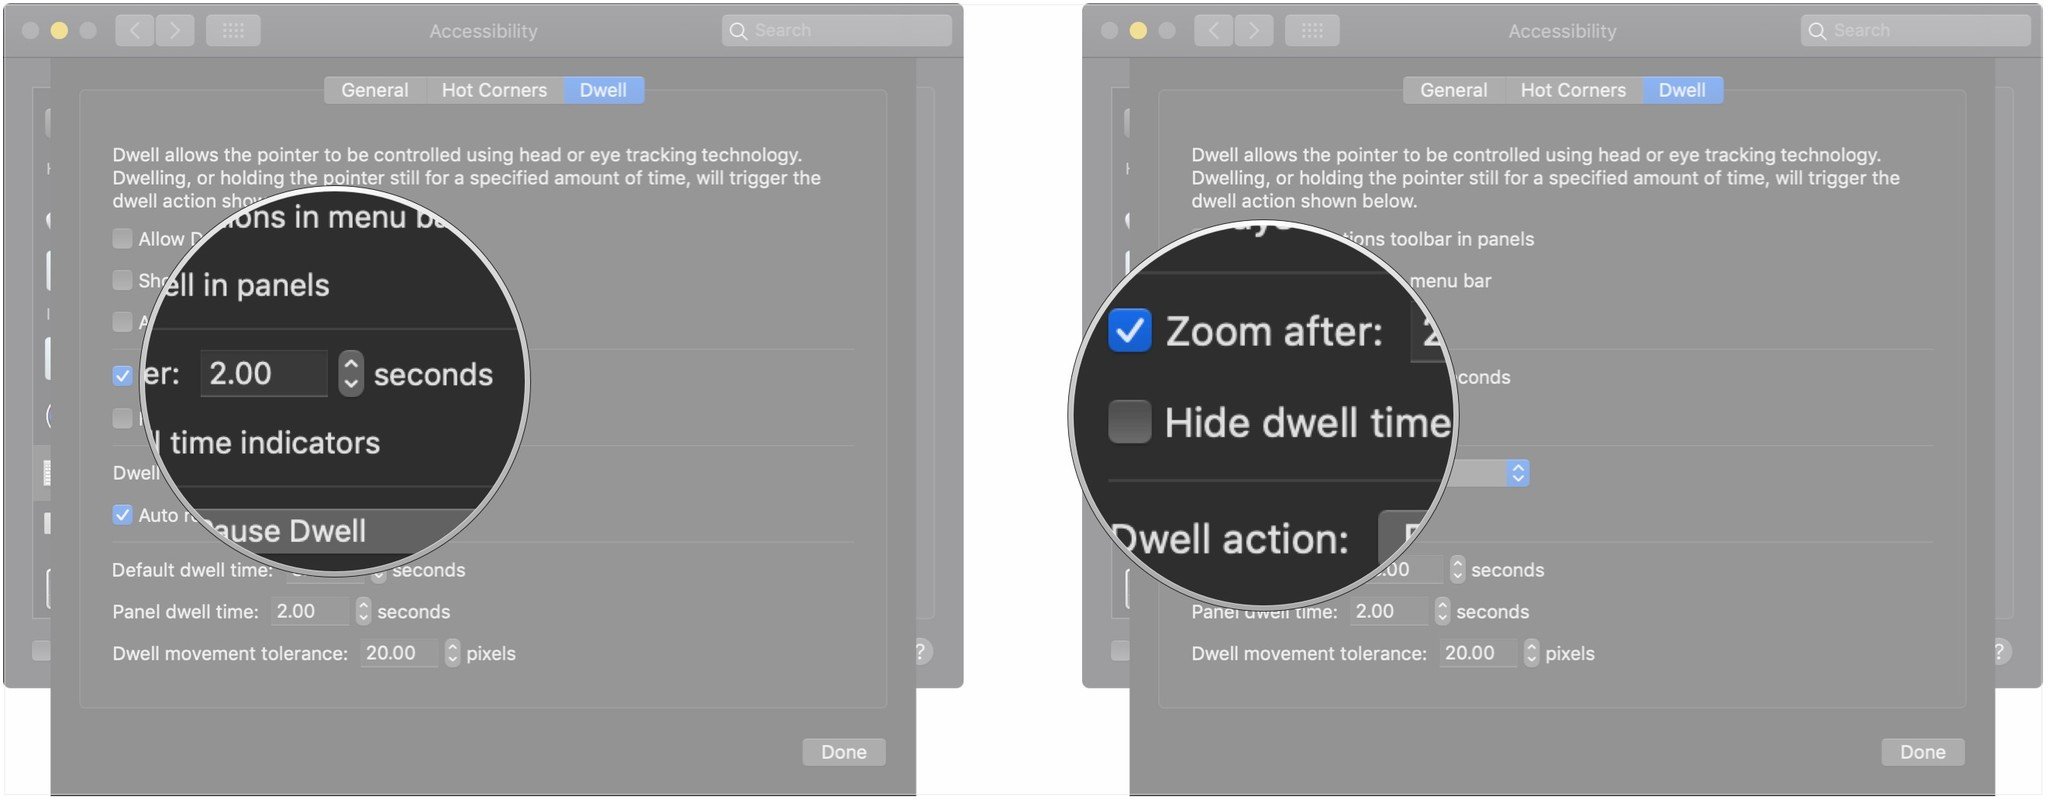
  8. Click the checkbox to allow dwell to zoom.

  9. Click the arrows to determine when zooming should happen.
  10. Click the checkbox to hide dwell time indicators.

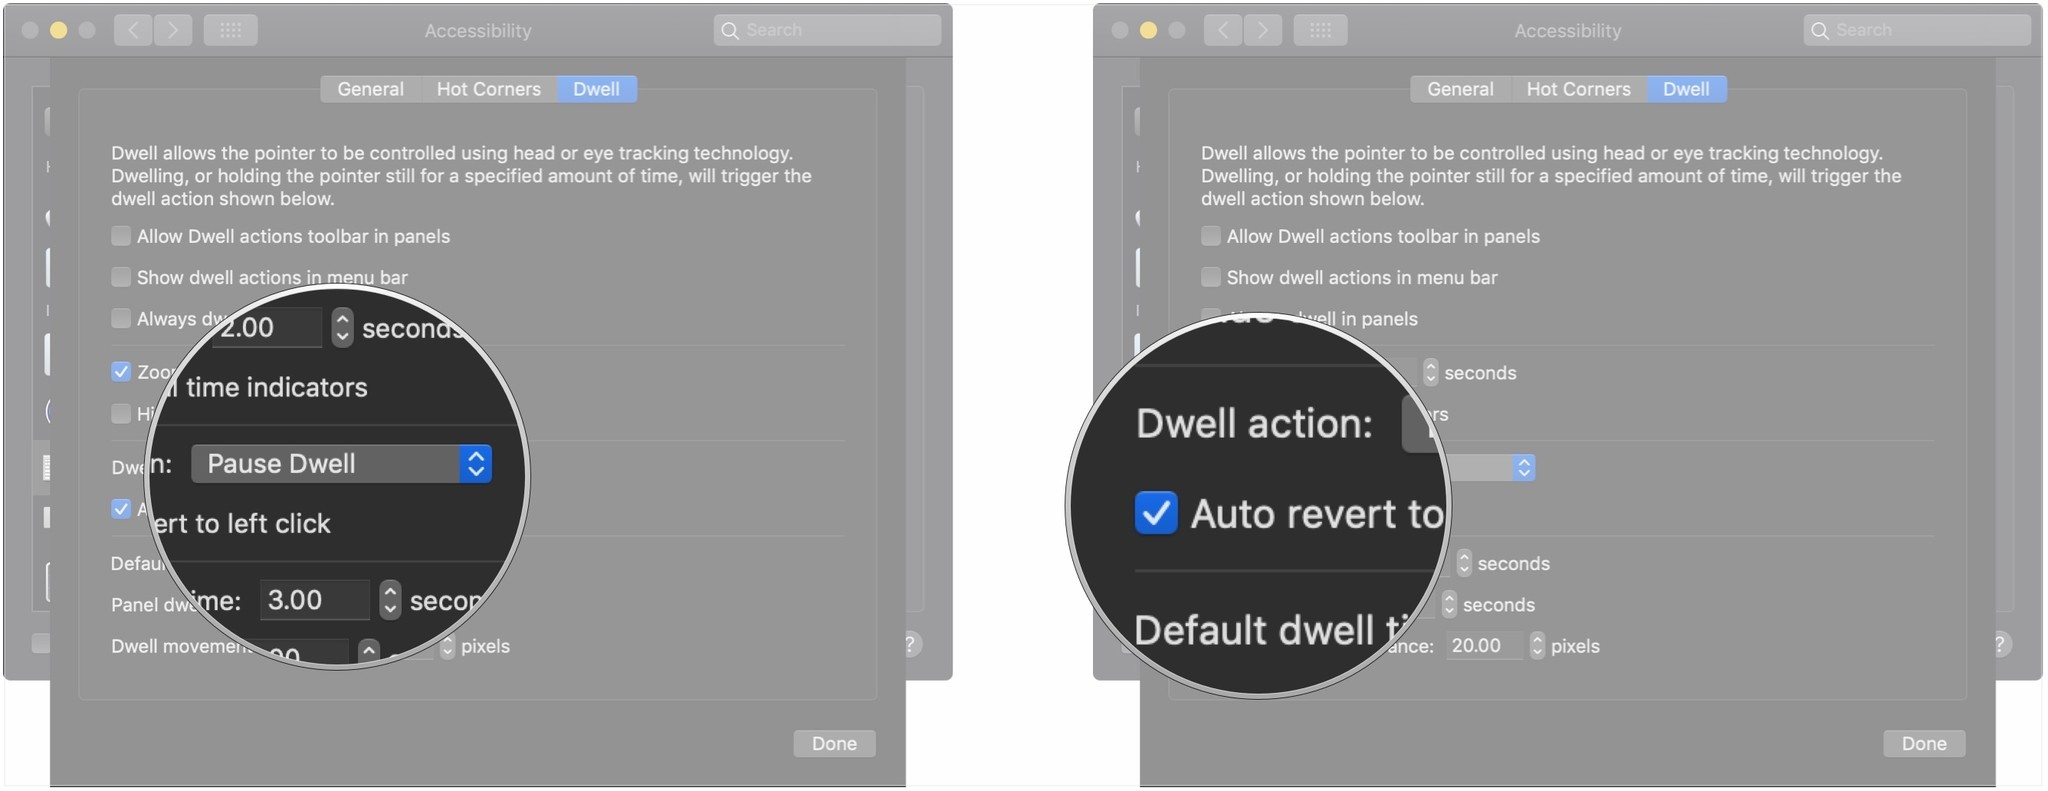
  11. Click the drop-down to determine the default dwell action.
  12. Click the checkbox to auto-revert to left-click.

  13. Click the arrows to set the default dwell time, the panel dwell time, and the dwell movement tolerance.

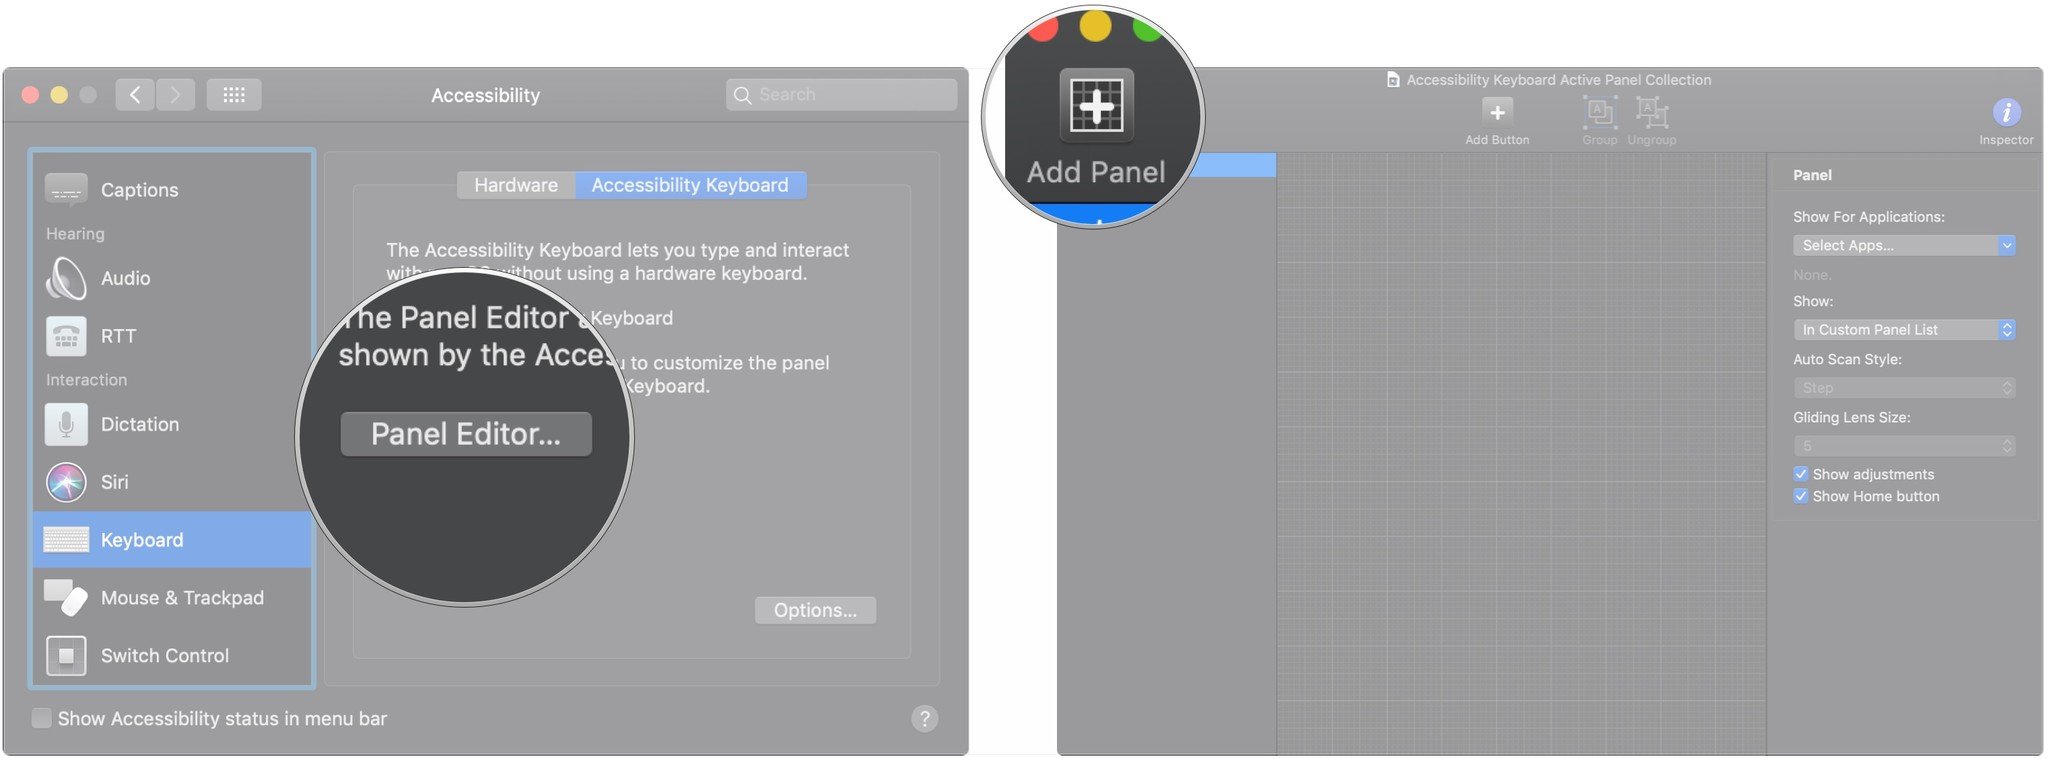
Keyboard accessibility on macOS: How to use the panel editor

The panel editor allows you to create custom panels to use along with the accessibility keyboard, allowing it to customize it exactly to meet your needs.

  1. Open System Preferences.
  2. Click Accessibility.

  3. Click Keyboard in the menu on the left.
  4. Choose the Viewer tab at the top right.
  5. Click Panel Editor

  6. Click Add Panel to create an entirely new panel.

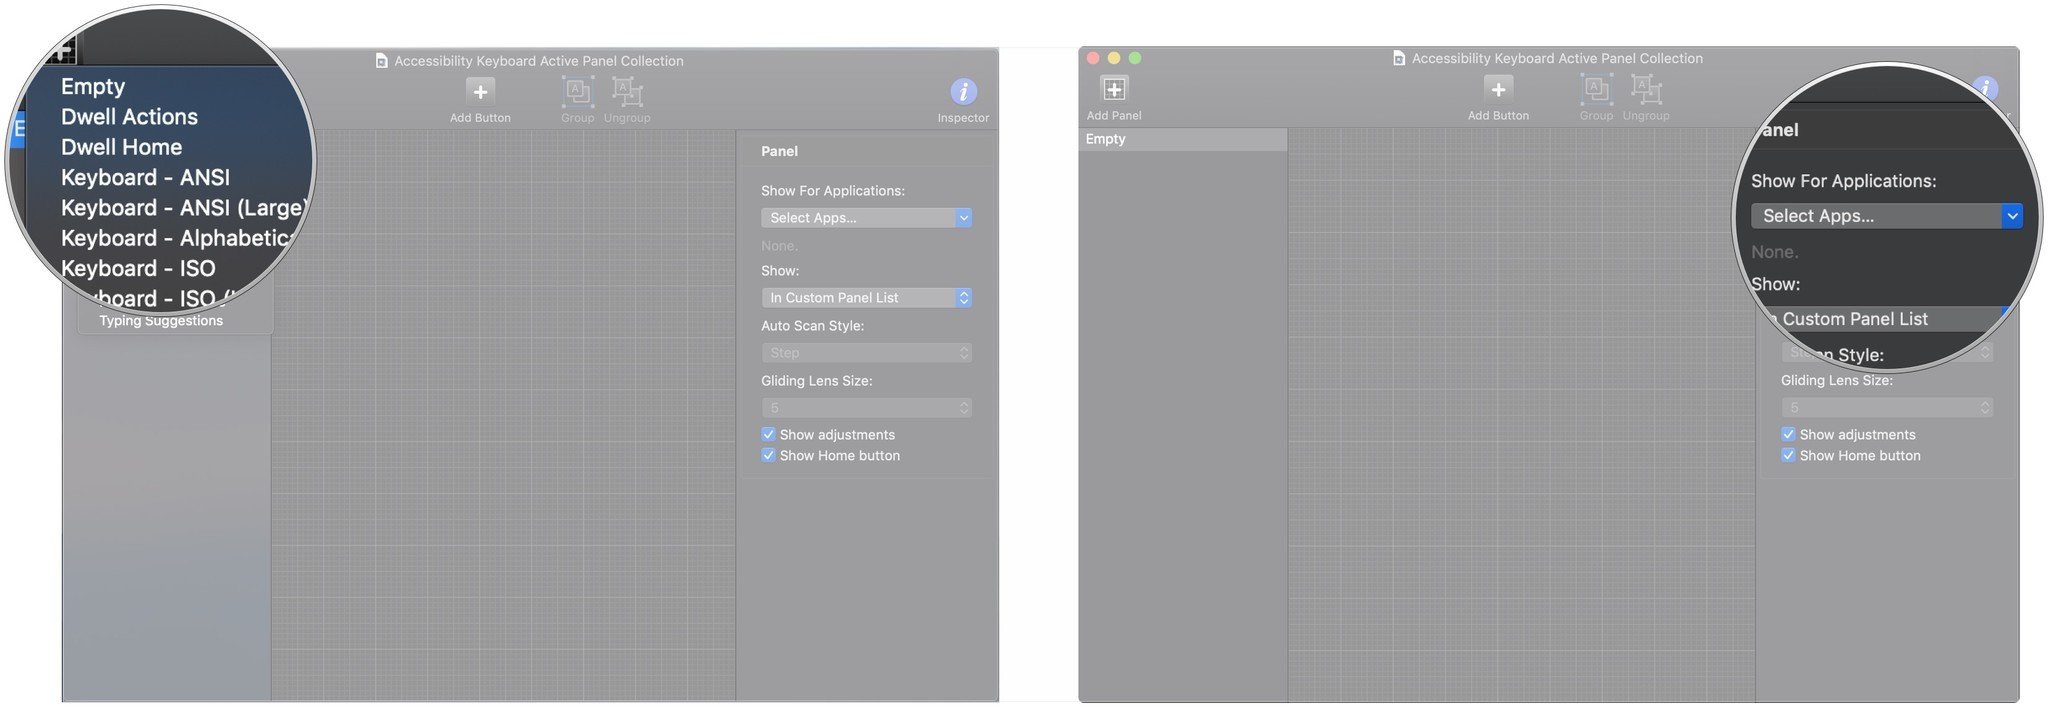
  7. Click the panel type you want to create.
  8. Click the drop-downs to determine panel behavior.

    • The drop-downs allow you to select which applications cause your panel to appear, how your panel is displayed, its auto scan style, and the size of its gliding lens.

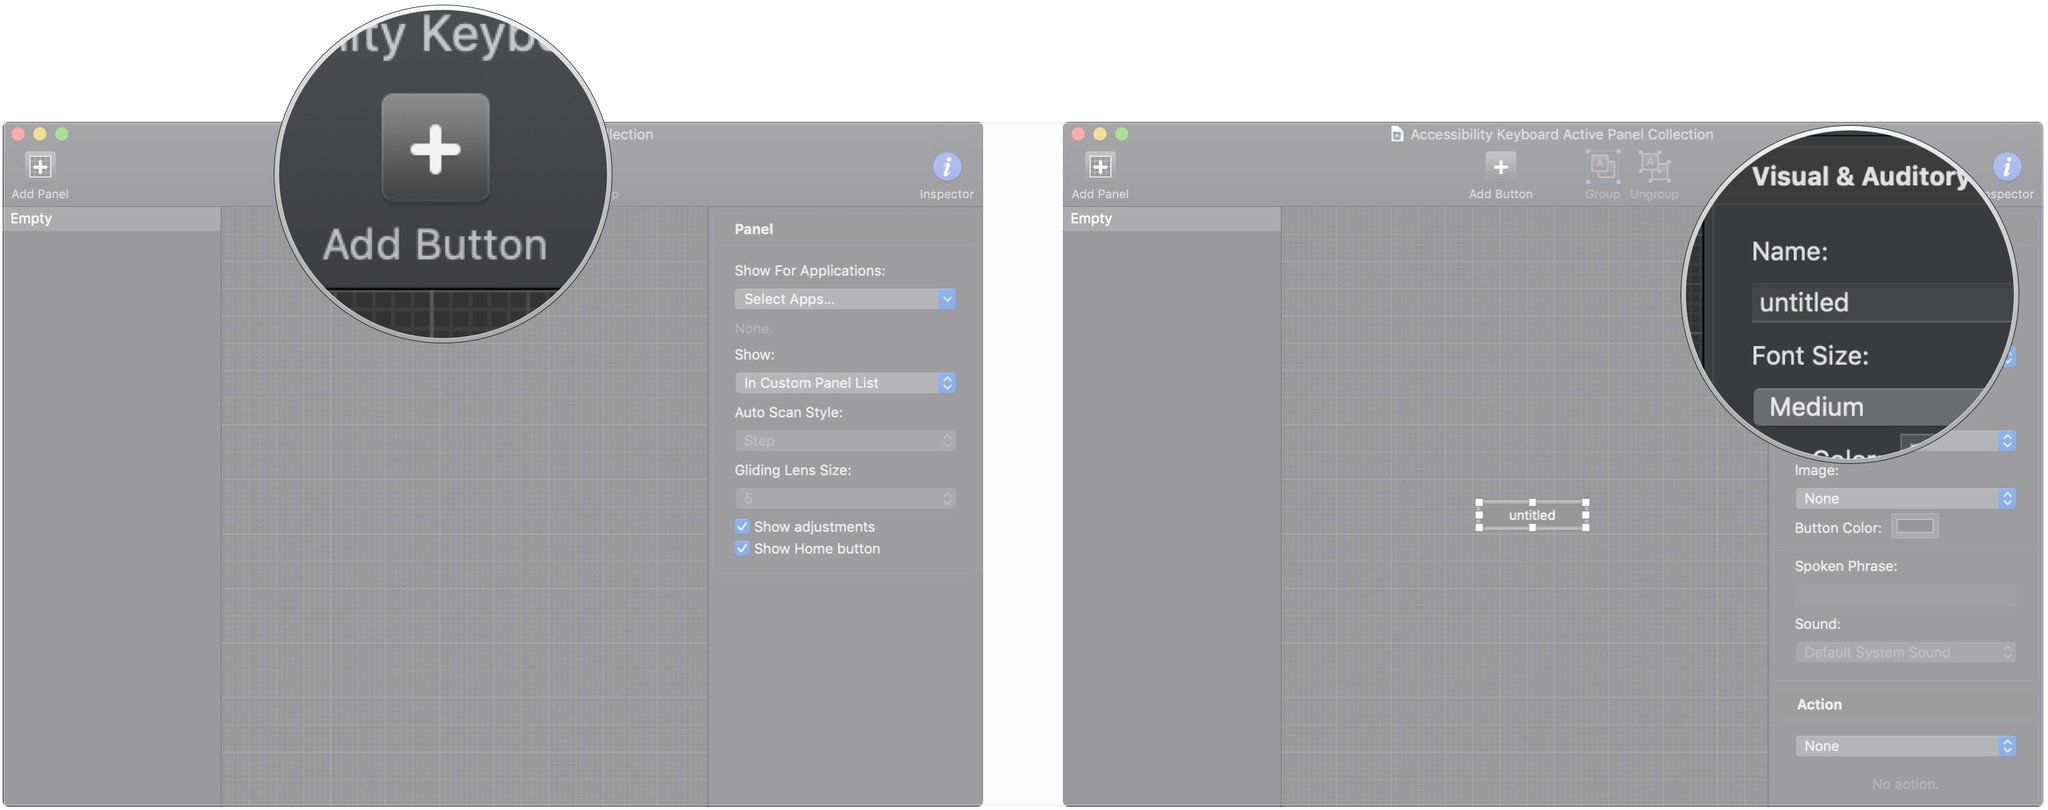
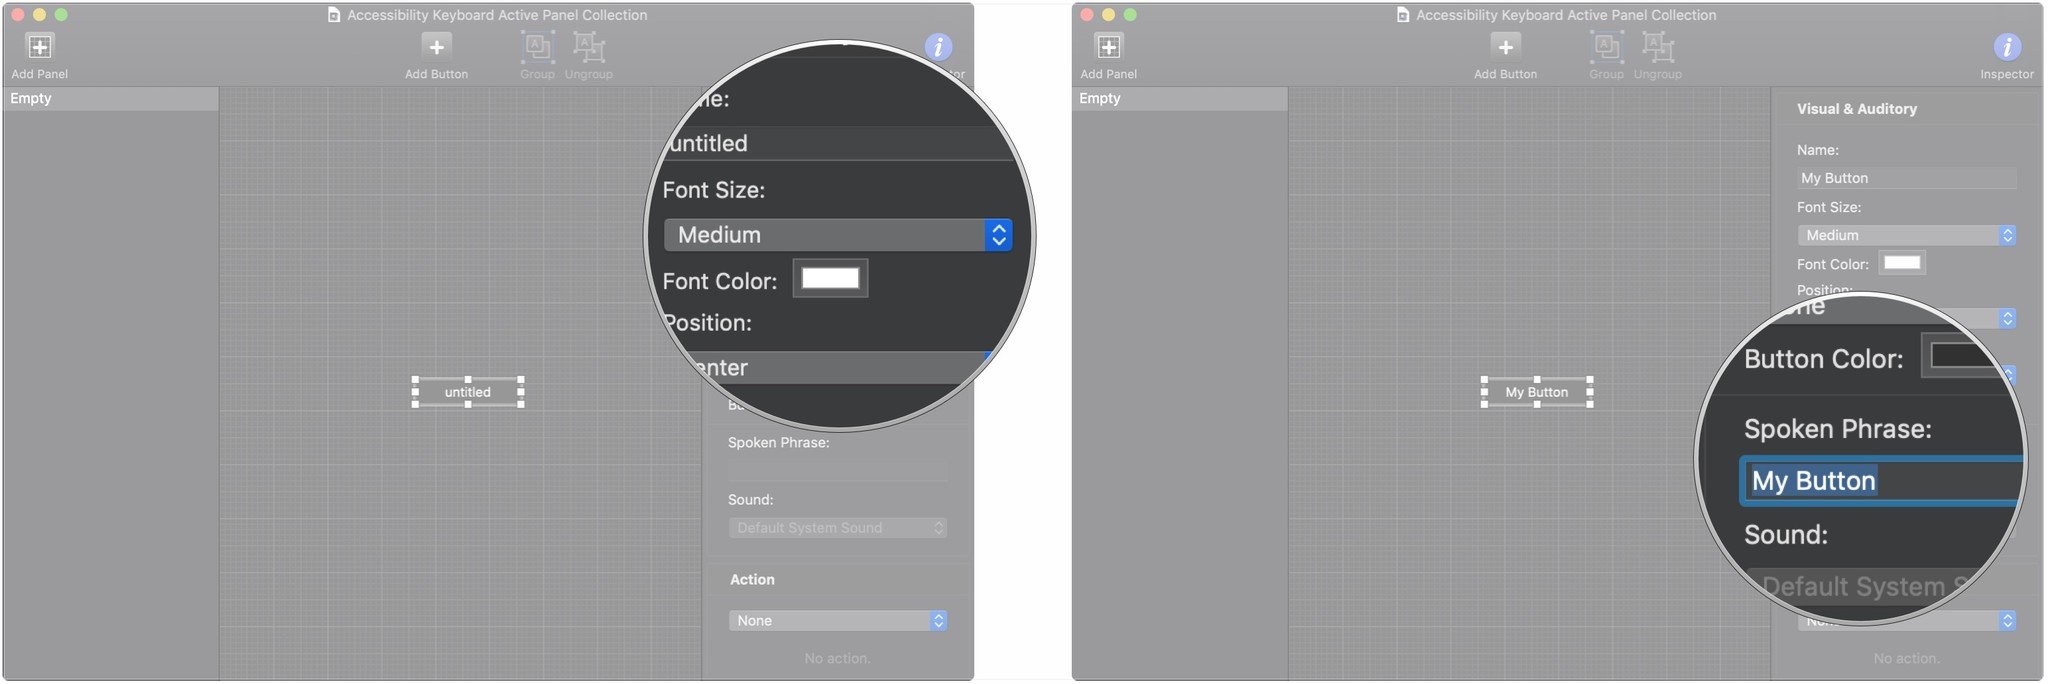
  9. Click Add Button to add a button to an existing panel.
  10. Enter a name for your button.

  11. Click the drop-downs and menus to determine the button's font size, screen position, image, color, and action.
  12. Enter a spoken phrase for activating the button.

Start typing

If you need to make your typing experience more manageable, the keyboard accessibility features should help you out. These are all of the current keyboard accessibility features that are available in macOS. Enjoy!

Updated February 2022: Updated for macOS Monterey.

Prevent others from snooping around on your phone with Guided Access

$
0
0

The iPhone Guided Access feature lets you lock your iOS device to a single app, preventing people from snooping around.

Have you ever come across a time when you have to hand off your device to someone else so that they could use it? Yes, we all have been in that situation, but there's also the possibility of them poking around in other apps, which could contain sensitive information or things you don't want others to see. Whether you're using your most powerful iPad at work and need to use it to display info to others, or you let your child use your iPhone to watch a video, you can lock the device to just that particular app with an Accessibility feature called Guided Access.

Guided Access is originally an Accessibility feature, but it has proven itself to be a useful tool for anyone who doesn't want others to snoop around on their best iPhone or favorite iPad. By locking the device to a single app, no one besides you can exit out of it, because you can even use Touch ID or Face ID for security, as well as a specific six-digit passcode for Guided Access.

Whether it's a writing app, drawing app, music app, math app, or a story, video, or reading app, iPhone's Guided Access feature helps make sure that all attention remains only on that app. It also prevents you from accidentally exiting to the Home screen or another app when you don't mean to. Think of it as a kind of "guest mode," because you can let someone else use an app like Safari without worrying about them going through your other apps or messages.

How to enable iPad or iPhone Guided Access

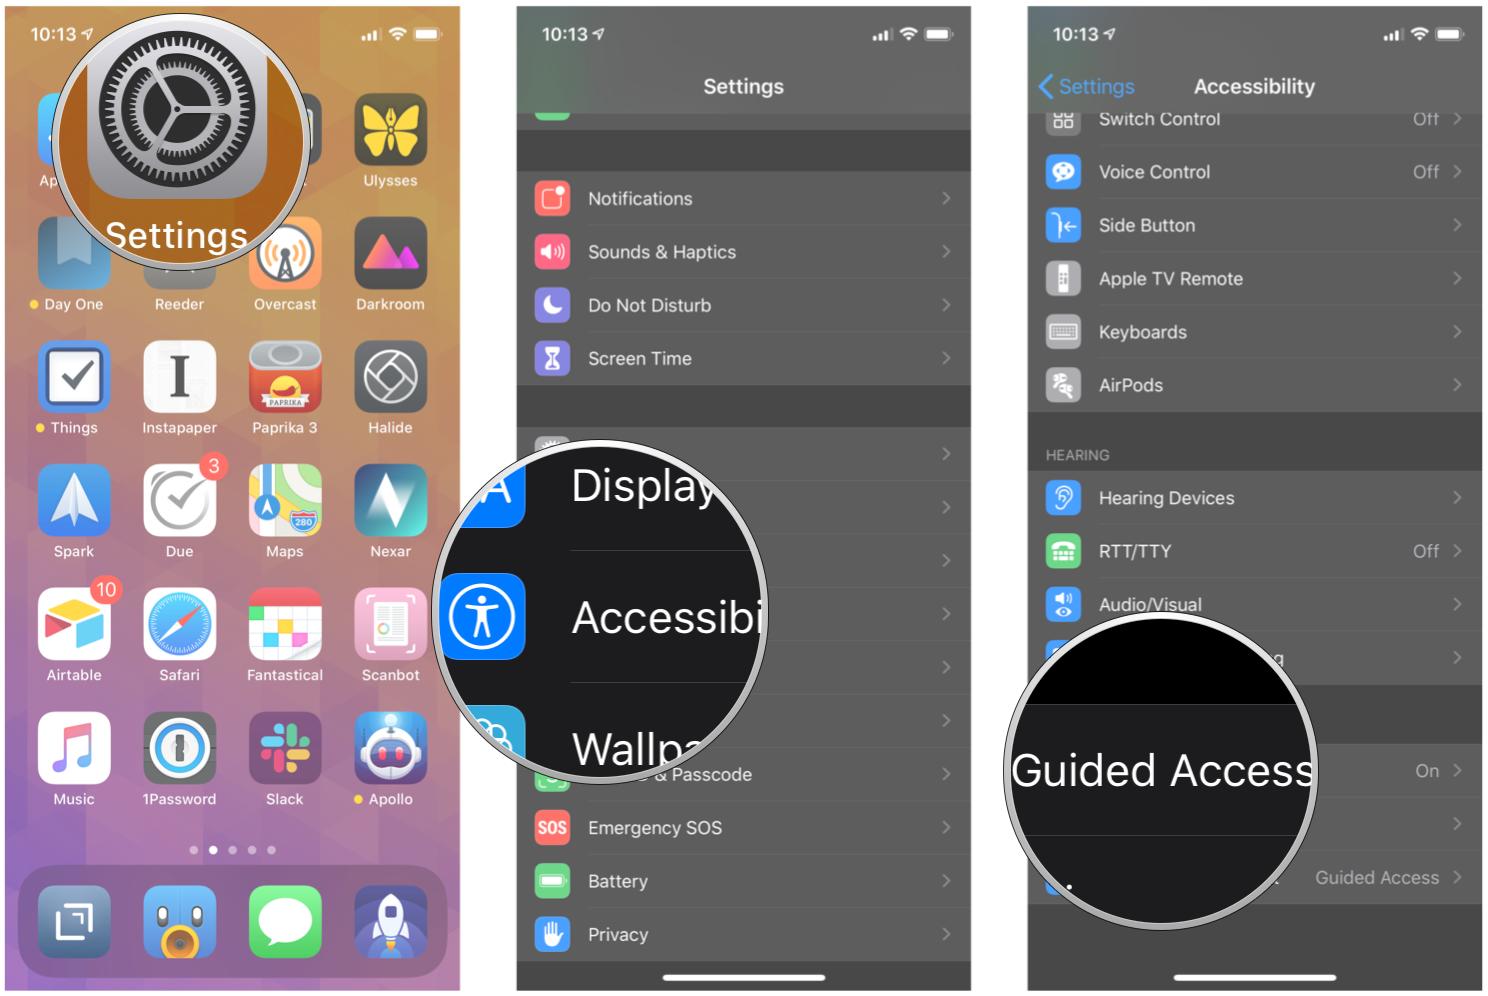
  1. Launch Settings on your iPhone or iPad.
  2. Tap on Accessibility.
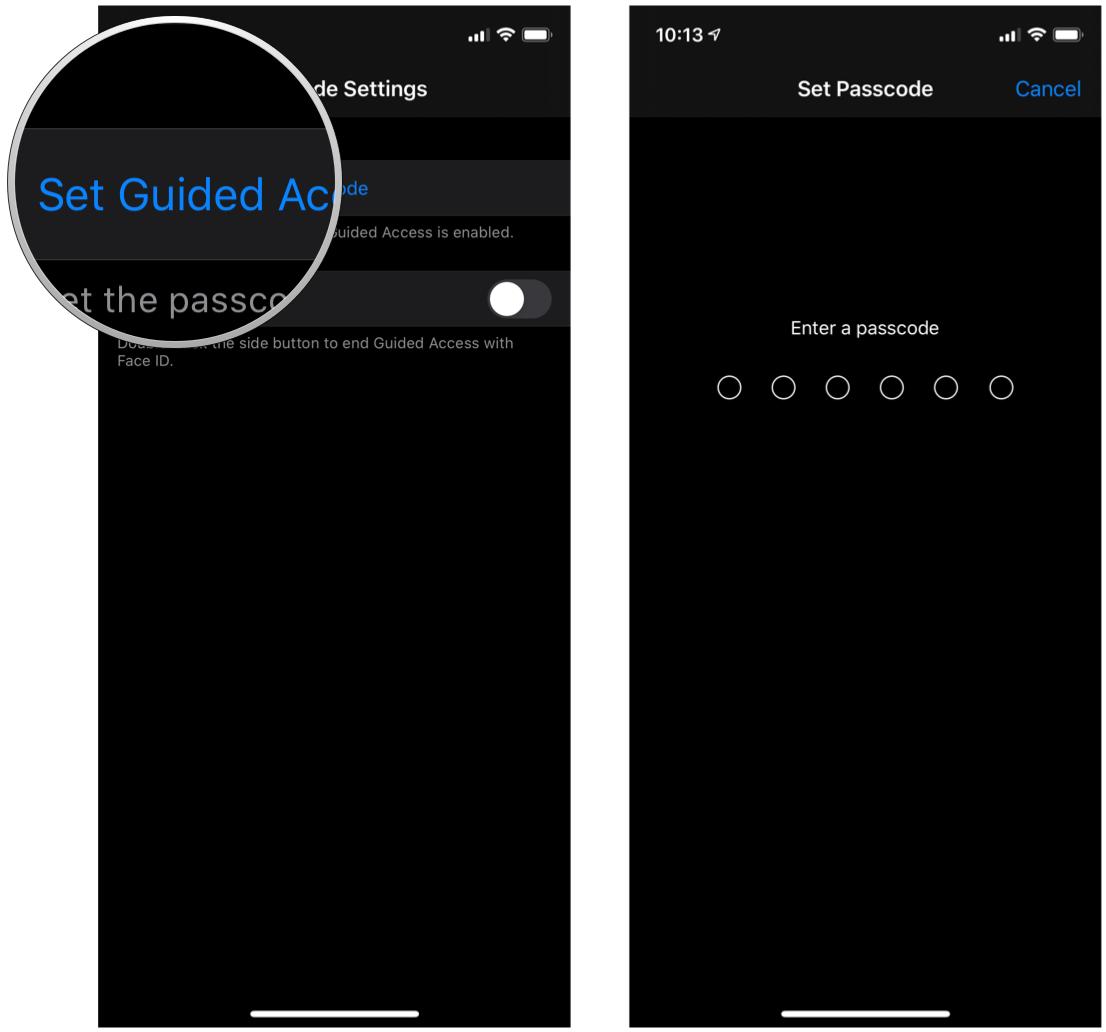
  3. Scroll down to the bottom and then tap on Guided Access.

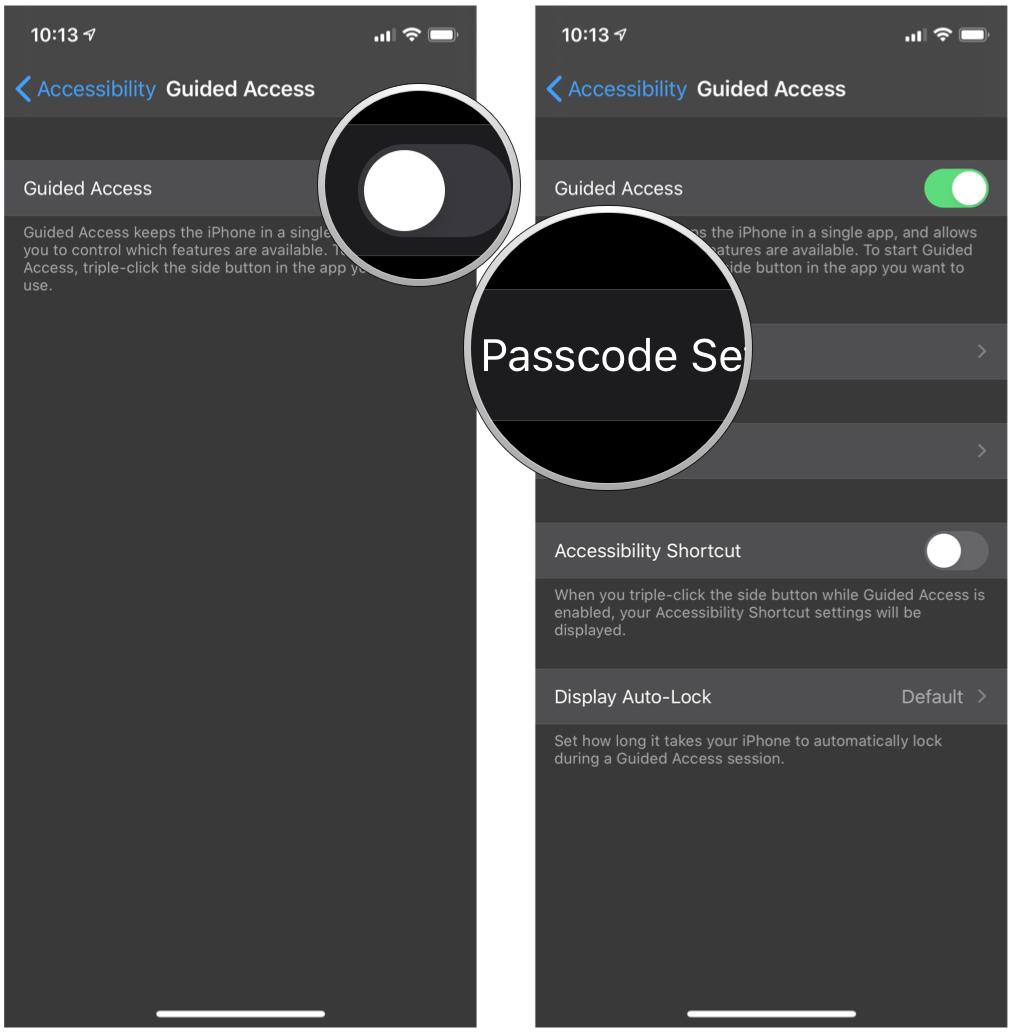
  4. Turn the toggle for Guided Access to ON (green).
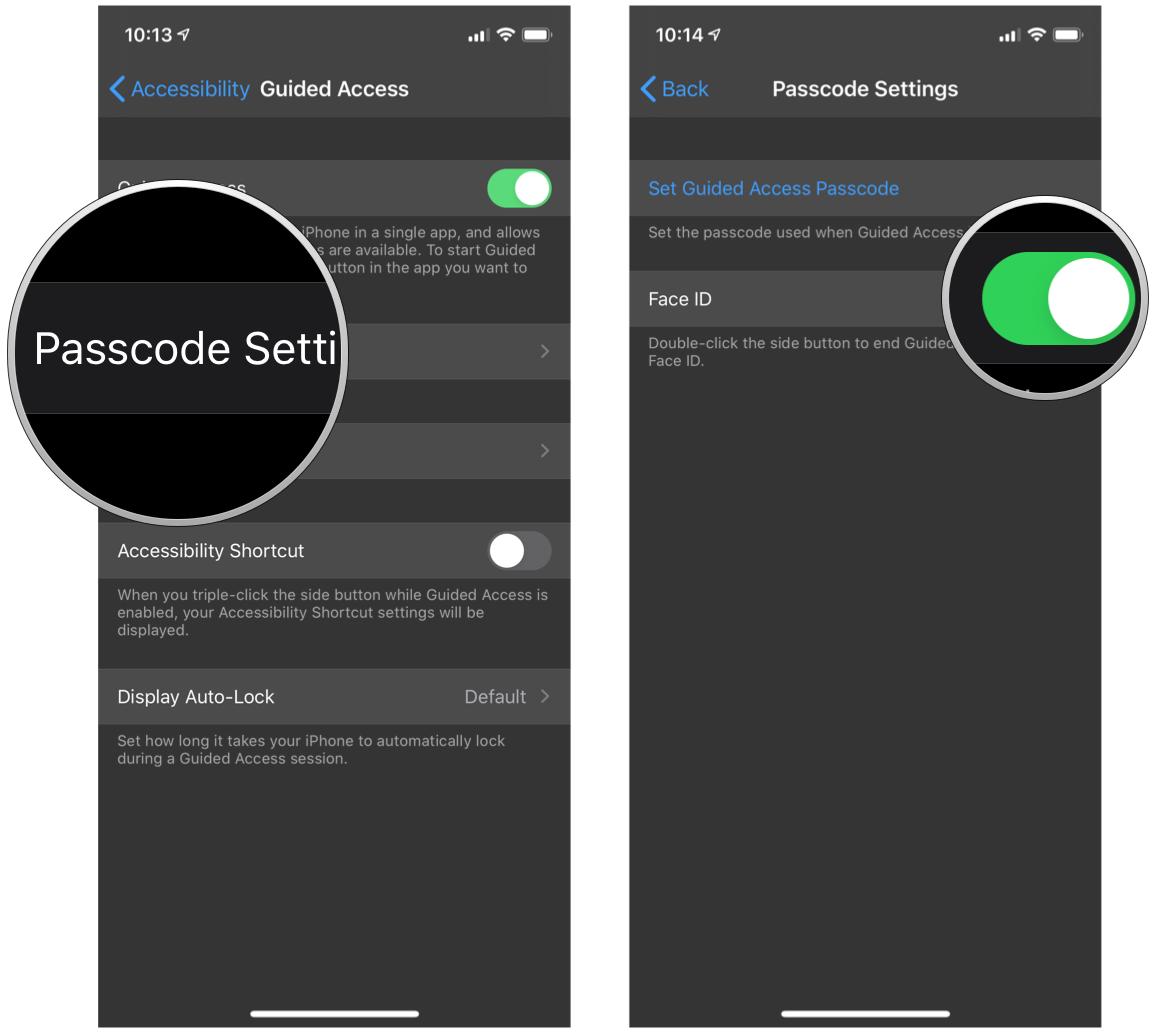
  5. Tap on Passcode Settings.

  6. Tap Set Guided Access Passcode to create a six-digit passcode. This passcode is needed to end a Guided Access session.
  7. Verify your passcode by typing it in again.

How to enable Face ID or Touch ID for Guided Access

  1. Launch Settings on your iPhone or iPad.
  2. Tap on Accessibility.
  3. Scroll down to the bottom and then tap on Guided Access.

  4. Tap Passcode Settings.
  5. Turn the toggle to ON for Face ID or Touch ID (depending on your model).

How to use Guided Access

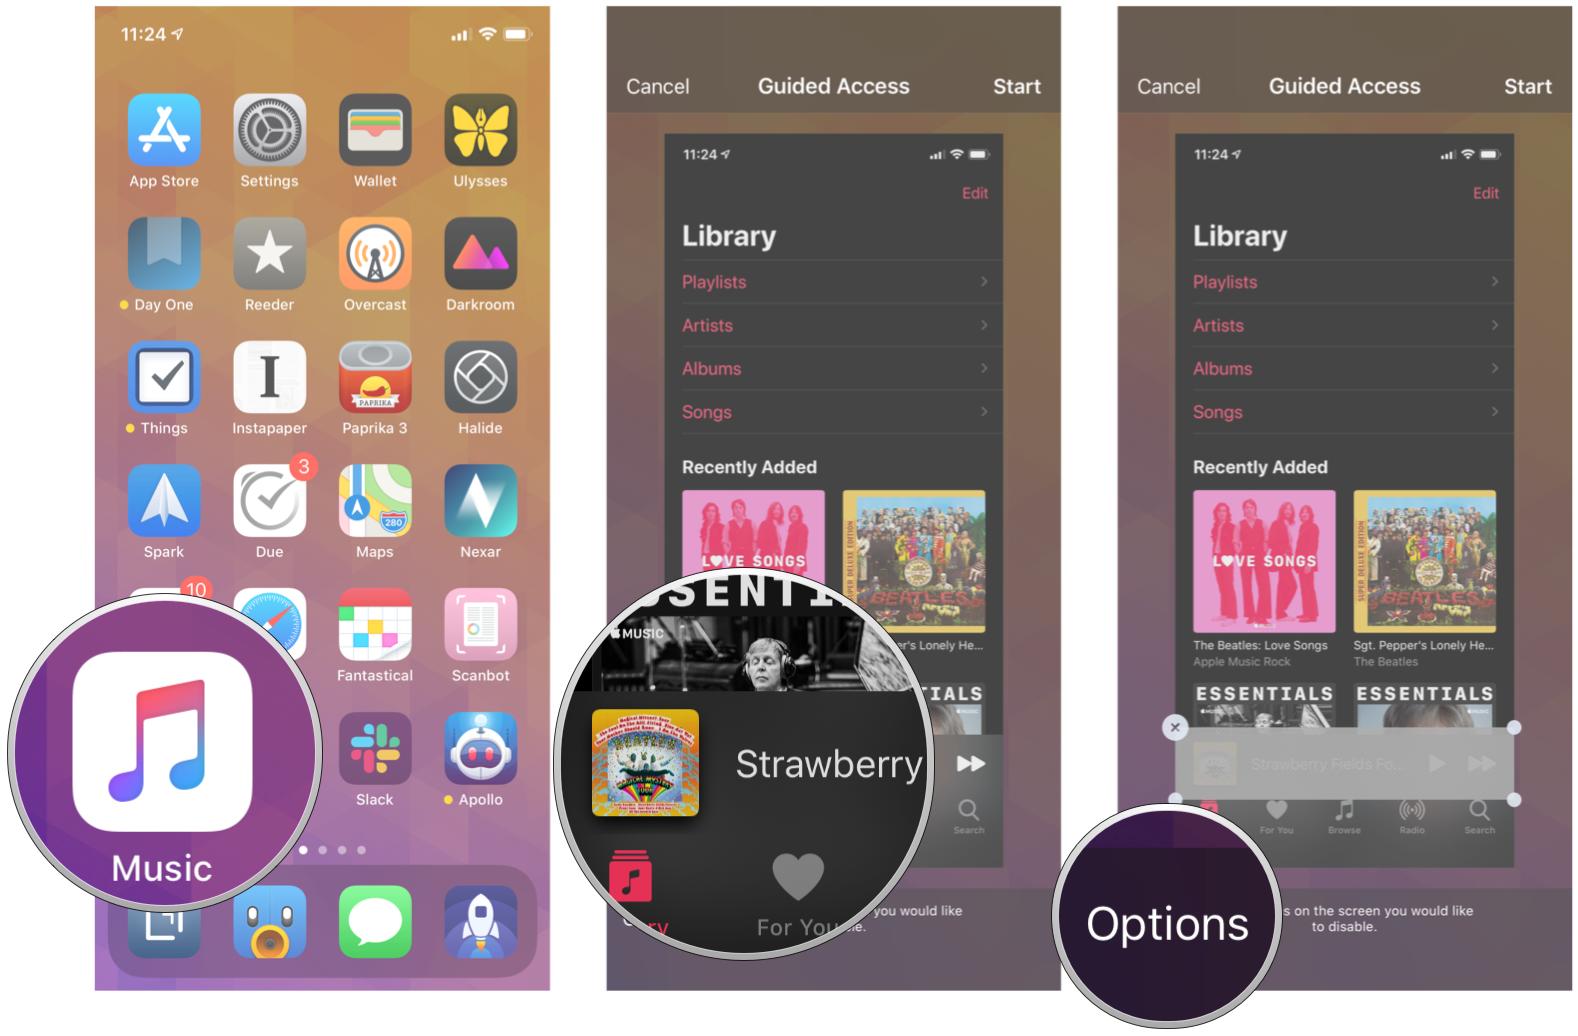
  1. Launch the app you'd like the user to have access to. In this case, we used Music.
  2. On iPhone or iPad with a Home button, triple-click the Home button, or on iPhone or iPad with Face ID, triple-click the Side button to launch Guided Access.
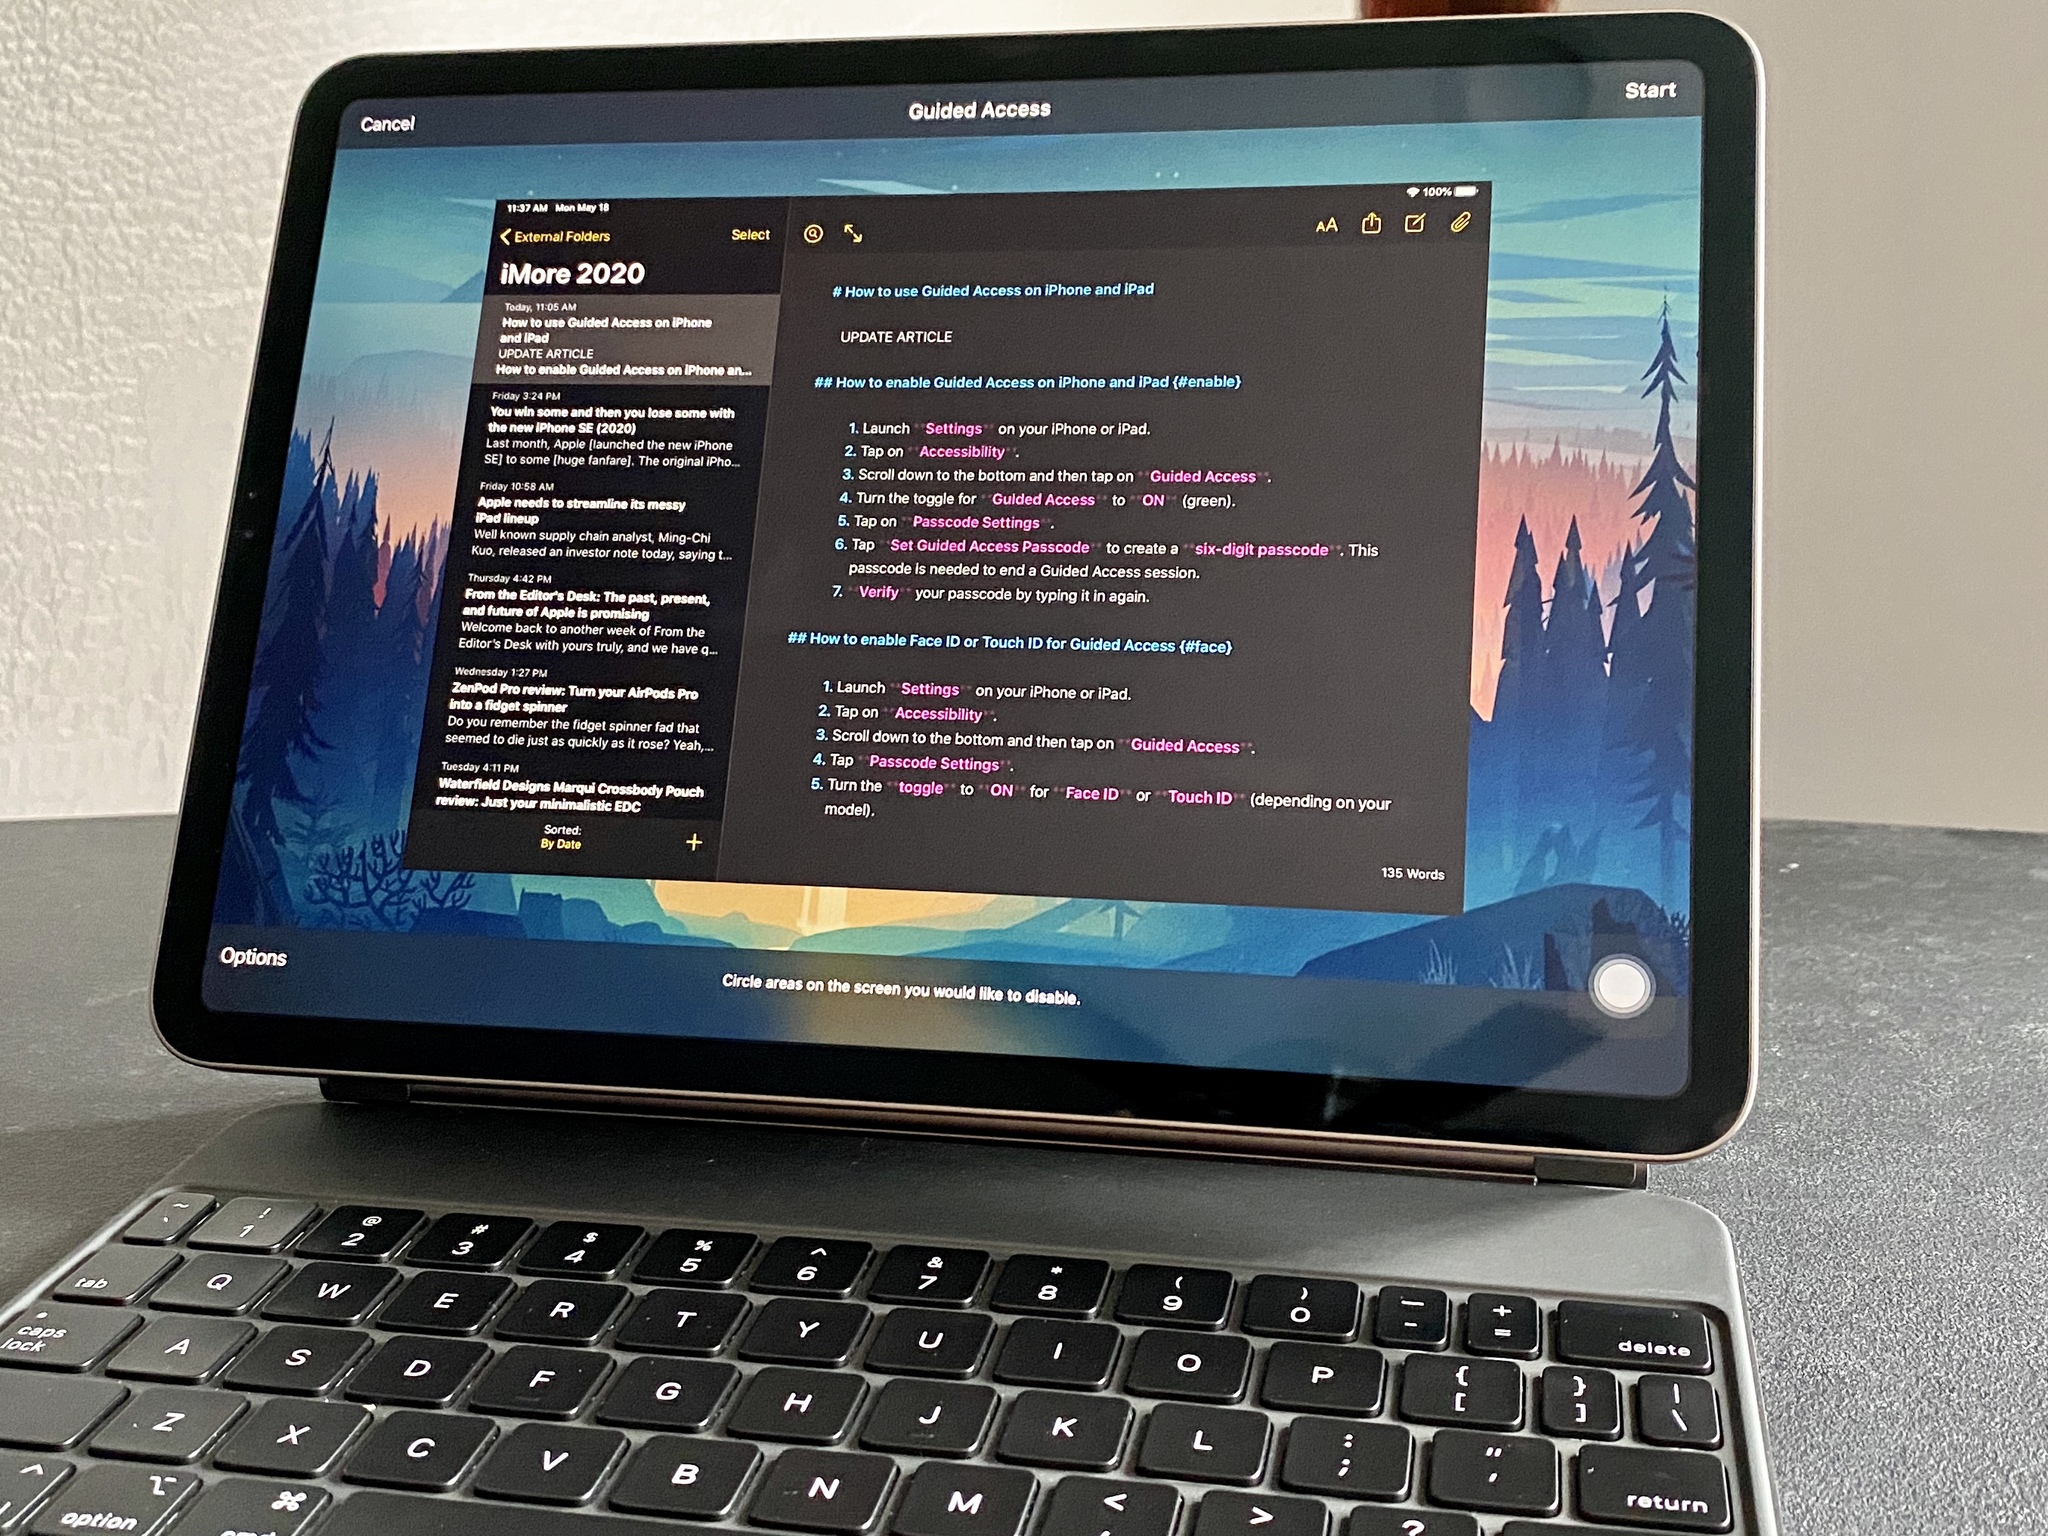
  3. Circle any areas of the screen that you would like to make inaccessible.

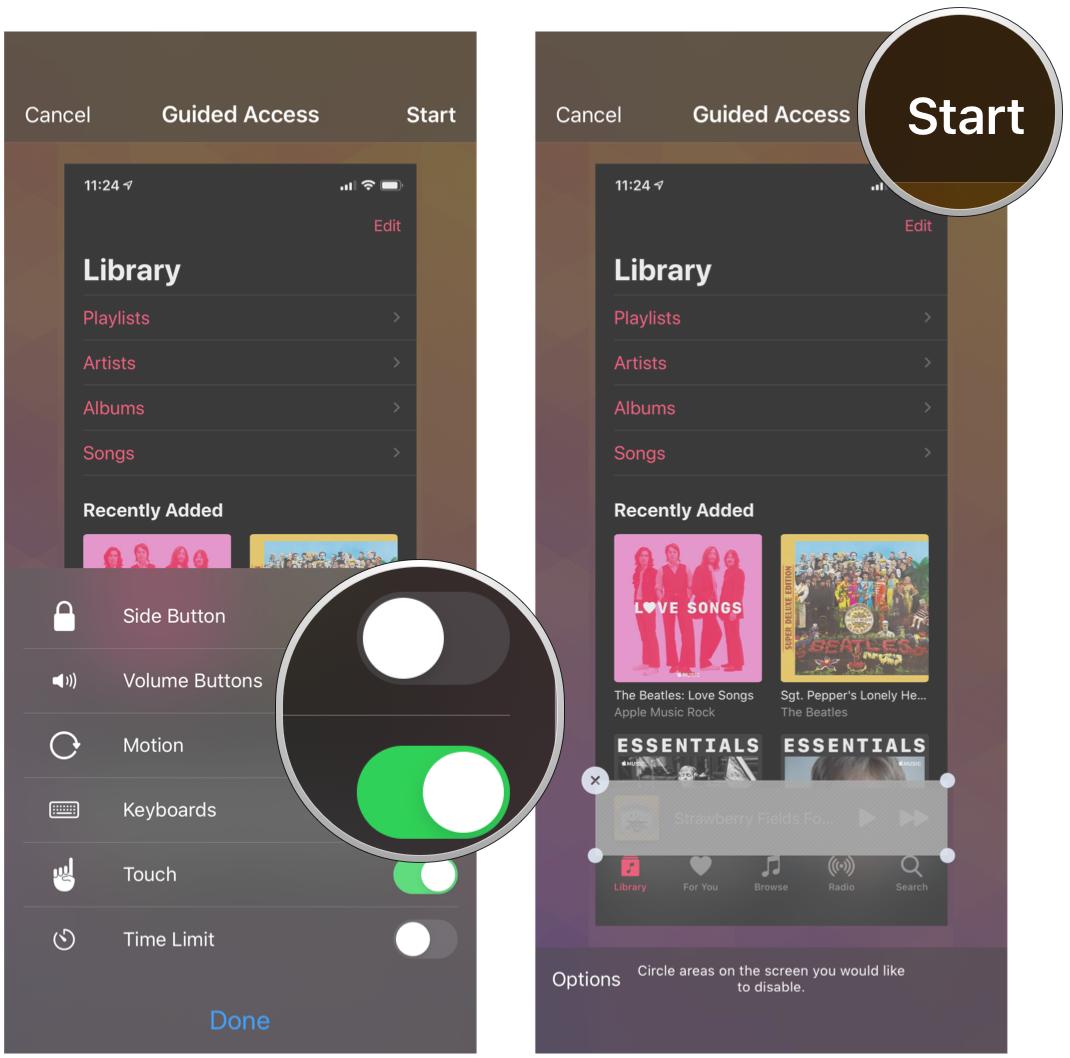
  4. Tap on Options in the bottom left corner to choose whether or not you want to grant access to the Sleep/Wake button, Volume buttons, touch screen, and motion. Tap Done to save your selections.
  5. Tap on Start at the top of the screen to begin Guided Access.

Once Guided Access is enabled, anyone trying to leave the specific app you've locked it to will receive a banner message telling them to triple-click the Home button to exit. If they don't know the pre-set passcode, they won't be able to exit Guided Access.

Lock it down to a single app with Guided Access

As you can see, using the Guided Access feature on your device, such as the iPhone 13, definitely comes in handy. When it's enabled, you can let someone use your device for a particular app without having to look over their shoulder to make sure they're not looking where they shouldn't be looking. It's originally an Accessibility feature, but it has other use cases too. It's easy to set up and use.

February 2022: These steps are still accurate to enable and use Guided Access in iOS 15.

Here are all the details you need to know about iPadOS 15

$
0
0

Here are all of the important details you need to know about Apple's latest version of iPadOS.

Back in 2019, Apple finally spun out an iPad-specific version of iOS, dubbed iPadOS. With it and subsequent versions, Apple has been able to offer more features aimed solely at the iPad in order to make the most of the increased screen real estate and powerful hardware.

If you're unsure about updating your existing iPad to iPadOS 15 or you're doing research ahead of ditching your laptop for an iPad, here's everything you need to know about iPadOS.

Can I install iPadOS 15?

Before you find dive into all that iPadOS 15 has to offer, it's worth knowing whether your device can actually run the latest version of Apple's iPad-specific software.

Here are all of the iPad models that work with iPadOS 15:

  • iPad Pro 12.9-inch (5th generation)
  • iPad Pro 11-inch (3rd generation)
  • iPad Pro 12.9-inch (4th generation)
  • iPad Pro 11-inch (2nd generation)
  • iPad Pro 12.9-inch (3rd generation)
  • iPad Pro 11-inch (1st generation)
  • iPad Pro 12.9-inch (2nd generation)
  • iPad Pro 12.9-inch (1st generation)
  • iPad Pro 10.5-inch
  • iPad Pro 9.7-inch
  • iPad (8th generation)
  • iPad (7th generation)
  • iPad (6th generation)
  • iPad (5th generation)
  • iPad mini (5th generation)
  • iPad mini 4
  • iPad Air (4th generation)
  • iPad Air (3rd generation)
  • iPad Air 2

That device compatibility list is the exact same as it was for the previous year's iPadOS 14 update, so if you are running one of the best iPad models from the last few years, you won't have any issues upgrading to version 15. If your device is on the list, read on to find out more about iPadOS 15's biggest features.

SharePlay

One of the headline features of the iPadOS 15 release is SharePlay. Most likely a feature that was brought to the fore by the pandemic, SharePlay unlocks some new functionality for your video calls with shared entertainment experiences and productivity use cases.

SharePlay is akin to other shared streaming experiences like Netflix Party and Facebook Watch Together in that it allows users to enjoy content simultaneously, though it expands beyond just movies and TV shows and includes music, Fitness+ workouts, games, and even more content types. It didn't ship on day one with iPadOS 15 and instead launched with the iPadOS 15.1 release, but it's available to everyone now.

Widgets and App Library

With iPadOS 14, Apple finally put widgets on the iPad Home screen, though these were confined to the left side of the display. It seemed a rather arbitrary call on Apple's part, especially since you could place widgets anywhere on your iPhone's Home screen in iOS 14, which released at the same time.

In iPadOS 15, Apple righted this wrong and freed widgets from the Today View panel, allowing users to place them in more of a free-form manner rather than being restricted to one side of the screen. There's even a special XL widget size that is only available on the iPad's larger canvas.

It's a similar story for the App Library in iPadOS 15. It was curiously absent in iPadOS 14 despite launching on the iPhone in iOS 14, but version 15 of the iPad's software has fixed this. Now, you can remove app icon clutter from your iPad's Home screen without deleting the app itself. You can launch it from the App Library or Spotlight search whenever you need it.

Multitasking and keyboard shortcuts

Continuing the story of refinement in iPadOS 15 is Apple's update to iPad Multitasking. As I wrote in my iPadOS 15 review, Multitasking in iPadOS 15 has gotten perhaps its biggest overhaul since iPad split-screen apps debuted in iOS 9, making it much easier to discover and use for both the average iPad user and power users.

With it, you can keep two windows side-by-side with Split View, or temporarily bring in a new app window to fire off a quick message with Slide Over. You can also keep watching video from the web or an app while carrying on with other tasks thanks to picture-in-picture support, jot something down with Quick Note, and switch between multiple windows of the same app with the Shelf.

Another neat improvement in iPadOS 15 for multitaskers concerns keyboard shortcuts. While these were supported in iPadOS 14, the feature is much more robust in iPadOS 15, with a redesigned menu accessed by the ⌘ key and the addition of the Globe key modifier for system functions like returning to the Home screen, switching apps, Multitasking, showing the App Library, invoking Siri, and much more.

Quick Note

Quick Note is a novel feature that launched first with iPadOS 15 before later coming to the Mac. It is a new universal capture system that you can invoke at any time by swiping from the bottom right corner of your iPad screen with your finger or Apple Pencil. You can also get to Quick Notes by pressing Globe-Q on your keyboard, hitting the Quick Note toggle in Control Center, or by tapping "New Quick Note" from the contextual menu when selecting text in Safari.

When you do so, you'll get what is effectively a picture-in-picture window that acts like a notepad for jotting down whatever you need to in that moment. You can type in a Quick Note, handwrite with Apple Pencil, or drop in links, images, and other media. Once you get into the habit of using it, it's a really convenient way to ensure you don't forget things or for keeping certain bits of information to hand.

Focus

While not exclusive to iPadOS, Focus is still an incredibly useful tool for those that use an iPad extensively.

If, at first blush, Focus appears to you to be just a beefed-up version of Do Not Disturb, then you've got the gist already. However, instead of being a binary on or off setting for alerts, Focus allows you to set up customized Do Not Disturb modes for things like Work, Personal, Entertainment, Gaming, Sleep, Driving, and anything else you may need.

Each Focus mode can allow different people or apps to reach you, and new notification priority settings let you decide whether only time-sensitive alerts or any low-priority notification can get through your digital barrier. Focus can even customize what apps appear on your Home screen allowing you to avoid distracting social media apps and games while in your Work mode or hide anxiety-inducing work apps while you are in your Personal Focus.

Your Focus mode syncs between your iPad, iPhone, and Mac devices too, so you don't have to be worried about one of your other devices pinging you when you need a bit of time to, well, focus.

Universal Control

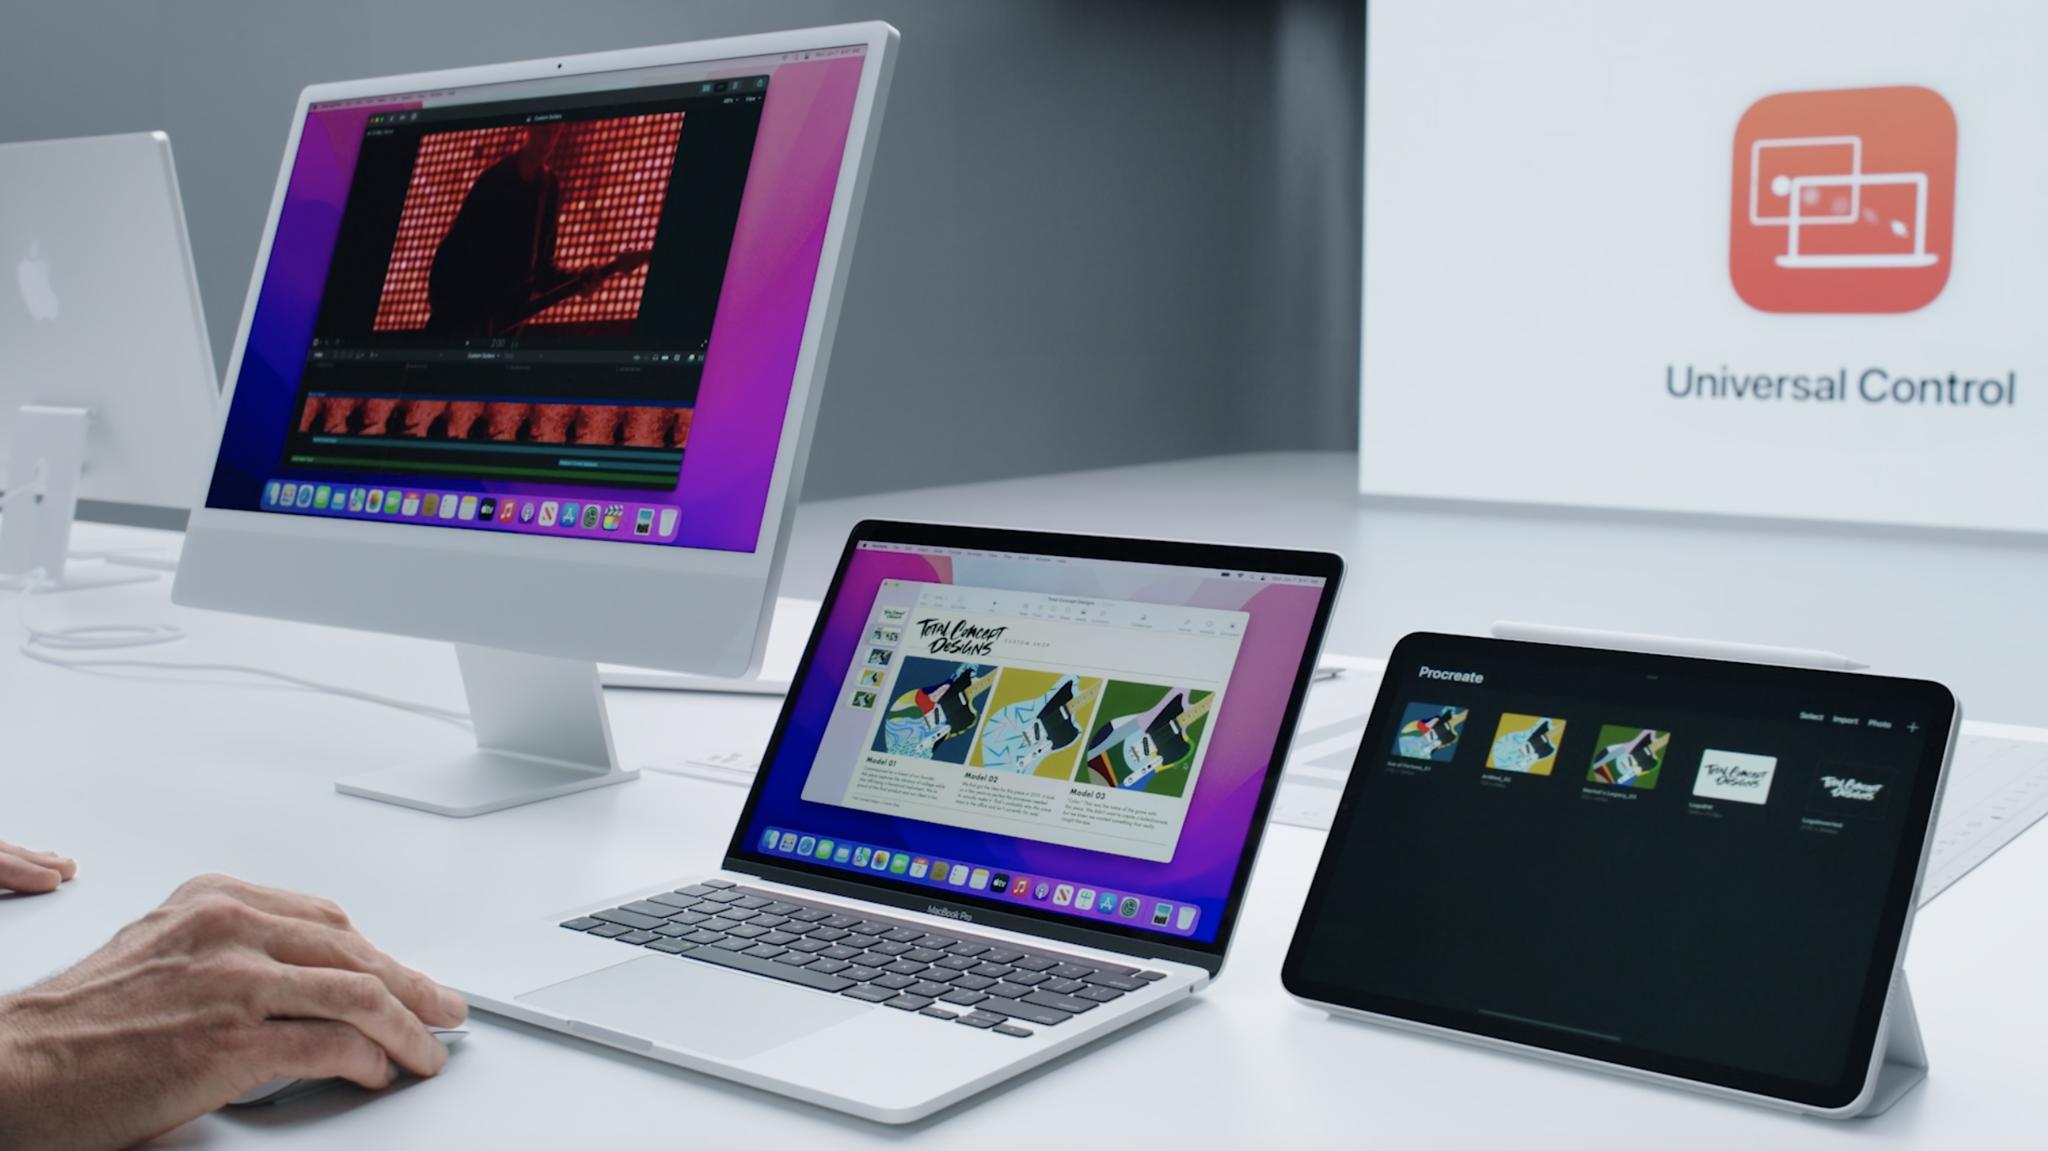
Apple's cross-platform Universal Control feature was unveiled as a tentpole feature of iPadOS 15, although it's still yet to launch to the general public. It is, however, included in the beta versions of iPadOS 15.4, Apple's next iPadOS update which we expect will be released in early 2022.

There are both developer beta and public beta versions of iPadOS that are available if you want to try it and other upcoming features. Be warned, though: you should also never install a beta on your main device and you should always back up your data before installing.

Get up to date

Though iPadOS 15 is light on blockbuster features, there's still plenty to get excited about. It improves foundational experiences of using an iPad with better Multitasking and features like the App Library and Focus modes while adding some neat new capabilities like SharePlay and Universal Control that make it worth updating to.

Plus, it's available on every iPad that was capable of running iPadOS 14, so there's no one being left behind.

Updated March 2022: Updated for iPadOS 15.

iOS is for everybody thanks to these great accessibility features

$
0
0

Everything you ever wanted to know about iOS accessibility all in one place.

Accessibility is all about making the iPhone, iPod touch, and iPad work for as wide a range of people as possible. That can include the very young, the very old, people brand new to computers and mobile devices, as well as people with disabilities or special needs.

With iOS, Apple has added features to specifically help those with visual impairments, including blindness, color blindness, and low vision; and auditory impairments including deafness in one or both ears; physical or motor skill impairments, including limited coordination or range of motion; and learning challenges, including autism and dyslexia. It also includes features like Siri and FaceTime which can provide significant value for the blind or the deaf. Many of these features can be found in Settings and all of them can be found on the iPhone and iPad.

How to use voice control with Siri for iPhone and iPad

Siri is the name of Apple's personal digital assistant, and one of its most important accessibility features. That's because Siri is voice control that talks back to you, that understands relationships and context, and with a personality straight out of Pixar.

Use voice control with Siri to get answers to questions or get Siri to do things for you, just like you would ask a real assistant, and Siri will help keep you connected, informed, in the right place, and on time. You can even use Siri's built-in dictation feature to enter text almost everywhere by simply using your voice.

How to use VoiceOver on iPhone and iPad

VoiceOver is an accessibility feature that makes the iPhone and iPad easier to operate for blind people or people with low vision. With VoiceOver, anyone with a visual impairment can have their iPhone or iPad's screen read to them, including buttons, icons, links, and other interface elements, and use gestures to navigate and select options. Because VoiceOver is included in Apple's framework for developers, any app using default controls gets VoiceOver support built right in.

How to magnify your screen with zoom for iPhone and iPad

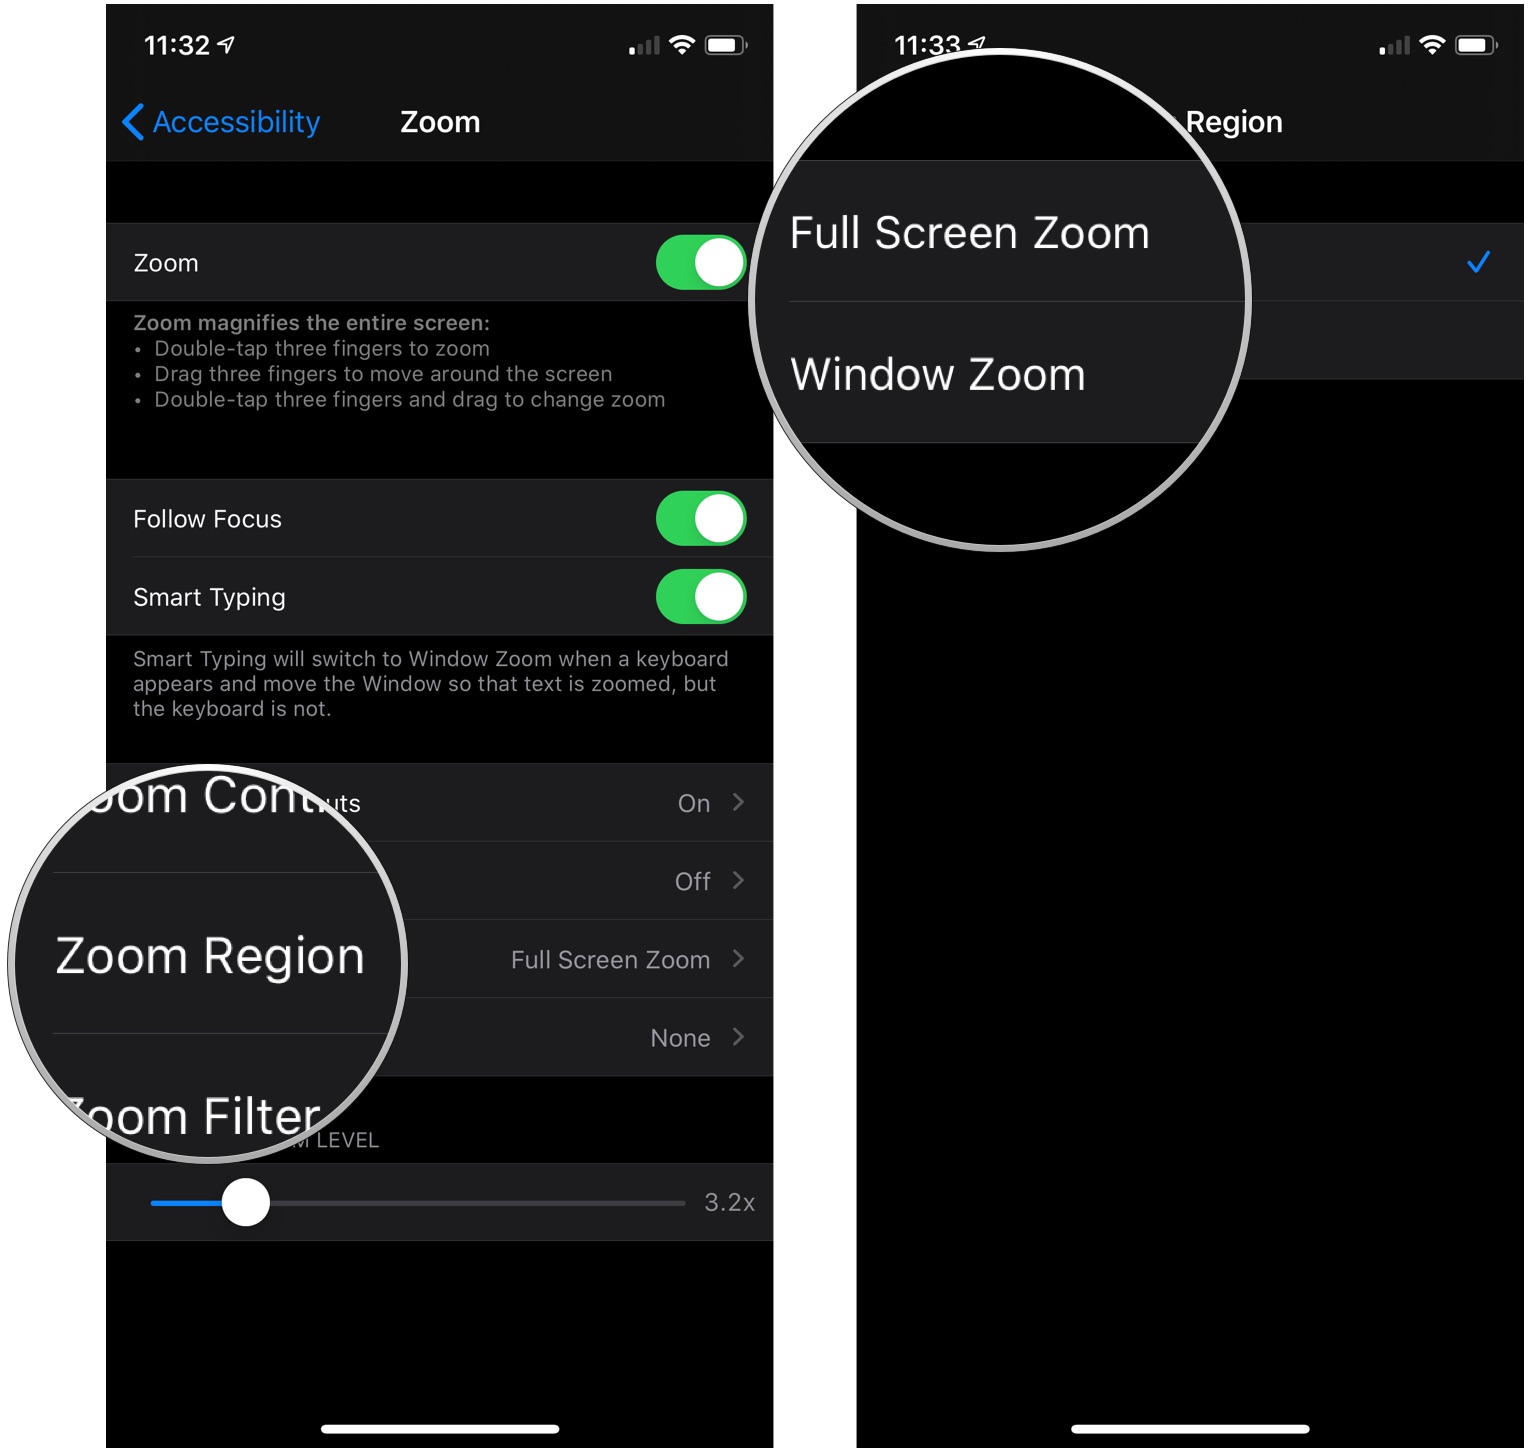
Zoom is an accessibility feature that makes everything from text to icons to interface elements bigger and easier to see on the iPhone and iPad. Zoom magnification on iPhone and iPad defaults to 200% but can be set from 100%-500% to help anyone with low vision of any level. When in zoomed mode, all the standard navigation and selection gestures — tap, swipe, and pinch — work just like normal.

Zoom can work alongside VoiceOver to provide even greater assistance for those with visual impairments and it could be a useful tool for designers, too, who can use zoom as well to help check pixel-level details on-screen.

How to use your camera as a magnifying glass on iPhone and iPad

The Magnifier for iPhone and iPad essentially turns your device into a magnifying glass, using the built-in camera. If you have trouble reading the newspaper or need to see the fine print on a label, just fire up the Magnifier and it'll magnify things up to 500%!

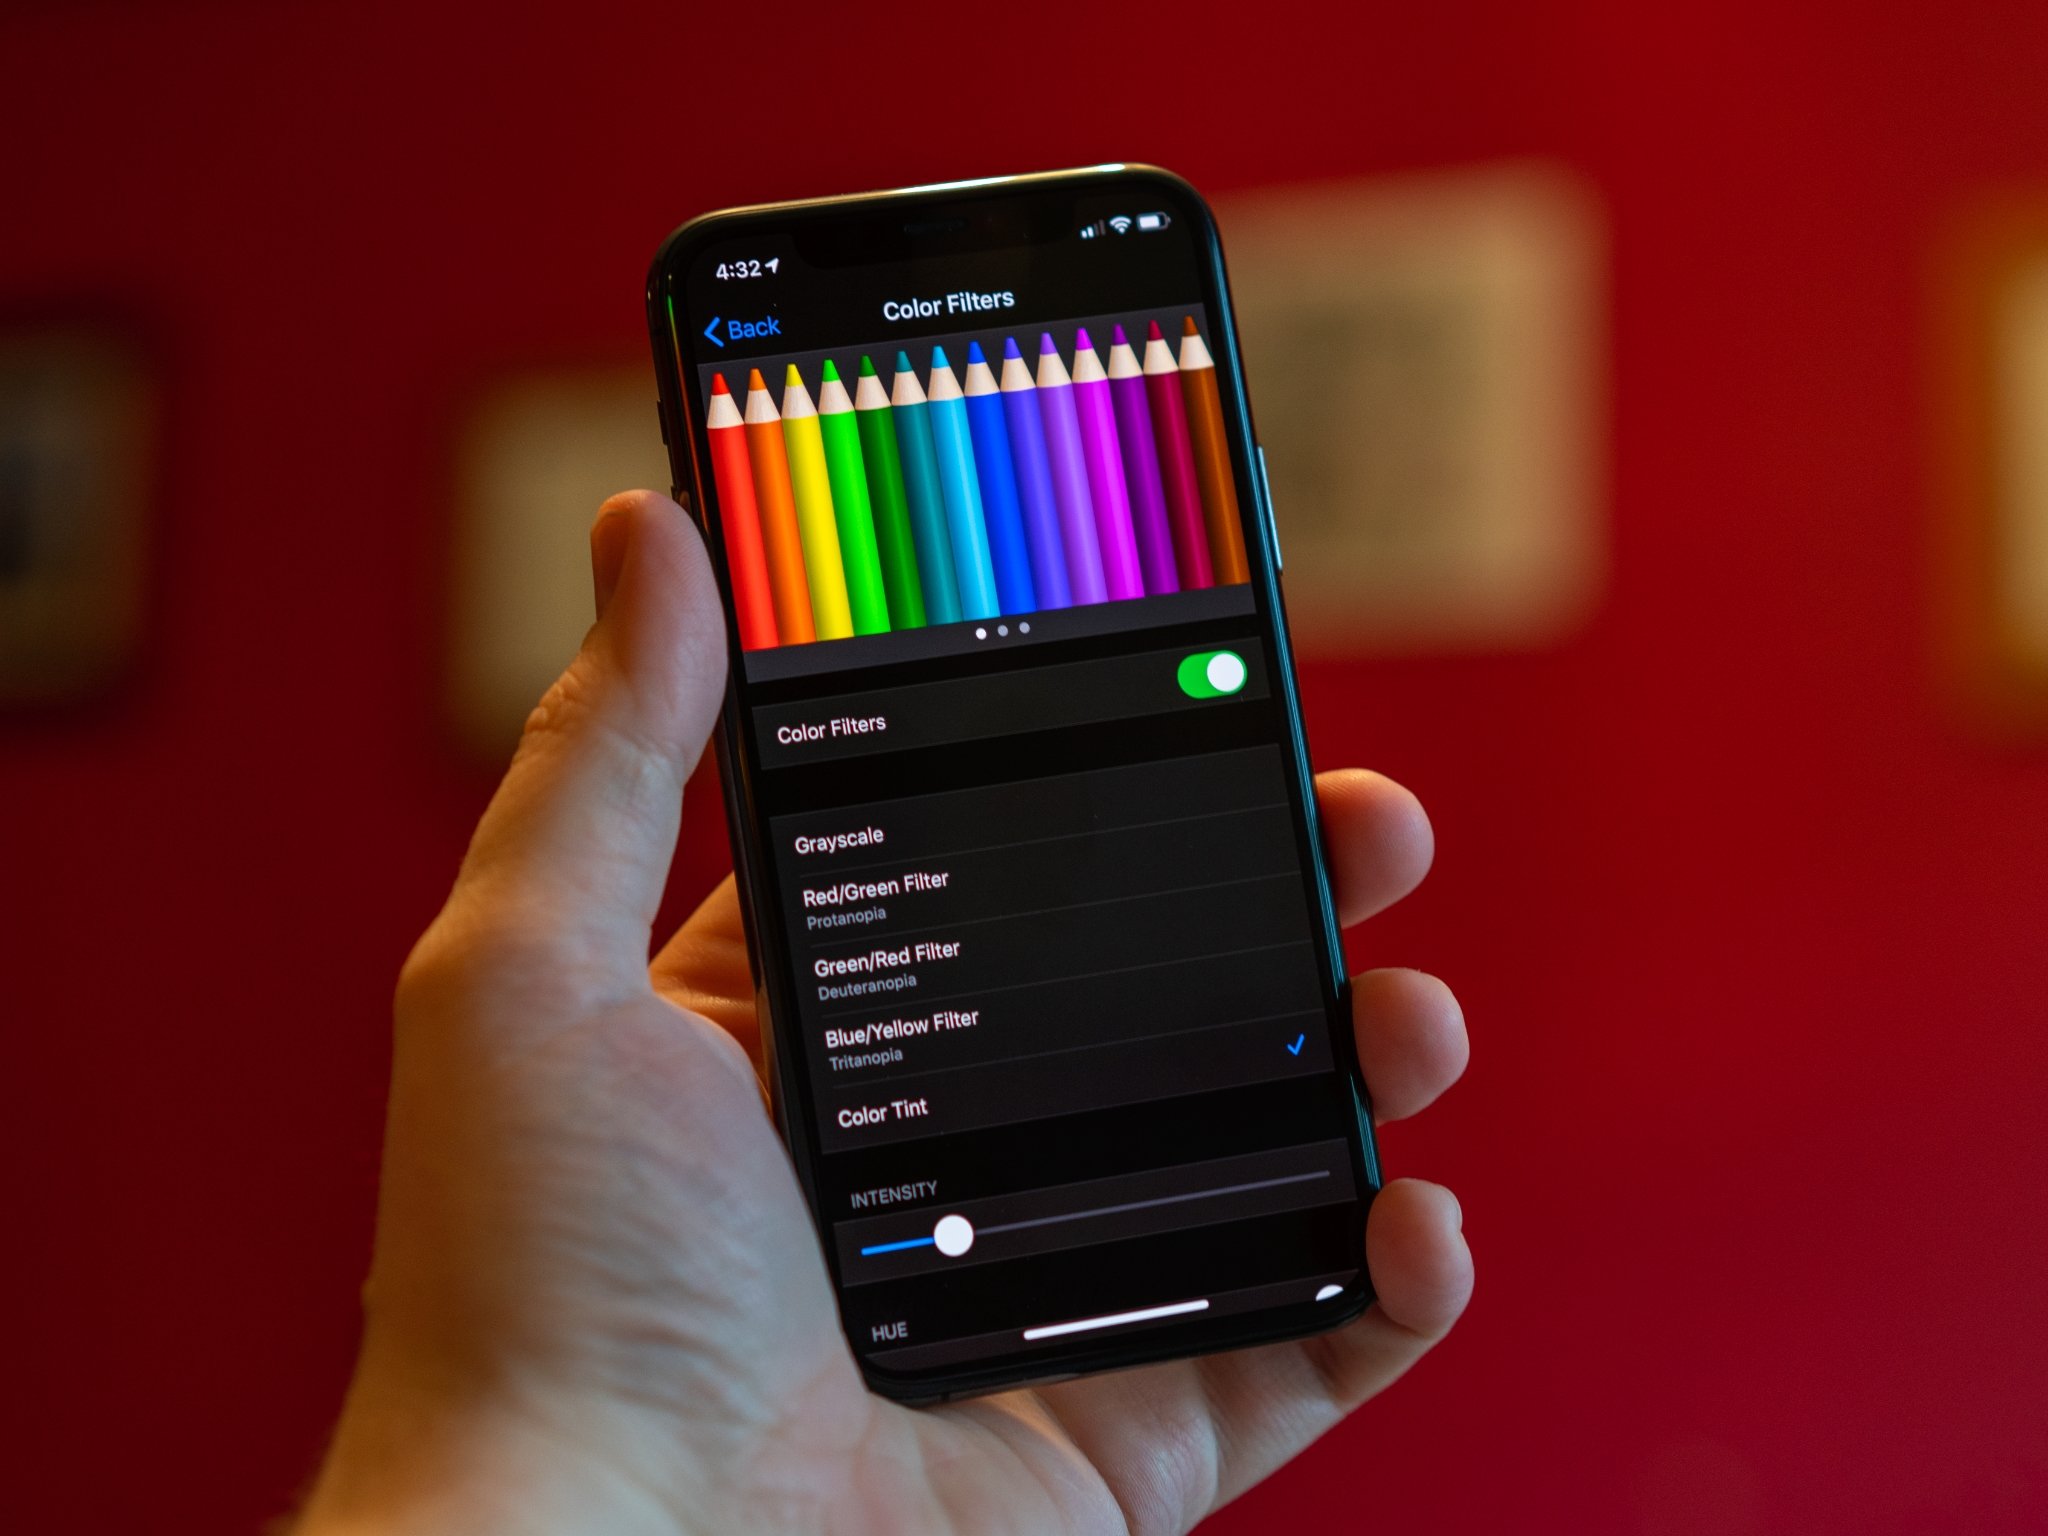
How to use Display Accommodations and Color Filters on iPhone and iPad

Display Accommodations in iOS is an accessibility feature that makes the iPhone and iPad easier on the eyes for some people with a sensitivity to brightness, easier to distinguish for some people with color blindness, and easier to make out for some people with low vision. It can even be used in combination with Zoom to greatly increase legibility for anyone with a visual impairment.

How to have text read with speak selection on your iPhone and iPad

Speak selection is an accessibility feature that reads aloud any text you've highlighted on your iPhone or iPad. It's ideal for anyone who has difficulty making out text because of small size or style, has dyslexia, or is just learning a written language. Speak selection can even highlight words as they're read to aid in comprehension and adjust dialect and speed so you or a family member can better follow along. It's simple enough to set up Spoken Content on your iPhone or iPad.

How to increase legibility with large and bold text on iPhone and iPad

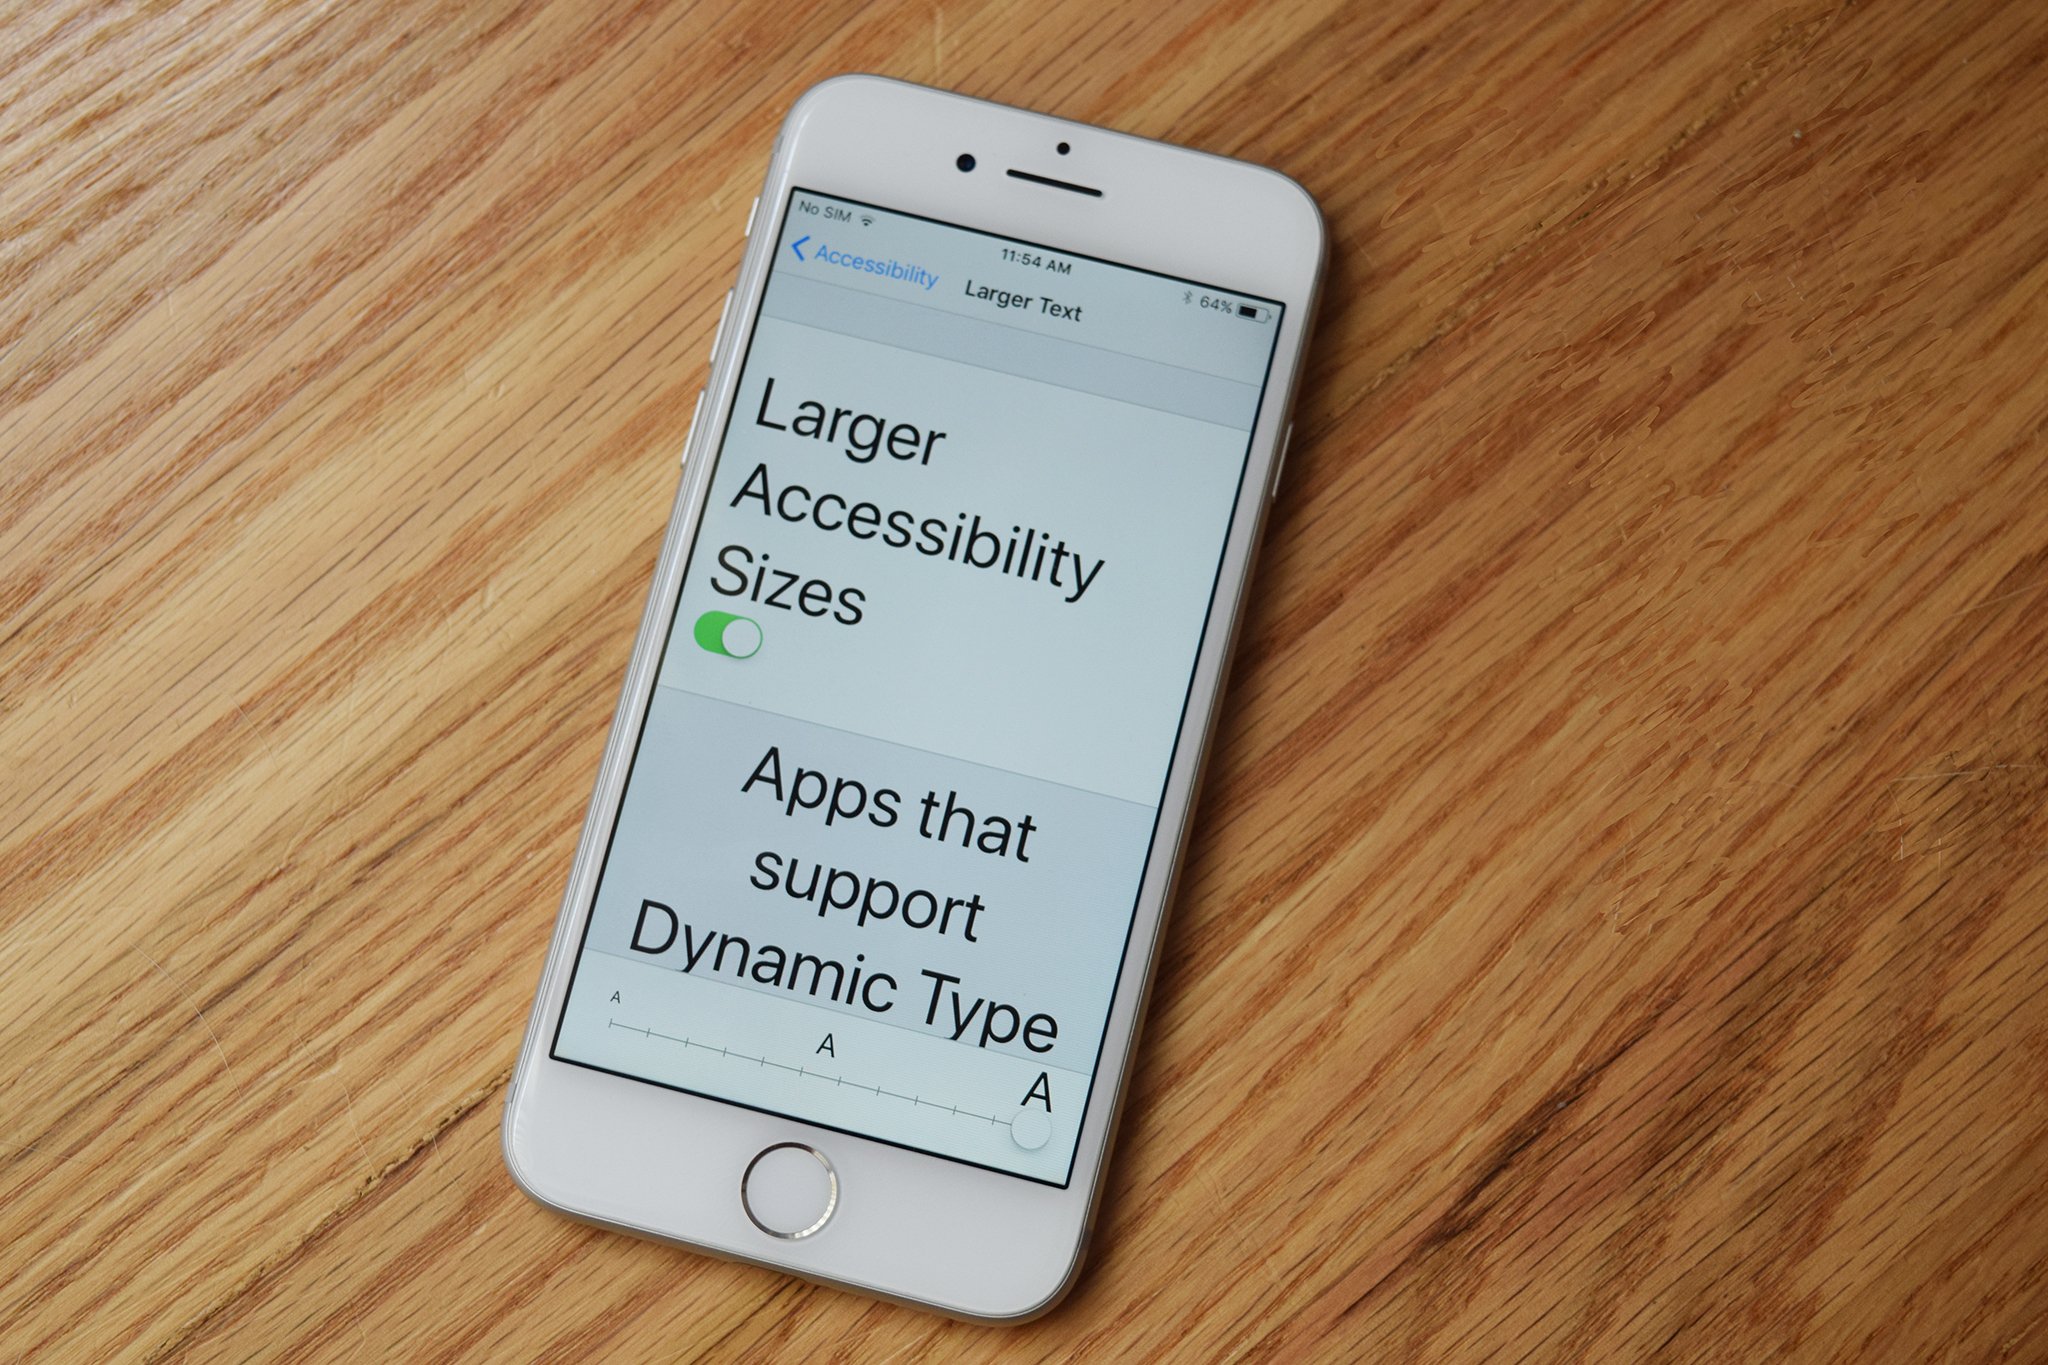
Large and bold text is an Accessibility feature that helps increase legibility by using the iOS dynamic type engine to make fonts bigger and/or heavier and generally easier to read. For people with low vision, making text larger can magnify words without also magnifying interface elements. For people who need more contrast, making text bold can turn thin, hard-to-see lines into thicker, easier-to-see lines. Applying large or bold text in iOS will make text larger and bolder in all of Apple's apps, and in any App Store apps that support the dynamic type framework.

How to use Touch Accommodations on iPhone and iPad

For people with motor skill impairments, Touch Accommodations is a useful and convenient accessibility feature that helps make using a touchscreen much easier and much less frustrating. These accommodations allow you to set a duration for tapping and holding, ignore extra taps, and more.

How to make buttons more tappable by enabling shape outlines on iPhone and iPad

Button shapes is an accessibility feature that underlines or re-creates the outlines found around tappable interface elements in previous versions of iOS. Since a lot of iOS interface elements are tappable button targets without outlines, it can be hard to know exactly where that target is and where it ends. For anyone with eye-hand coordination impairment, button shapes can help increase accuracy and reduce frustration.

How to increase contrast and reduce motion on iPhone and iPad

Increasing contrast on your iPhone and iPad makes it easier to make out text and interface elements. In some apps, it's not always super easy to differentiate between background and foreground elements, especially for those with visual impairments, but increasing the contrast between the two can help to make things clearer.

The reduced motion settings do away with a lot of the graphical movements of iOS, like those triggered by swiping gestures or even the subtle parallax effect of icons on the Home screen. These are touches of whimsy that can actually be of detriment to some users' experience. You can also reduce motion on Apple Watch.

How to use FaceTime to make video calls on your iPhone or iPad

FaceTime is Apple's voice over IP (VoIP) calling service. It allows anyone with a recent iPhone, iPod touch, iPad, or Mac to make free video (or audio) calls to any other Apple user over Wi-Fi or cellular connection. That makes it perfect for keeping in touch with family who lives far away, with the kids while traveling, with business partners at distant offices, or even with that special someone while shopping for the perfect gift. It also makes it a great accessibility feature for anyone who is deaf or hard of hearing — you can visually communicate with sign language over a FaceTime video call.

How to connect to hearing aids and use audio accessibility on your iPhone or iPad

Hearing aid support is an accessibility feature that allows the iPhone and iPad to connect with and manage compatible hearing aids. You can connect to most Bluetooth-enabled hearing aids as well as special Made of iPhone (and iPad) hearing aids that use a special version of Bluetooth to provide greater power efficiency and higher quality digital audio. Made for iPhone (and iPad) hearing aids can also be placed into Live Listen mode where anyone with a hearing impairment can use the iPhone's mic to help pick up conversation and sound.

How to lock attention to a specific app with Guided Access for iPhone and iPad

Guided Access lets you lock the iPhone or iPad to a single app. For as long as guided access is enabled, only that one specific app can be used, and there's no way to exit it for the Home screen or any other app. Guided Access can be extremely useful in education settings, to help kids focus on learning math, language, and other skills, and for working with people on the autistic spectrum. Whether it's a writing app, drawing app, music app, math app; or a story, video, or reading app, guided access helps make sure that all attention remains on that app.

Guided access can also be used by kiosks, restaurants, stores, and other businesses to create a dedicated information or transaction device, and it can even be used to create a "guest mode" so you can hand your device to someone and let them use Safari, iBooks, Video, or a game without having to worry about them snooping through your personal information.

How to enable AssistiveTouch on iPhone or iPad

AssistiveTouch is an accessibility feature that makes the iPhone and iPad easier to use for anyone with motor control, coordination, or other forms of physical impairment. With AssistiveTouch a special on-screen menu lets you easily tap or perform other gestures instead of potentially more difficult or complex manipulations like pressing the hardware Home button, pressing multiple buttons at the same time, or performing other gestures that are uncomfortable or impossible. The iPhone and iPad can even interface with third-party assistive devices to make sure that, even if they're wheelchair mounted, they remain as accessible and functional as possible for as many people as possible.

How to enable Switch Control on iPhone and iPad

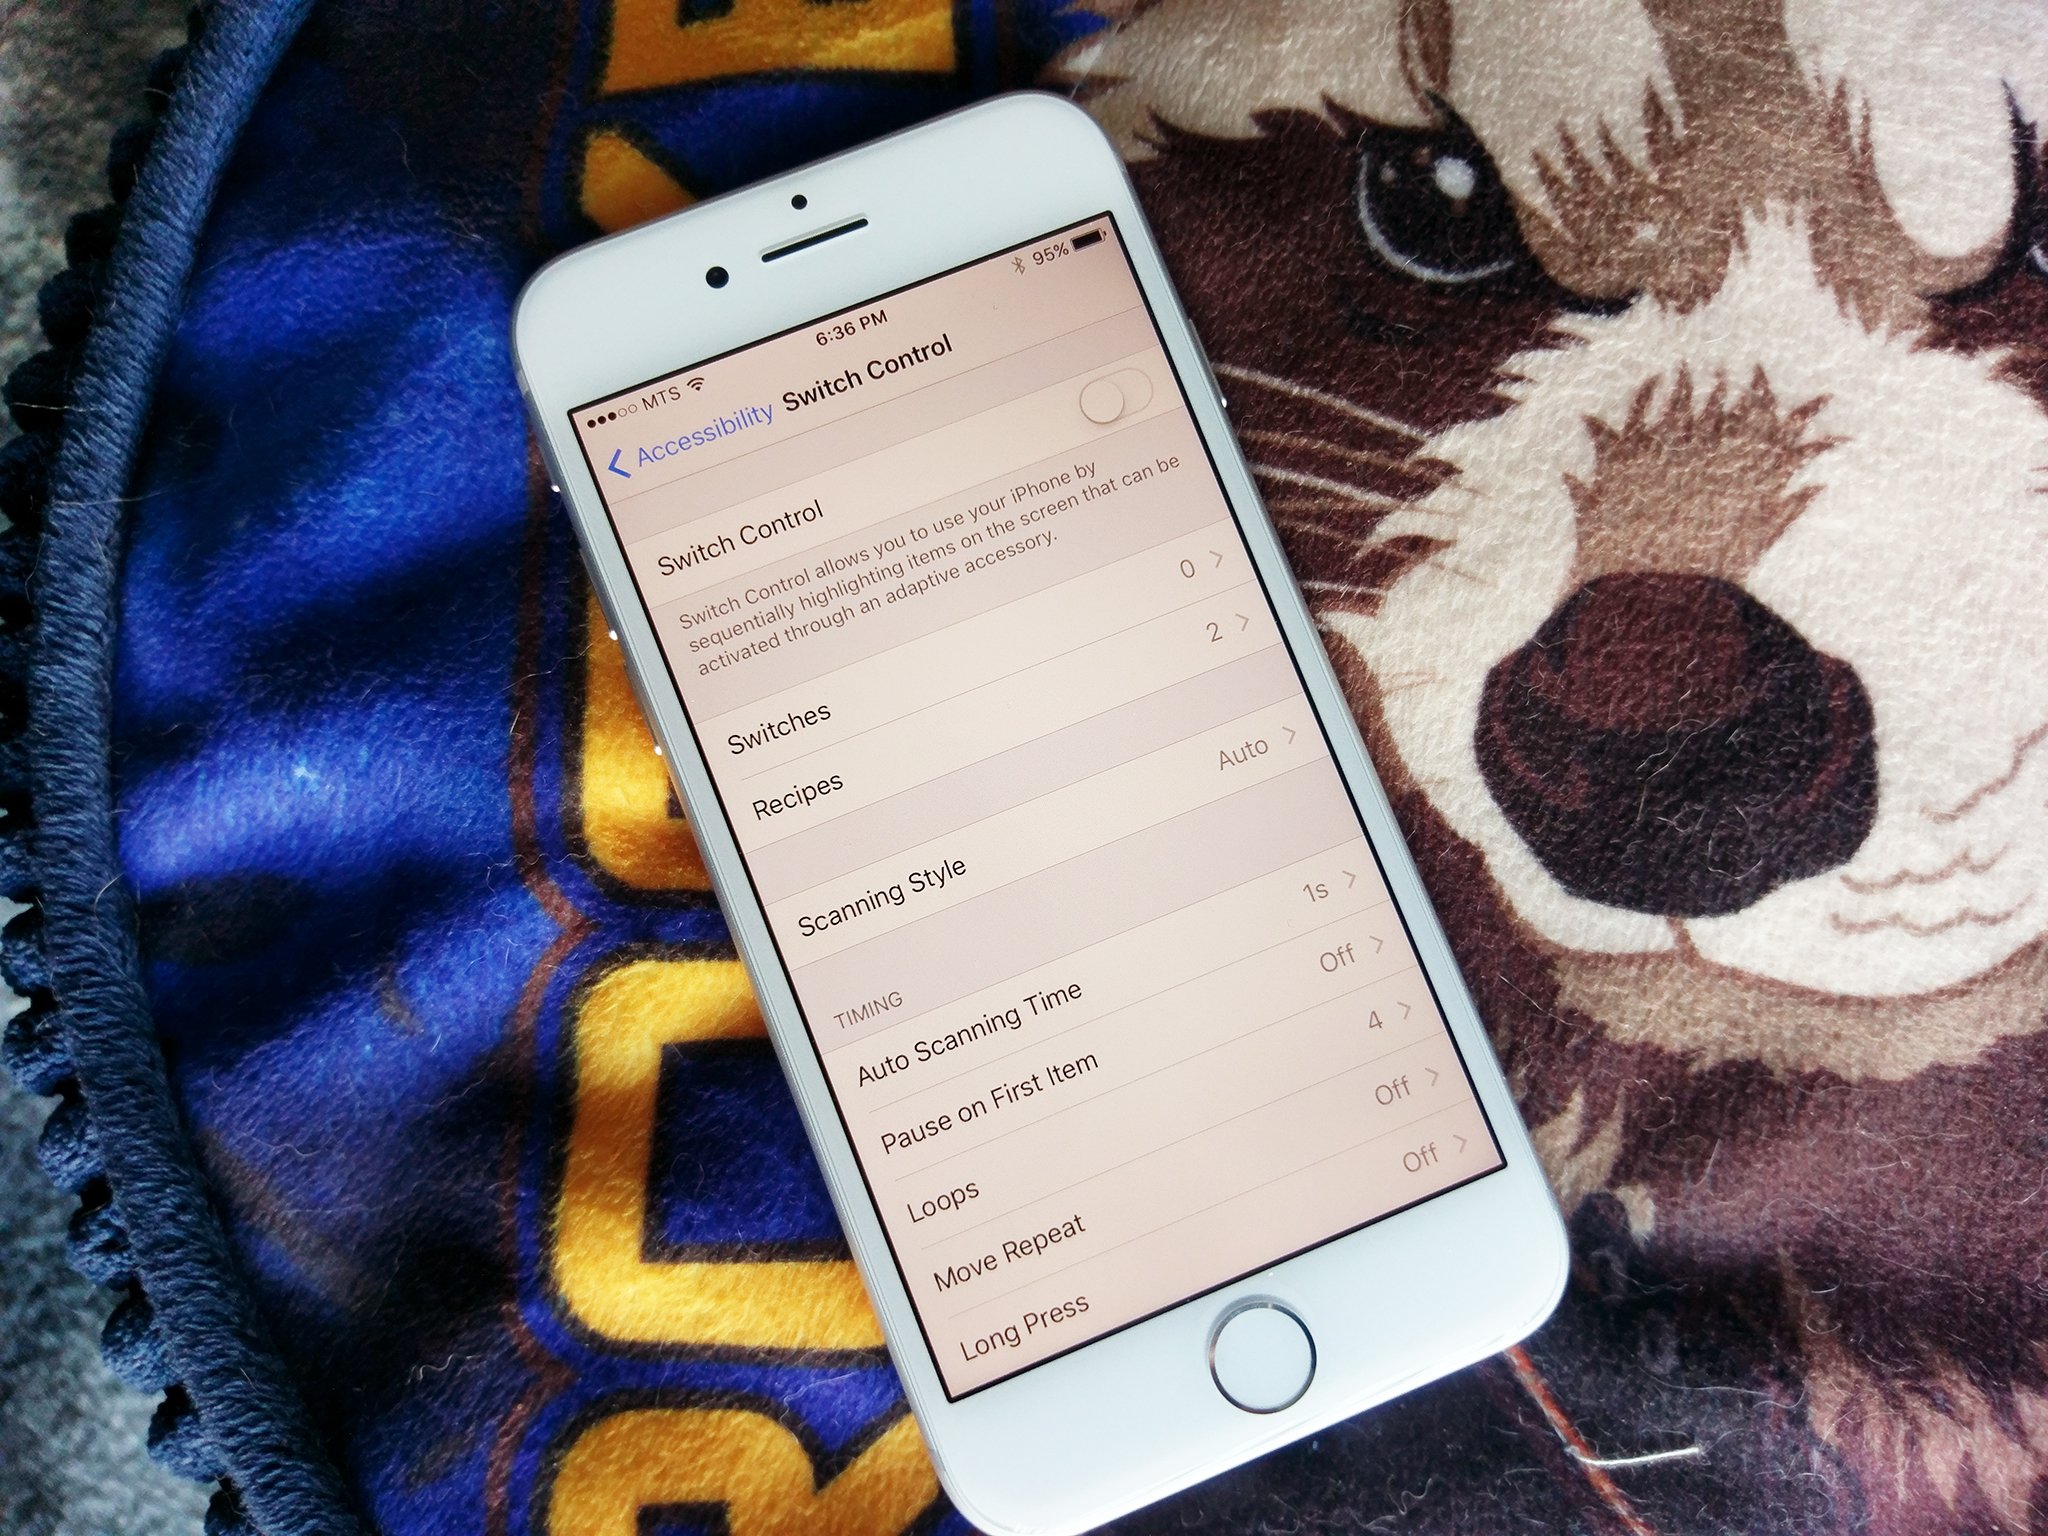
Switch Control is designed to make the iPhone and iPad easier to use for anyone with a physical and/or motor skills impairment. With Switch Control, you can scan between items, use crosshairs to pick specific points, or manually select items using multiple switches, and then use an external adaptive switch, your iPhone or iPad screen itself, or even the front FaceTime camera to trigger the switch. Both hardware buttons and software interface elements can be selected and triggered with switches and a variety of options let you set them up just exactly the way you want or need them.

How to change the Home button and Face ID behavior on iPhone and iPad

Changing how Face ID works on modern iPhone models like the iPhone 13, or the Home button behavior on iPhone SE and other classically-shaped iPhones, is a great accessibility feature for those with motor impairments. Home-click speed lets you increase the interval of time needed for your iPhone or iPad to recognize a double- or triple-click. Disabling Face ID Attention Awareness allows you to unlock your iPhone or iPad with Face ID if you're not able to look directly at it.

For the Home button, by default, if you want to enter multitasking app switcher or bring up the accessibility shortcut you need to double or triple tap quickly, each click following in a very short period of time. Adjusting the speed lets you set a slow or even slower pace, so you have all the time you need to get the right amount of clicks in.

How to enable Reachability for one-handed use of your iPhone

All models of iPhone have a large screen size these days. That's great for watching movies and playing immersive games, not so great for reaching to the top of the screen with the same hand you're holding the iPhone with. With Reachability, you can access buttons and icons at the top of the screen without having to use two hands.

How to set the triple-click Home or Side button shortcut on iPhone and iPad

The triple-click accessibility shortcut lets you rapidly access one or more features without having to dive into Settings each time. With the shortcut, a quick triple-click of the Home button on iPhone and iPad (or the Side button for Home button-less models) can trigger VoiceOver or Zoom, invert colors, enable AssistiveTouch, or can even bring up a menu so you can choose from several options.

If you don't want one or more accessibility features on all the time, but you use them often enough that you want to access them easily at any time, or different members of the family or group who share a device have different accessibility needs, the triple-click shortcut is for you.

A more inclusive iOS

As you can see, there are a lot of useful accessibility-related tools and settings that can help customize the iOS experience to your particular needs.

Ultimately, the best iPhone or iPad experience is going to depend on what you can get out of the devices you are using each day. While you likely won't need all of the features above, you'll be glad that the few you may need are ready and waiting to be used.

Updated March 2022: Updated for iOS 15 and iPadOS 15.

Voice Controls in Monterey let you command your Mac — here's how!

$
0
0

Yes, you can control your Mac as you speak!

With Voice Control in macOS Monterey, users can use speech commands to control their devices. The feature has been designed for those folks with limited agility, mobility, and other conditions available on iPhone, iPad, and Mac. However, it also serves as a great new way to interact with your devices.

Voice Control works on all of your favorite Macs, available for your accessibility needs.

How to turn on Voice Controls on Mac

If you're using Voice Control for the first time, you'll need to set it up by following these steps:

  1. Click on System Preferences on your Mac's Dock.

  2. Select Accessibility.
  3. On the Accessibility page, tap Voice Control under the Motor section.
  4. Check the box for Enable Voice Control.

How to wake/sleep Voice Controls on Mac

You can wake and sleep Voice Control by doing the following:

  1. Click Wake on the Voice Control icon to wake the tool.
  2. Click Sleep on the Voice Control icon to put the tool to sleep. During this time, Voice Control won't work.

How to change the Voice Controls language on Mac

Voice Control uses your default language at startup. To change:

  1. Click on System Preferences on your Mac's Dock.

  2. Select Accessibility.
  3. On the Accessibility page, tap Voice Control under the Motor section.

  4. Click on the pull-down next to Language.
  5. Select Customize.
  6. Tap the box for the language(s) you'd like to add.
  7. Choose OK.

How to select a new language in Voice Controls on Mac

  1. Tap the current language noted on the Voice Control icon on the right side of your device.
  2. Choose the language you now want to use.

How to enable/disable commands in Voice Controls on Mac

You can enable/disable any command in Voice Control, including those created by Apple and yourself:

  1. Click on System Preferences on your Mac's Dock.

  2. Select Accessibility.
  3. On the Accessibility page, tap Voice Control under the Motor section.

  4. Click on the Commands button.
  5. Check the box(es) for the commands(s) you want to enable or uncheck the box(es) for the command(s) you want to disable.
  6. Click on the Done button.

How to create custom commands in Voice Controls on Mac

Yes, you can add personal commands to work with Voice Controls. To add Custom Commands:

  1. Click on System Preferences on your Mac's Dock.

  2. Select Accessibility.
  3. On the Accessibility page, tap Voice Control under the Motor section.

  4. Click on the Commands button.
  5. Select +.
  6. Next, add your command in the When I say box. By default, this command is usable across all apps.
  7. To restrict the command to only one app, click on the While Using pull-down menu.
  8. Choose the app you'd like to use with your custom command.
  9. Choose how this command is Performed from the pull-down menu.
  10. Select Done.

You can now use this new custom command as you would others with Voice Control.

How to delete custom commands in Voice Controls on Mac

You can permanently delete any custom command for Voice Controls:

  1. Click on System Preferences on your Mac's Dock.

  2. Select Accessibility.
  3. On the Accessibility page, tap Voice Control under the Motor section.

    >

  4. Click on Commands button.
  5. Highlight the command to delete under Custom.
  6. Select -.
  7. Click Delete to confirm the deletion.

Your custom command is no longer usable through Voice Control on Mac.

How to change the microphone for Voice Controls on Mac

By default, Voice Control will use your Mac's built-in microphone. You can change this to another microphone when available:

  1. Click on System Preferences on your Mac's Dock.

  2. Select Accessibility.
  3. On the Accessibility page, tap Voice Control under the Motor section.

  4. Click on the pull-down menu next to Microphone.
  5. Choose the microphone to use.

How to receive an alert when a command is recognized in Voice Controls on Mac

You can receive a sound alert each time a command is recognized:

  1. Click on System Preferences on your Mac's Dock.

  2. Select Accessibility.
  3. On the Accessibility page, tap Voice Control under the Motor section.
  4. Click the box next to Play sound when command is recognized.

So much to do

Voice Control works on all the best Macs, including the 24-inch iMac. As you can see, there's a lot you can do simply using your voice on Mac, thanks to the built-in Voice Controls. So start using them today and make your computing life much easier.

Updated April 2022: Refreshed for macOS Monterey.

Changing the look of closed captions on Mac is easy to do

$
0
0

Need captions on your Mac? We got you!

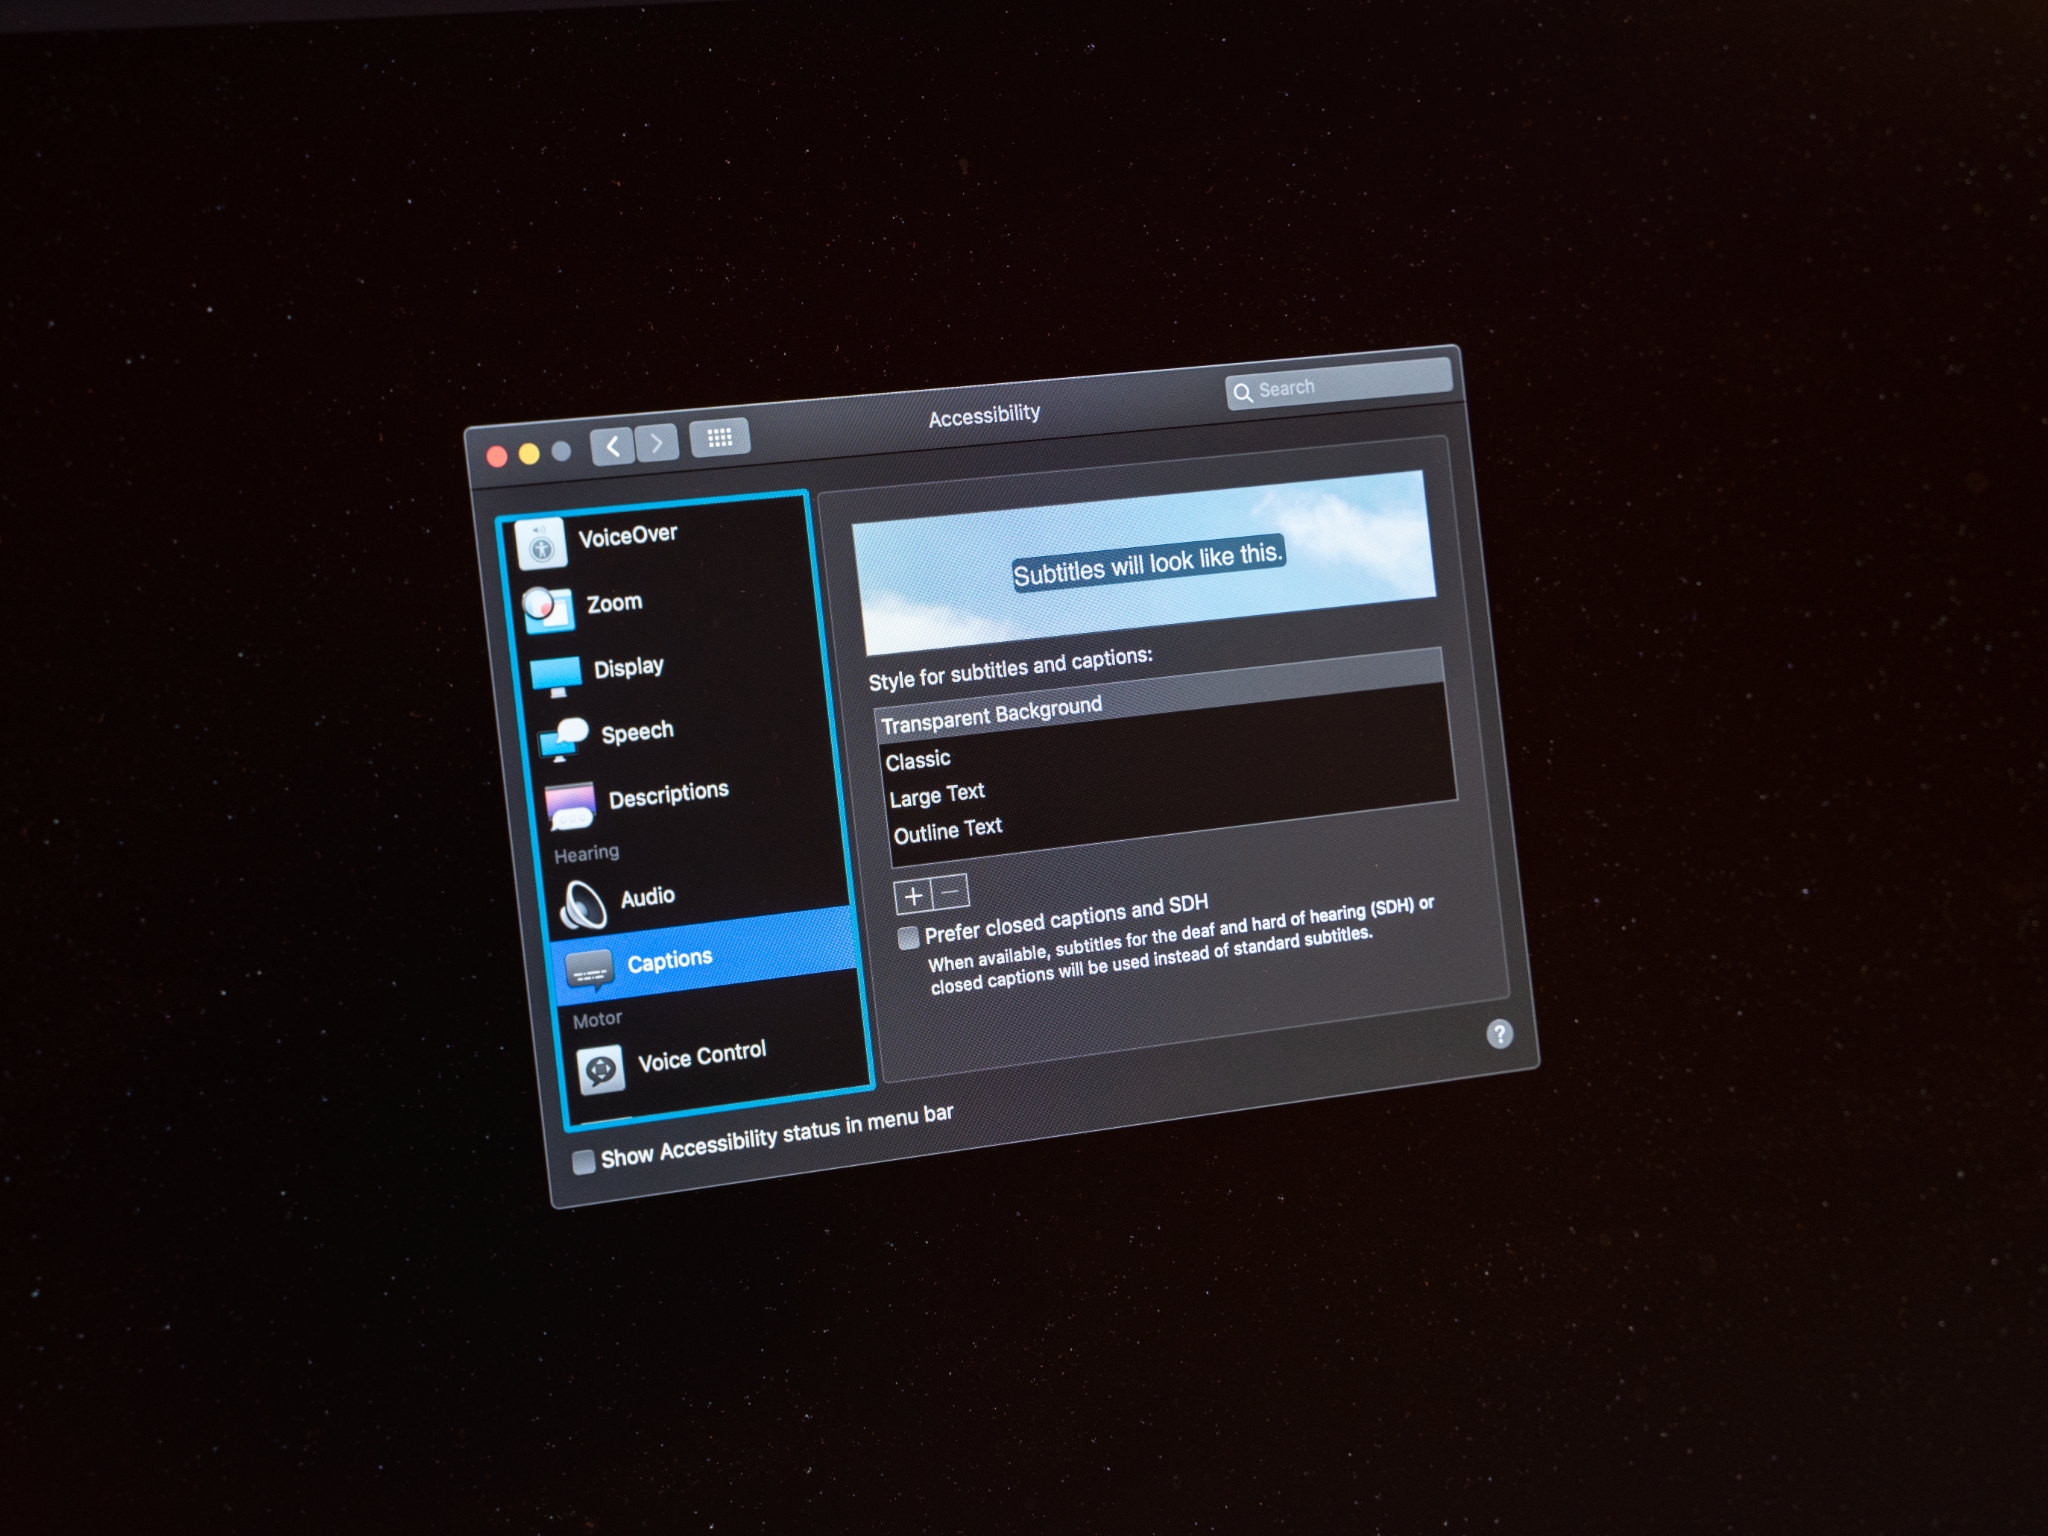
Just like enabling closed captions on your TV, you can do the same in Accessibility on your Mac, and they'll be there for you when available. And you don't just have to stick with one style. If the default reverse text is too hard to read, you can switch it up to different presets or create your own.

Here's how to change the look of closed captions in macOS Monterey.

How to change the preset caption style on Mac

  1. Click the Apple menu button on the top left of your screen.
  2. Click System Preferences.
  3. Click Accessibility.

  4. Click Captions in the menu on the left. You'll have to scroll down just a bit.
  5. Click one of the caption style options:

    • Transparent Background
    • Classic
    • Large Text
    • Outline Text

The window above the choices will preview each one so you can decide which works best for you.

How to create custom captions on Mac

  1. Click the Apple menu button on the top left of your screen.
  2. Click System Preferences.
  3. Click Accessibility.

  4. Click Captions in the menu on the left. You'll have to scroll down just a bit.
  5. Click the + button below the three style presets.

  6. Enter a name for the style next to Style Name.
  7. Click the dropdown menu next to Background Color.
  8. Click a background color.

  9. Click the dropdown menu next to Background Opacity.
  10. Click an opacity option.
  11. Click the dropdown menu next to Text Color.
  12. Click a text color.

  13. Click the dropdown menu next to Text Size.
  14. Click a text size.
  15. Click the dropdown menu next to Font.
  16. Click a font.

  17. Click the checkbox next to each dropdown menu to allow or deny video the ability to override each setting.
  18. Click OK when you're finished.

How to enable closed captions and SDH by default on Mac

When available, you can use closed captions and subtitles for the deaf and hard of hearing (SDH) by default.

  1. Click the Apple menu button on the top left of your screen.
  2. Click System Preferences.
  3. Click Accessibility.

  4. Click Captions in the menu on the left. You'll have to scroll down just a bit.
  5. Click the checkbox next to Prefer closed captions and SDH.

Check out some other accessibility features

Apple has always tried to provide good Accessibility features, but in recent years they have really stepped up their game. One of our personal favorites is Voice Control, which lets you control your best Mac with only your voice.

In fact, our own writer, Luke Filipowicz, broke his hand a few years ago and came to rely on Voice Control quite extensively during his post-op recovery.

It just goes to show that having high-quality Accessibility features is good for everyone, because you never know when you might need them yourself.

Updated April 2022: Includes latest macOS Monterey information.


Using Real-Time Text (RTT) on Mac allows you to make calls too!

$
0
0

Yes, you can make Real-Time Text (RTT) calls on Mac. Let's do this.

In macOS Monterey, you can use the real-time text (RTT) protocol for conversational text calls. In the United States, you can make and receive RTT calls on Macs introduced in 2012 and later, except for the Mac Pro. With RTT, you can transmit conversational text as it is typed or created. The newest technologies that make this possible include instant messaging, Text over IP, and IP relay. Here's how to do it.

To use RTT on any of our favorite Macs, you must have macOS Mojave 10.14.2 or later. It would help if you also had an iPhone with a carrier plan from AT&T, T-Mobile, or Verizon. Standard voice call rates apply.

How to set up RTT on Mac

To use RTT on Mac, you must first set up Wi-Fi calling on your iPhone and add your Mac as one of the other devices to be used for Wi-Fi calling.

From there:

  1. Choose the Apple icon at the top left of your Mac.
  2. Select System Preferences from the pull-down menu.
  3. Click Accessibility.

  4. Select RTT in the sidebar.
  5. Toggle On Enable RTT.

  6. Toggle On Send Immediately to send characters as you type them.
  7. Enter the U.S. RTT relay number, 711.

RTT is ready to go on your Mac.

How to make an RTT call on Mac

You use FaceTime to make RTT calls on Mac. You can begin either through the Contacts or FaceTime app.

To use with Contacts:

  1. Click Finder on the Mac dock.
  2. Choose Go on the menu bar.

  3. Select Applications.
  4. Choose Contacts.

  5. Select the RTT button for the person you want to call by moving the pointer over the person's phone number.

To use with FaceTime directly:

  1. Click Finder on the Mac dock.
  2. Choose Go on the menu bar.

  3. Select Applications.
  4. Choose FaceTime.

  5. Click the audio button next to the contact or after entering a phone number.
  6. Choose RTT Call or RTT Relay Call from the pop-up menu.

Once a call gets answered:

  1. Click RTT to begin exchanging text messages. While texting, you can also speak through your microphone, if available, or click Mute to mute your microphone.
  2. Type your message.
  3. Press Return or click the send arrow to send it. If Send Immediately is turned on in RTT preferences, the other person sees your message as you type it.
  4. To hide your conversation, click RTT. While the conversation is hidden, you won't see the other person's messages. Click the button again to return to the discussion.

How to answer and end an RTT call on Mac

To answer an RTT call on Mac:

  1. Click Accept to answer it.
  2. Select RTT to begin exchanging text messages.

To end an RTT call on Mac, click End.

More about accessibility

Macs offer terrific accessibility tools, including those shown above. Sometimes even if you don't technically need to use the accessibility tools, they can help you to have a more organized and smooth Mac experience. Start using them today to maximize your computing work and entertainment.

Updated May 2022: Updated for macOS Monterey.

Make your Apple Watch easier to read with the Zoom Accessibility feature

$
0
0

Zoom increases the magnification of the Apple Watch interface, making it bigger for the visually impaired. Here's how to use Zoom on Apple Watch

When it comes to reading text on your wrist, even the best Apple Watch can be a little small for some people. Luckily, you don't have to squit your eyes any longer!

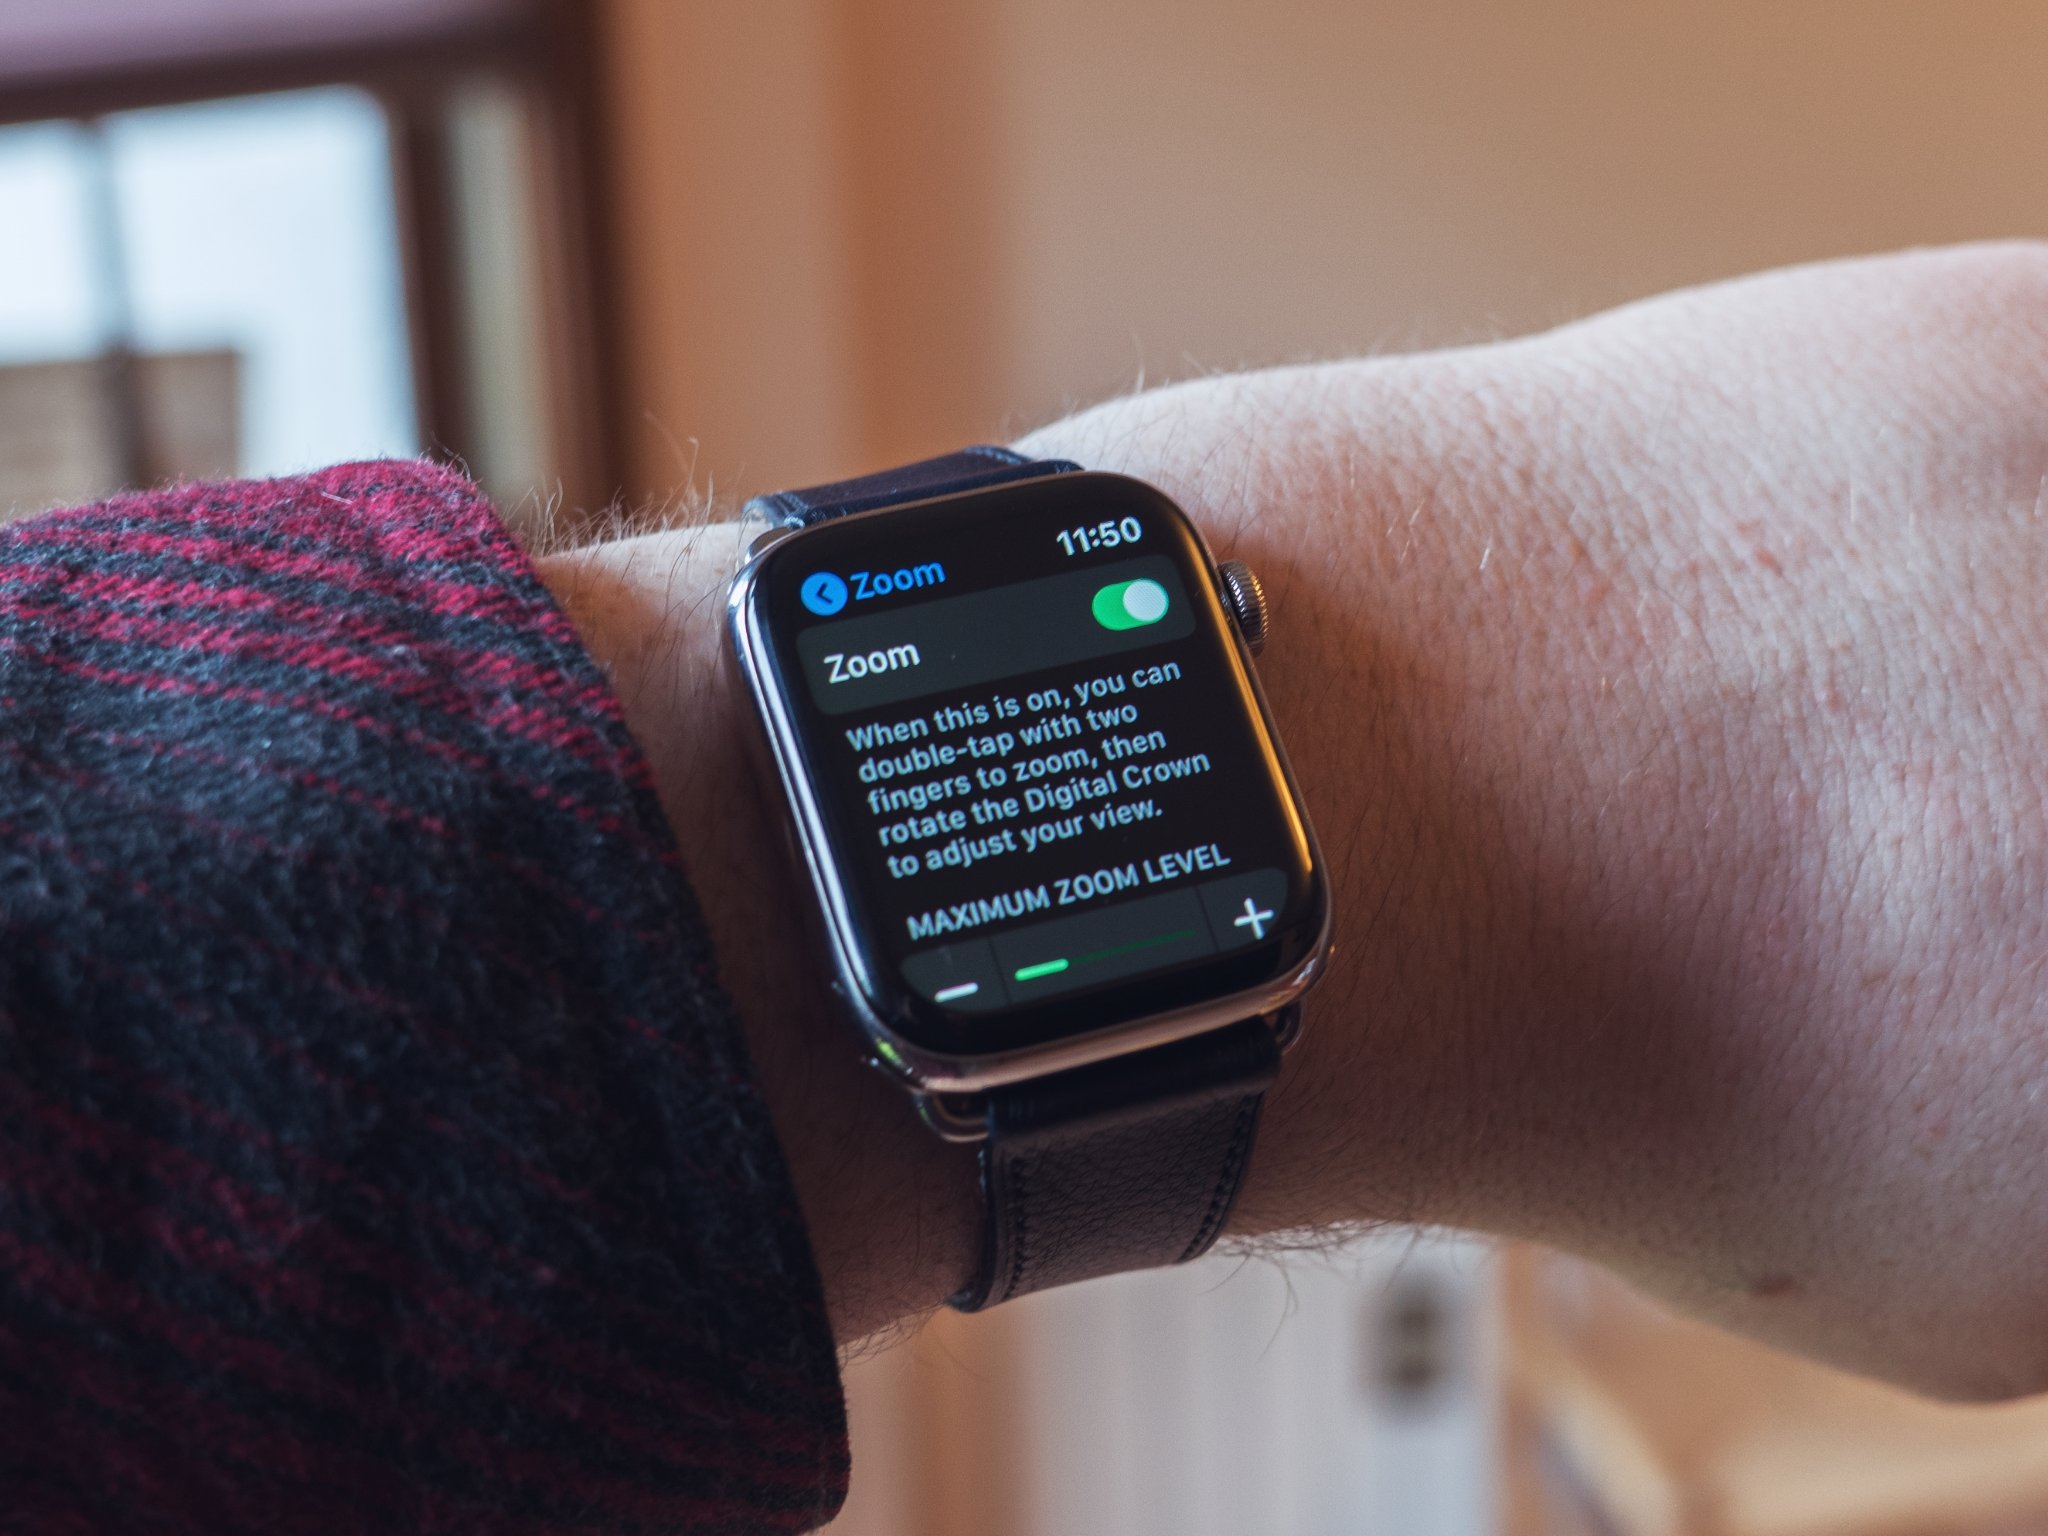
In watchOS 8, Zoom allows you to enlarge text and other elements on your Apple Watch display to appear larger when you tap the display. For those with visual impairments or partial blindness, it's a huge help to be able to see your favorite Apple Watch much clearer when you're interacting with it. Plus, when you learn how to use Zoom on Apple Watch, you'll be able to zoom in to the display when you want and zoom out too, meaning it will look like a normal Apple Watch display when you want it to. Here's how to set up and use Zoom on Apple Watch.

How to enable Zoom on the Apple Watch

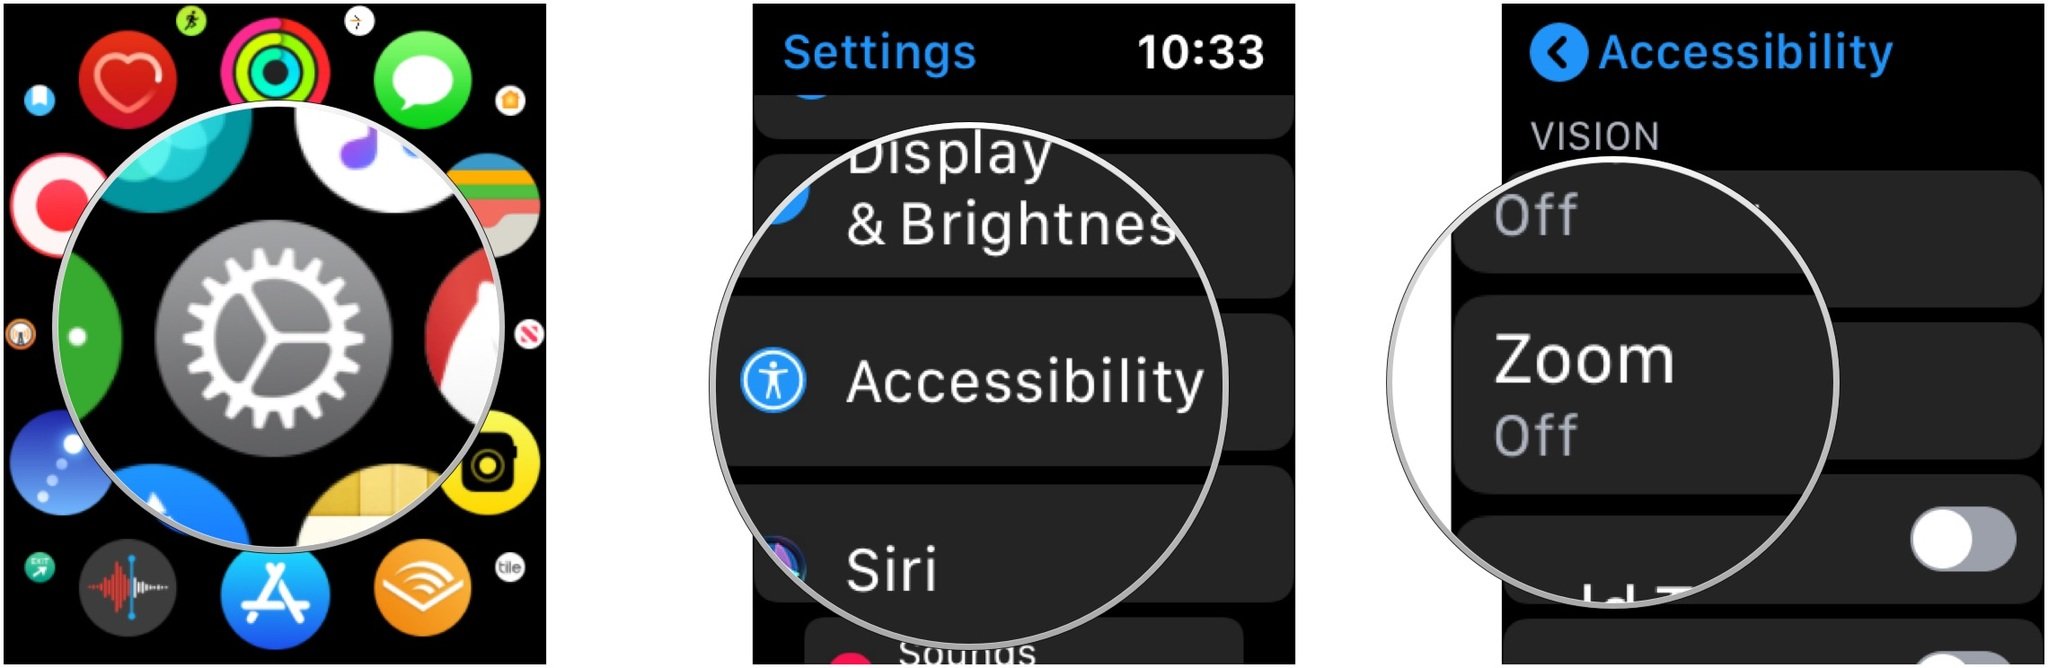
  1. Launch the Settings app from your Apple Watch Home screen.
  2. Tap on Accessibility.
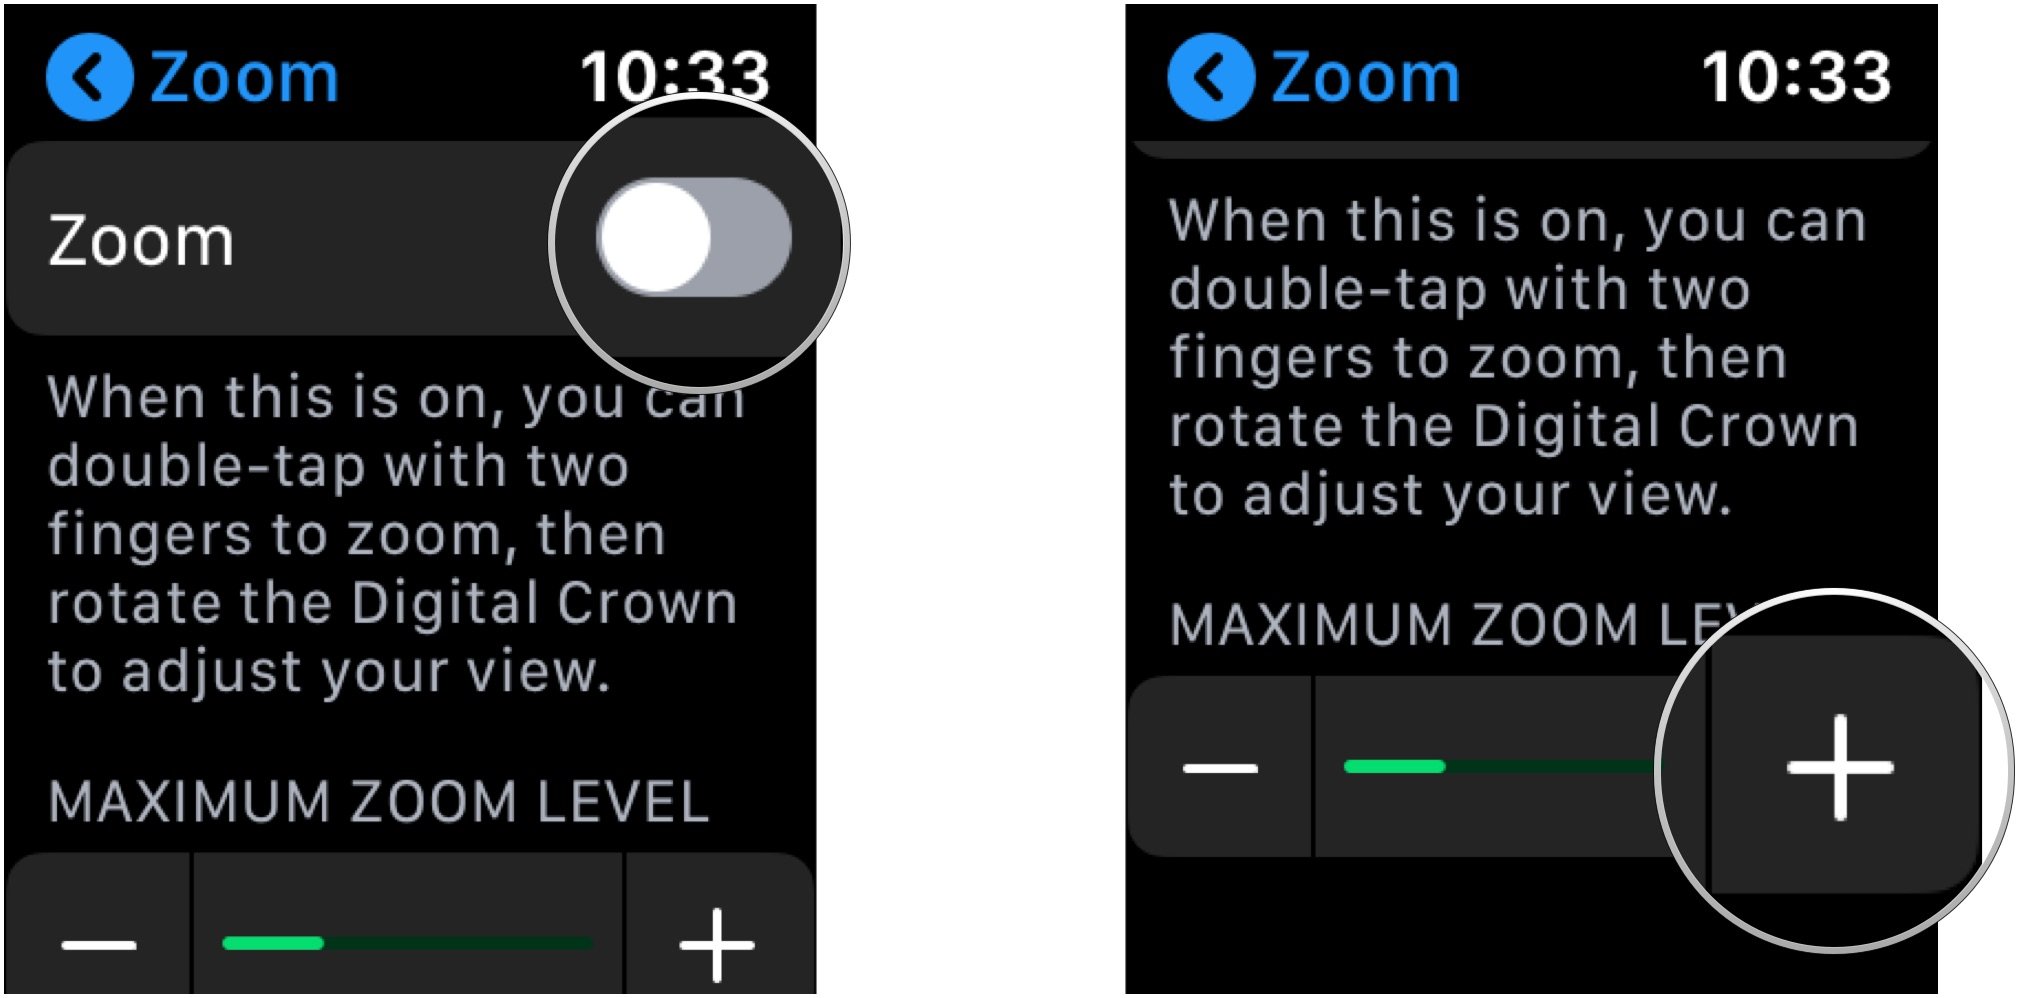
  3. Tap on Zoom.

  4. Tap the switch next to Zoom to the green 'on' position.
  5. Tap the + or - buttons to increase or decrease the maximum zoom level.

To disable Zoom, repeat the same steps and toggle Zoom to OFF (gray).

How to enable Zoom using the Apple Watch app for iPhone

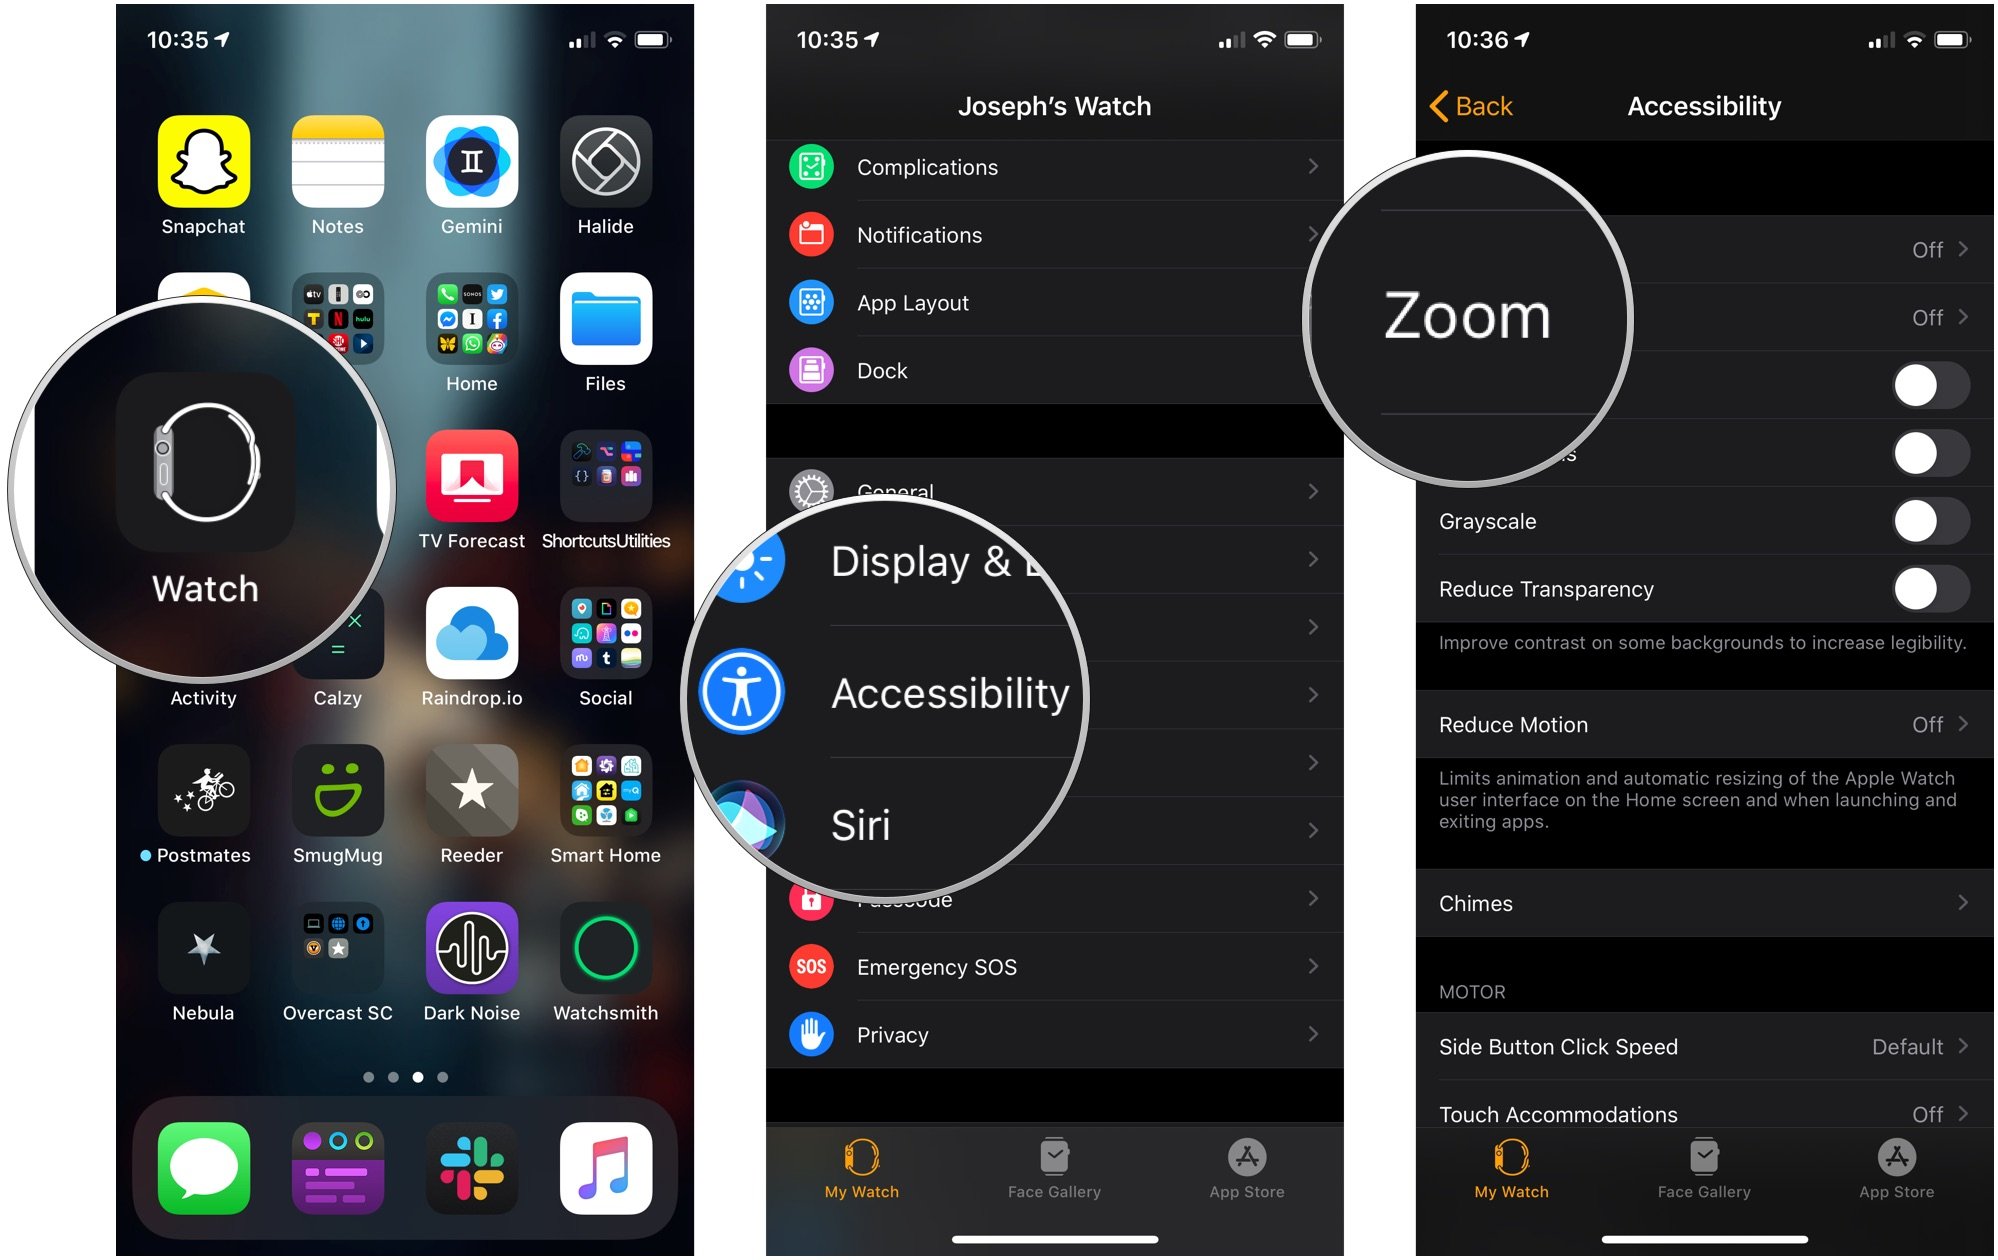
  1. Launch the Apple Watch app from your iPhone Home screen.
  2. Tap on Accessibility.
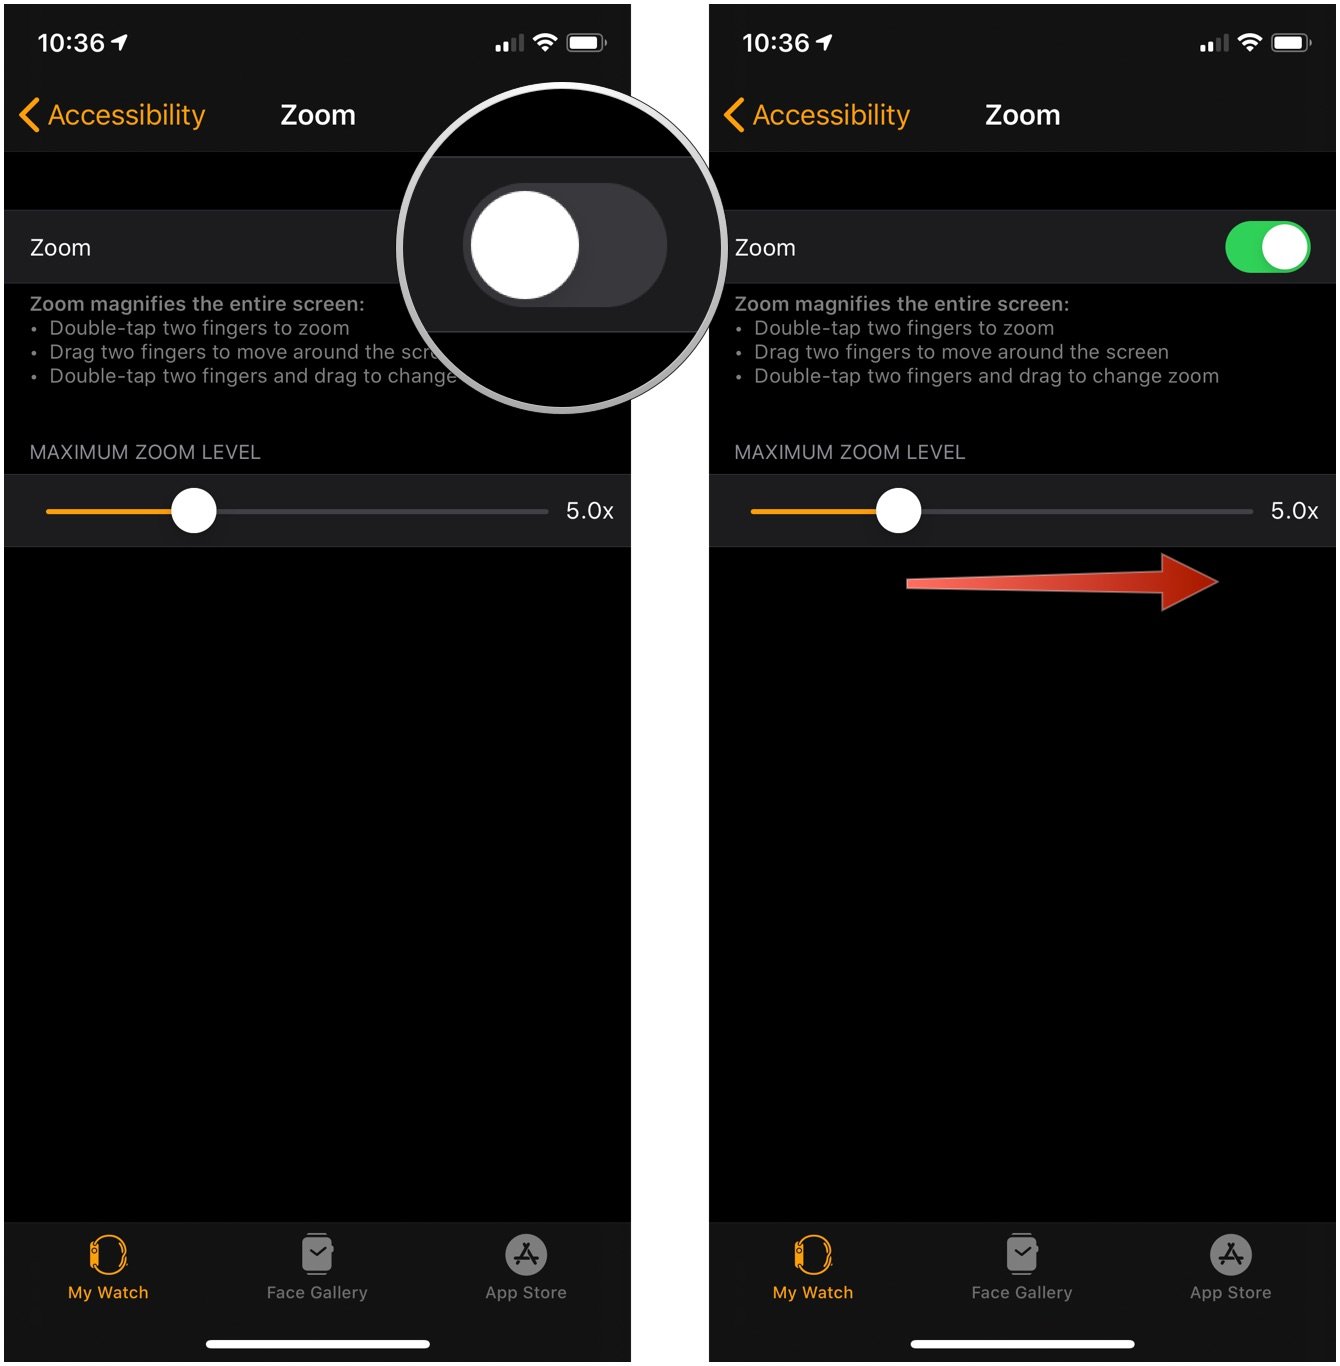
  3. Tap on Zoom.

  4. Tap the switch next to Zoom to the green 'on' position.
  5. Drag the slider left or right to adjust the maximum zoom level.

To disable Zoom, repeat the same steps and toggle Zoom to OFF (gray).

How to control Zoom on your Apple Watch

Controlling zooming on your Apple Watch is all about double taps.

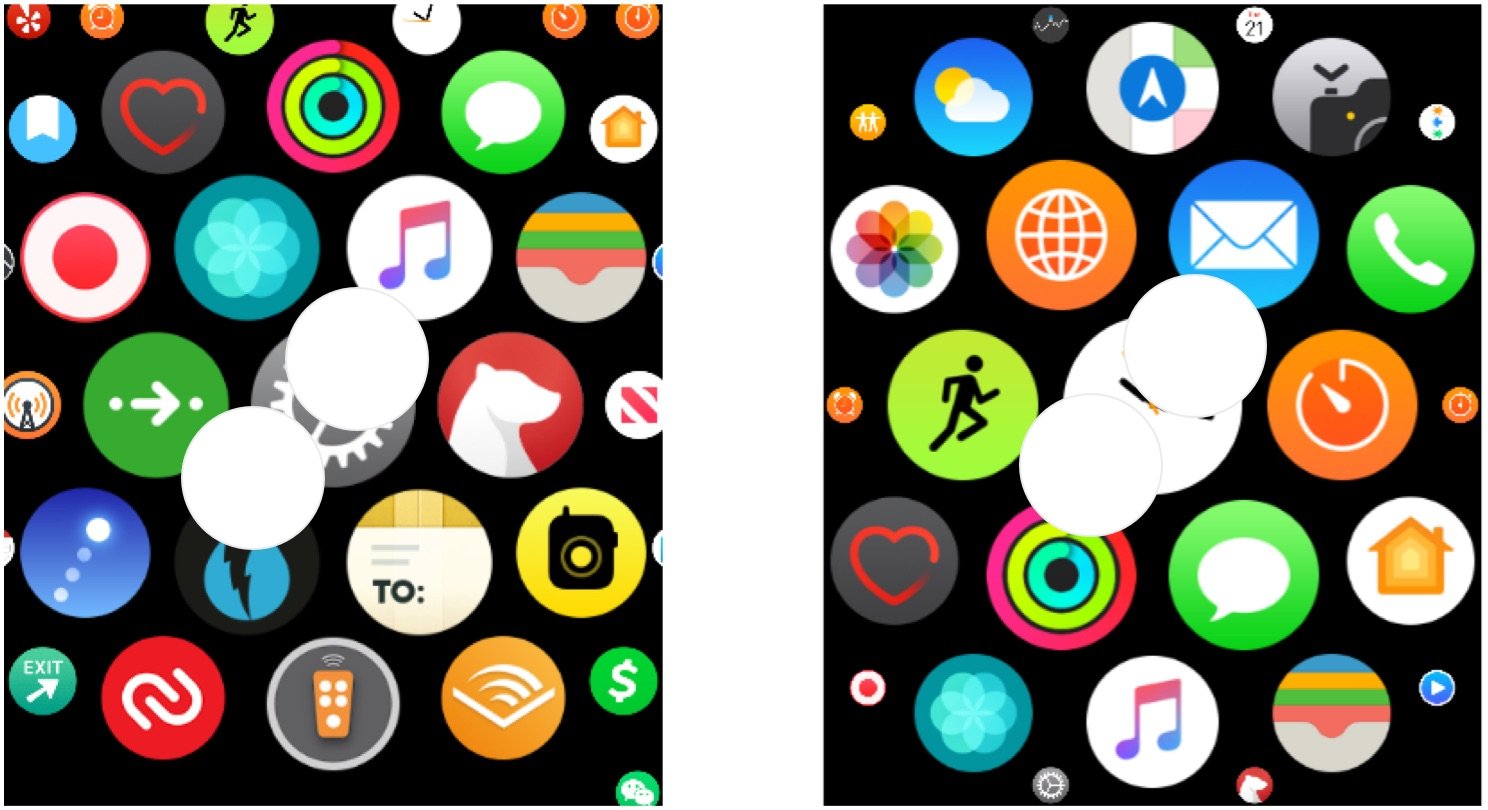
  1. Double-tap with two fingers to zoom into the display on your Apple Watch.
  2. Double-tap, hold, and drag with two fingers to adjust the degree of zoom on the Apple Watch.

Need more help navigating your Apple Watch?

I firmly believe that when tech because more accessible, it benefits everyone. The good news is Apple seems to take accessibility seriously, and new features that are designed to help those who can't interact with their Apple Watch the same way others keep getting added to the software. The most recent one was AssistiveTouch.

With AssistiveTouch on Apple Watch, you can control apps and navigate through menus without touching the screen. The tool uses the Apple Watch's gyroscope, accelerometer, and optical heart rate sensor to recognize movements to navigate your Apple Watch. While it was designed to help people with limb differences, anyone can learn how to use AssitiveTouch on Apple Watch as long as you are running iOS 15, watchOS 8, and have an Apple Watch Series 4 or newer.

Updated May 2022: Updated for the latest version of watchOS 8.

Apple says major new accessibility tools are coming this year

$
0
0

Apple's accessibility lineup is growing significantly in 2022 once these new features arrive.

What you need to know

  • New tools are coming this year.
  • Includes hardware, software, and machine learning.
  • Across multiple Apple products.

Update, May 17 (5:50 pm ET): Greg Joswiak shared a video showing how Apple's new accessibility feature "Door Detection" will work.

On Tuesday, Apple previewed new software features for users with disabilities. The new tools, expected to launch later this year, use hardware, software, and machine learning advancements. They touch many of Apple's leading software and hardware properties.

Among the new features are Door Detection, which will allow those who are blind or have low vision to use their iPhone and iPad to navigate the last few feet to their destination, Voice Control, and Switch Control for users with physical and motor disabilities so they can fully control Apple Watch from their mobile devices with Apple Watch Mirroring, and LIve Captions for the Deaf and hearing community for iPhone, iPad, and Mac. Apple also is expanding support for screen reader VoiceOver with over 20 new languages and locales.

As Sarah Herrlinger, Apple's senior director of Accessibility Policy and Initiatives, explains: "Apple embeds accessibility into every aspect of our work, and we are committed to designing the best products and services for everyone. We're excited to introduce these new features, which combine innovation and creativity from teams across Apple to give users more options to use our products in ways that best suit their needs and lives."

Described by Apple as a "cutting-edge navigation feature," Door Detection combines the power of LiDAR, camera, and on-device machine learning. It will be available in a new Detection Mode within Magnifier, the company's built-in app that supports blind and low vision users.

Meanwhile, new advances with Apple Watch through Apple Watch Mirroring will allow users to control Apple Watch remotely from their paired iPhone. With Apple Watch Mirroring, users can take advantage of iPhone's assistive features like Voice Control and Switch Control and use inputs like voice commands, sound actions, head tracking, etc. The mirroring technology uses hardware and software integration, including advances built into AirPlay.

For the Deaf and hard of hearing community, the company will soon introduce Live Captions for iPhone, iPad, and Mac. The technology will allow users to follow along more easily with any audio content for a much more helpful experience. Examples of use include placing FaceTime calls, using a video conferencing or social media app, streaming media content, and more.

Apple's VoiceOver technology is coming to 20 additional locales and languages, including Bengali, Bulgarian, Catalan, Ukrainian, and Vietnamese. Additionally, VoiceOver users on Mac can use a new Text Checker tool to discover common formatting issues such as duplicative spaces or misplaced capital letters, making proofreading documents or emails even more manageable.

Other new accessibility features announced today, May 17, including

With Buddy Controller, users can ask a care provider or friend to help them play a game; Buddy Controller combines any two game controllers into one, so multiple controllers can drive the input for a single player.

With Siri Pause Time, users with speech disabilities can adjust how long Siri waits before responding to a request.

Voice Control Spelling Mode gives users the option to dictate custom spellings using letter-by-letter input.5

Sound Recognition can be customized to recognize sounds that are specific to a person's environment, like their home's unique alarm, doorbell, or appliances.

The Apple Books app will offer new themes, and introduce customization options such as bolding text and adjusting line, character, and word spacing for an even more accessible reading experience.

These features will be available later this year with software updates across Apple platforms.

Update, May 17 (5:50 pm ET)— Greg Joswiak shared a video showing how Apple's new accessibility feature "Door Detection" will work.

Greg Joswiak, Apple's Senior Vice President of Worldwide Marketing, posted a video to Twitter showing how the company's new accessibility feature "Door Detection" will work. The video was in the press release but if you didn't happen to read that you can still check out the new feature below:

For accessibility, using Real-time text (RTT) on iPhone is best

$
0
0

If you have an iPhone 6 or later, you can use Real-time Text.

Did you know you can use the Real-time text (RTT) protocol for conversational text calls on the iPhone? In the United States, you can make and receive RTT calls on the iPhone 6 and later. With RTT, you can transmit conversational text as soon as you — or the person you are talking to — type it out. The newest technologies that make this possible include instant messaging, Text-over-IP, and IP-relay. Here's how to use RTT on your iPhone.

How to set up RTT on iPhone

To use RTT on your iPhone, you must have a compatible carrier plan in the United States or Canada. Your iPhone also must be running iOS 10 or later. Here's how to get started with RTT:

  1. Launch the Settings app on your Home screen.
  2. Scroll down and tap Accessibility.
  3. Tap RTT/TTY.

  4. Tap the toggle for Software RTT.
  5. Tap Relay Number and enter the phone number for TTY relay calls.
    • In the United States, enter 711.
  6. Tap the back button.

  7. Tap the toggle for Send Immediately if you want to send characters as you type. Otherwise, you'll need to type full messages before you send them.
  8. Tap the toggle for Answer All Calls as RTT/TTY so you don't receive voice calls. If not, you can still upgrade calls using the RTT button (see below). Confirm by tapping Answer All Calls as RTT/TTY.
  9. Tap the toggle for Hardware TTY to answer and make TTY calls from an external TTY device instead of the iPhone. In this case, make sure that you also turn on Answer All Calls as TTY.

  10. Tap the toggle for Answer RTT Calls as Muted if you want your iPhone's microphone to default to muted when answering a call.
  11. Tap the toggle for Show Notifications to receive alerts for messages while away from the call.

How to make an RTT call on iPhone

To make a call using RTT on your phone:

  1. Launch the Phone app on the Home screen.
  2. Tap Contacts at the bottom.
  3. Tap the name of the person you wish to call.

  4. Tap the person's phone number.
  5. Tap RTT/TTY Call or RTT/TTY Relay Call.

  6. Wait for the call to connect, then tap the RTT icon.
  7. Enter your message. If you turned on Send Immediately in the Settings, your recipient sees your message as you type. Otherwise, enter your message, then tap the up arrow to send.
  8. To end the call, tap the back button at the top left
  9. Tap the hang up button.

How to answer an RTT call on iPhone

With RTT enabled, you can answer RTT calls with just a tap. Here's how:

  1. Tap the RTT button, which shows instead of the default answer button.
  2. Tap RTT to upgrade the call to a text conversation.

How to turn an existing voice call into RTT on iPhone

If you want to turn an existing voice call into RTT:

  1. Tap Use RTT to the right of the End Call button.
  2. Wait for the microphone icon to turn to RTT.
  3. Tap RTT to open the text conversation.

Real-time text makes your iPhone even more accessible

While primarily a feature of accessibility for iPhone and iPad, everyone can take advantage of RTT on the best iPhone during a call. With RTT and options like Send Immediately enabled, your messages will appear instantly on the other end without having to tap send. Apple also makes it easy to set up and use Real-time text on Apple Watch and Mac so you can always stay in touch.

Updated May 2022: Updated for iOS 15.

Use your iPhone with one hand using Reachability

$
0
0

The best way to use your iPhone one-handed.

As iPhone displays have gotten larger, the days of using only one finger to perform most tasks are generally over. However, it's still possible, at least in some respects, with Reachability. When activated, this accessibility feature lets you reach items at the top of the mobile device by swiping down on the screen's bottom edge to bring the top into reach. Here's how to use it on iPhone.

What is Reachability?

Reachability is a built-in iOS 15 feature that works on all the best iPhones that lowers the top half of the screen so buttons and other on-screen objects are within easy reach of your thumb. For many folks, these will be top navigation buttons while using their phones one-handed.

It is available regardless of where you are on your mobile device and is super useful when using your phone with one hand.

How to enable Reachability

  1. Launch Settings from your Home screen.
  2. Scroll down and tap Accessibility.

  3. Select Touch under the Physical and Motor section.
  4. Set the toggle next to Reachability to the green on position.

How to use Reachability on iPhones with Face ID

  1. Swipe down on the bottom edge of the screen.
  2. Swipe up on the bottom edge of the screen or tap the blank space at the top of the screen to return to full screen. Reachability will reset itself after a few seconds if you don't touch anything.

How to use Reachability on iPhones with a Home button

  1. Lightly Double-tap (don't click) the Home button when you're on a screen you'd like to use with Reachability.
  2. Lightly Double-tap the Home button again or tap the blank space at the top of the screen to return to full screen. Reachability will reset itself after a few seconds if you don't touch anything.

Learn more about accessibility

Now that you're set up with Reachability, why not check out our coverage of Apple's other accessibility features for iPhone and iPad? There are tons of ways to customize your experience and adapt your devices to your needs.

Updated June 2022: Minor updates made.

Getting content off of a deceased loved one’s iPhone can be tricky

$
0
0

Here are a few ways you can get data off an iPhone belonging to someone who recently passed.

Something is always left behind when a loved one passes away. As our devices become increasingly intertwined with our lives, they're also becoming something to think about when someone dies. Our iPhones contain our digital legacy — years of photos, contacts, message threads, and phone calls — and it makes sense that if someone you love has died you might want to hold on to some of that.

Unfortunately, if the person protected their iPhone with a passcode, your options are limited. Apple builds its devices with security and privacy in mind, and won't (and often can't) unlock them for you if you don't have the passcode. However, there are some steps you might be able to take in order to get around these restrictions. Keep in mind, however, that at least some of these steps might not work.

iCloud.com

If your loved one used iCloud, there's a chance that the data could be accessible to you if you can gain access to the account. If the individual that has passed away shared their iCloud credentials with you, it could be as simple as logging into iCloud.com with those details in order to see what data has been saved there — that could include information like contacts, mail, photos, and more. You could also restore an iCloud backup onto an iPhone, though this may involve resetting the deceased individual's iPhone if you don't have a spare device kicking around (more on that in the next section).

If you don't know your loved one's iCloud password but you do have access to the email address their iCloud account uses, you could use that email to reset the password for the iCloud account and gain access that way.

Erase and restore from a backup

If you're wanting to restore your loved one's information wholesale onto an iPhone, you can do so via iCloud or iTunes/Finder (depending on where they saved their data). If you don't have a spare, blank iPhone, this process is going to involve erasing the deceased individual's device using a Mac or PC since you don't have the passcode for the iPhone itself.

Before erasing an iPhone, it's always best to ensure there definitely is a backup otherwise that data will be gone for good.

Restore from an iCloud backup

Once again, you'll need your loved one's iCloud credentials to use this method. You can erase the iPhone and restore it from an iCloud backup, which will restore the iPhone's content, but not its passcode (you can choose a new one during setup instead).

In order to erase the iPhone, you'll need to hook it up to your Mac or PC, open iTunes/Finder, and put the iPhone into Recovery Mode. Once restored, set the phone up using the most recent iCloud backup for the original owner's account.

Restore from an iTunes backup

If the person used a Mac or PC to back up their iPhone, you can use this method if you have access to and can get into that computer. As with the iCloud method, you'll still need to plug the iPhone into the computer cable, open iTunes/Finder, and put the iPhone into Recovery Mode in order to erase it.

When setting the phone back up again, you can select the option to restore from a Mac or PC and follow the instructions. You can restore the iPhone from an unencrypted backup (or an encrypted one, if you know the password).

As with an iCloud backup, restoring from an iTunes backup will restore the content of the iPhone, but not its passcode. Note that you won't be able to use this method with a Mac or PC that the person didn't use, as you'd need the iPhone's passcode in order to allow it to trust the computer and send data back and forth.

Legacy Contact access

In 2021, Apple announced its Digital Legacy program, which allows someone you choose to access your digital information stored in iCloud after you die.

Given the information above, you can see how difficult it can be in situations where surviving friends or family members need to access a deceased individual's device but can't because of a passcode. Adding Legacy Contacts allows for an official way around these security measures for individuals you trust. If you are already set up as a Legacy Contact, you can request access to iCloud data with your Access Key and the account owner's death certificate.

While it won't help in situations where the feature was set up after the person died, it's worth every iPhone and iPad user setting up to help avoid loved ones being locked out in the future while still maintaining the best iPhone security practices.

If you don't have access to the iCloud account, a device passcode, or Legacy Contact access

Outside of the situations outlined above, it's difficult to gain access to someone's Apple-related accounts or devices — and that's for good reason, from a security and privacy perspective.

The flip side of this is that, once a person is gone, it can be difficult to access things like contacts, important documents, photos, and other treasured memories if they didn't share their Apple ID or device passcode with you before they died. This is particularly common in cases where someone has passed away suddenly.

If they didn't opt in to the Digital Legacy program and set you up as a Legacy Contact, you don't have the device passcode, and you don't know the Apple ID credentials, there's not a great deal you can do without contacting Apple. The company doesn't provide too much context on the next steps, but it does state the following:

In the U.S. and other locales, you can request access to a deceased person's Apple ID and data with a court order that names you as the rightful inheritor of your loved one's personal information.

If you can provide the right information, it's possible that Apple can give you access to your loved one's Apple ID and data.

If in doubt, contact Apple Support

The tips above could help you out if you know your loved one's iCloud credentials or if you were already set up as a Legacy Contact for the individual that has passed away. If that's not your situation, then it's best to get in touch with Apple Support and ask what the next steps are before you go ahead with erasing a device or trying and failing to enter a password too many times. Apple is best placed to answer any queries about this situation and, hopefully, you'll get the result you want.

Updated June 2022: Updated for the latest version of iOS 15 and added information about Apple's Digital Legacy program.

Use an adaptive switch with your iPhone? Here's how to use Switch Control.

$
0
0

How do you use Switch Control on your iPhone? With accessibility settings!

Switch Control is an accessibility feature in iOS that allows folks with limited mobility to have full use of their device with the help of ability switches and other adaptive devices. When Apple makes the iPhone more accessible, it helps make the iPhone the best iPhone it can be, and Switch Control is a very robust feature.

Items on the screen are sequentially highlighted and can be activated by tapping, moving your head in front of the selfie camera, or pressing adaptive switches. You can also use point scanning and gestures, like pinching to zoom. Plus, you can even use multiple switches in iOS 15. Here's how to use Switch Control on iPhone and iPad

Note: Switch Control is easiest to set up if you pair your adaptive device first in your iPhone or iPad's Bluetooth menu.

How to enable Switch Control

  1. Launch Settings from your Home screen.
  2. Tap Accessibility.

  3. Tap Switch Control.

  4. Tap the Switch Control On/Off switch. It will be green when the feature is enabled.

You can turn off Switch Control whenever you want by following the same steps above.

How to add a new switch

  1. Launch Settings from your Home screen.
  2. Tap Accessibility.
  3. Tap Switch Control.

  4. Tap Switches.
  5. Tap Add New Switch…
  6. Tap a source.

    • External: You'll have to activate your external switch.
    • Screen: You'll have to select Full Screen afterward.
    • Camera: If you choose the camera, you'll also have to select actions for Left Head Movement and Right Head Movement.

  7. Tap the switch action you want the switch to do.
  8. Tap Long Press to set up a long press switch action. This is optional.

How to delete a switch

  1. Launch Settings from your Home screen.
  2. Tap Accessibility.
  3. Tap Switch Control.

  4. Tap Switches.
  5. Swipe left on the switch you want to delete.
  6. Tap Delete.

How to create a new recipe

A recipe is a set of actions that you can temporarily assign to switches in place of their normal actions. You can use recipes to perform frequently repeated or complex actions, like turning pages in iBooks. You'll need to have an adaptive switch connected to your device, but to get into the new recipe section, do the following:

  1. Launch Settings from your Home screen.
  2. Tap Accessibility.
  3. Tap Switch Control.

  4. Tap Recipes.
  5. Tap Create New Recipe...

From there, you'll be able to name your recipe and configure it with your adaptive switch or other assistive devices.

How to change scanning style

Changing the scanning style will change how you move through items on the screen. Auto Scanning is the default, but you have options if you would prefer to be in control.

  1. Launch Settings from your Home screen.
  2. Tap Accessibility.
  3. Tap Switch Control.

  4. Tap Scanning Style.
  5. Tap a scanning style:

    • Auto Scanning: Moves focus automatically after a specified duration
    • Manual Scanning: Requires a switch to be engaged to move focus and a second to activate items
    • Single Switch Step Scanning: Requires a switch to be engaged to move focus, and if no action is taken within a certain amount of time, the item in focus will automatically be activated.

How to change Auto Scanning Time

This will change how long it takes for Switch Control to automatically scan through items on a screen.

  1. Launch Settings from your Home screen.
  2. Tap Accessibility.
  3. Tap Switch Control.

  4. Tap Auto Scanning Time.
  5. Tap the plus and minus buttons to increase or decrease time.

How to enable Pause on First Item

If you get to a screen but need a second to get your bearings, you can enable Pause on First Item, and scanning won't start until you say so.

  1. Launch Settings from your Home screen.
  2. Tap Accessibility.
  3. Tap Switch Control.

  4. Tap Pause on First Item.
  5. Tap the Pause on First Item On/Off switch. When the switch is green, the feature is enabled.

How to change the number of loops

After each item on the screen has been visited a certain number of times, the cursor will become hidden. Here's how to change how many times the scan loops.

  1. Launch Settings from your Home screen.
  2. Tap Accessibility.
  3. Tap Switch Control.

  4. Tap Loops.
  5. Tap a number. You can loop from 1 to 10 times.

How to enable Move Repeat

If you need a little more time, Move Repeat will repeat the delay before "Move To Next/Previous Item" while a switch is pressed.

  1. Launch Settings from your Home screen.
  2. Tap Accessibility.
  3. Tap Switch Control.

  4. Tap Move Repeat.
  5. Tap the Move Repeat On/Off switch. When the switch is green, the feature is enabled.

How to enable and change the duration of Long Press

You can use Long Press to add another action to a switch that is activated when you hold it for a certain length of time. Here's how to enable it and change its duration.

  1. Launch Settings from your Home screen.
  2. Tap Accessibility.
  3. Tap Switch Control.

  4. Tap Long Press.
  5. Tap the Move Repeat On/Off switch. When the switch is green, the feature is enabled.
  6. Tap the plus or minus button to increase or decrease the length of time you have to press before Long Press is engaged.

How to change tap behavior

Tap behavior is what happens when the Select action is activated. It displays the Scanner Menu by default.

  1. Launch Settings from your Home screen.
  2. Tap Accessibility.
  3. Tap Switch Control.

  4. Tap Tap Behavior.
  5. Tap an option:

    • Default
    • Auto Tap: You change the Auto Tap duration when it's enabled. Just tap the plus and minus buttons that appear.
    • Always Tap

How to change which item is focused after tapping

You can change the item that Switch Control scans after an item is tapped. Here's how:

  1. Launch Settings from your Home screen.
  2. Tap Accessibility.
  3. Tap Switch Control.

  4. Tap Focused Item After Tap.
  5. Tap either First Item or Current Item.

How to enable Always Tap Keyboard Keys

  1. Launch Settings from your Home screen.
  2. Tap Accessibility.
  3. Tap Switch Control.
  4. Tap the Always Tap Keyboard Keys On/Off switch. When the switch is green, the feature is enabled.

How to enable Extended Predictions

  1. Launch Settings from your Home screen.
  2. Tap Accessibility.
  3. Tap Switch Control.
  4. Tap the Extended Predictions On/Off Switch. When the switch is green, the feature is enabled.

How to enable and change hold duration

You can enable and modify a hold duration so that your adaptive device must be held for a certain amount of time before a press is recognized. Here's how:

  1. Launch Settings from your Home screen.
  2. Tap Accessibility.
  3. Tap Switch Control.

  4. Tap Hold Duration.
  5. Tap the Hold Duration On/Off switch. When the switch is green, the feature is enabled.
  6. Tap the plus and minus buttons to lengthen or shorten the duration.

How to enable Ignore Repeat

Ignore Repeat is the time in which multiple presses are treated as a single input. This duration has to be less than the Auto Tap duration so that a double input press can be used.

  1. Launch Settings from your Home screen.
  2. Tap Accessibility.
  3. Tap Switch Control.

  4. Tap Ignore Repeat.
  5. Tap the Ignore Repeat On/Off Switch. When the switch is green, the feature is enabled.
  6. Tap the plus and minus buttons to change the duration.

How to change Gliding Cursor Speed

You can change the speed at which the Gliding Cursor moves across the screen. Here's how:

  1. Launch Settings from your Home screen.
  2. Tap Accessibility.
  3. Tap Switch Control.

  4. Tap Gliding Cursor Speed.
  5. Tap the Selection Mode you want
  6. Tap the plus or minus button to increase or decrease the speed.

When you enable Head Tracking, it uses the camera to track the movement of your head to control the pointer on the screen. Here's how you turn it on.

  1. Launch Settings from your Home screen.
  2. Tap Accessibility.
  3. Tap Switch Control.

  4. Tap Head Tracking.
  5. Tap the Head Tracking On/Off switch. The switch will turn green when enabled.

How to enable Sound Effects

  1. Launch Settings from your Home screen.
  2. Tap Accessibility.
  3. Tap Switch Control.
  4. Tap the Sound Effects On/Off Switch. When the switch is green, the feature is enabled.

How to enable speech in Switch Control

  1. Launch Settings from your Home screen.
  2. Tap Accessibility.
  3. Tap Switch Control.

  4. Tap Speech.
  5. Tap the Speech On/Off switch.
  6. Tap and drag the slider left or right to change the speaking rate. The right is faster; the left is slower.

How to change the speech voice in Switch Control

  1. Launch Settings from your Home screen.
  2. Tap Accessibility.
  3. Tap Switch Control.

  4. Tap Speech.
  5. Tap Voices.
  6. Tap the voice you want to use.

From here, you'll be able to hear what the voice sounds like. Note: You may have to download some of the voices before you can use them.

How to change menu items in Switch Control

  1. Launch Settings from your Home screen.
  2. Tap Accessibility.
  3. Tap Switch Control.

  4. Tap Menu Items.
  5. Tap a menu:

    • Top Level
    • Gestures
    • Device
    • Settings

  6. Tap a menu item to disable/enable it.
  7. Tap, hold, and drag the Reorder button (three horizontal lines) to reorder menu items.
  8. Tap the switch next to Show Streamlined First Page to enable/disable it. Having it enabled will make only the most important menu items be shown on the menu's first page.

How to enable/disable Group Items

Grouping items allows for faster navigation.

  1. Launch Settings from your Home screen.
  2. Tap Accessibility.
  3. Tap Switch Control.
  4. Tap the Group Items On/Off switch. When the switch is green, the feature is enabled.

How to enable the large cursor

  1. Launch Settings from your Home screen.
  2. Tap Accessibility.
  3. Tap Switch Control.
  4. Tap the Larger Cursor On/Off switch. When the switch is green, the feature is enabled.

How to change cursor color

  1. Launch Settings from your Home screen.
  2. Tap Accessibility.
  3. Tap Switch Control.

  4. Tap Cursor Color.
  5. Tap a color:

    • Blue
    • Red
    • Green
    • Yellow
    • Orange

How to create a new gesture

  1. Launch Settings from your Home screen.
  2. Tap Accessibility.
  3. Tap Switch Control.

  4. Tap Saved Gestures.
  5. Tap Create New Gesture…
  6. Tap or swipe to create a custom gesture.
  7. Tap Stop in the bottom right corner when you have finished making your gesture.

  8. Tap Save in the top right corner of your screen when you're finished.
  9. Type in a name for your new gesture.
  10. Tap Save.

Remember, you can tap Record if you want to re-do your gesture before saving. Any new gestures will now appear as an item under Saved Gestures.

iPhone's accessibility features are super important

Apple's constant updates and additions to the iPhone's accessibility features are one of the things that make your iPhone the best iPhone it can be.

We've also been really impressed with just how robust and useful Voice Control is on iPhone as well.

Updated June 2022: Updated for the newest version of iOS 15.


Amp up productivity with an awesome USB-C monitor for your MacBook

$
0
0

USB-C is gaining traction as the preferred USB connector port for both data transfer and power. Now, more than ever, it's vital to buy computer peripherals that support USB-C connectivity, including finding great USB-C monitors. If you're looking for a large-screen display to go with your MacBook Air, MacBook Pro, or Mac mini, you've come to the right place. Your best bet is the LG 27UK850-W 27-inch 4K UHD IPS Monitor, thanks to its 4K Ultra HD display, versatility, and price. It's perfect for most people, though there are other monitors better suited to different needs.

Best overall: LG 27UK850-W 27-inch 4K Monitor

At 27 inches, LG's latest 4K display is perfectly sized for most people. It supports a wide range of peripherals, including USB-C, USB-A, DisplayPort, HDMI, and standard headphones. Upon review of the LG 27UK850-W, we loved the true color vibrancy and clear visuals from the monitor's impressive 27-inch IPS screen covering 99% of the sRGB color spectrum. If you are an HDR content creator, you will love the display's ability to regenerate contrast and brightness for editing and previews.

The best part of this fantastic monitor is its ability to power your MacBook while acting as a display so that your battery does not limit you. It can even power the 13-inch MacBook Pro with ease (though it struggles to keep the 15-inch MacBook Pro juiced up more than a trickle during use). All you need is a single cable. The user interface is well simplified with on-screen controls.

The display is fitted with a tilt and height-adjustable mechanism for added ergonomic convenience. The smooth arched base provides reliable support and adds a touch of class to the screen. Life is undeniably good with such a monitor.

Pros:

  • A built-in USB hub for all your peripherals
  • Easy setup
  • 4K display
  • 60Hz refresh rate and 5ms response time
  • IPS 3-side borderless display

Cons:

  • Poor built-in audio
  • Awkward control panel

Best overall

LG 27UK850-W 27"-inch 4K Monitor

The best USB-C monitor for most people.

This 4K monitor is ideally situated between price and features with a variety of ports, high-speed data transfer, and more.

Best for daisy-chain: LG UltraFine 4K Display

When iMore reviewed the LG UltraFine 4K, we found the price tag very appealing compared to the LG UltraFine 5K Display. The display packs decent features, and it's compatible with MacBook Pro, MacBook Air, and Mac mini's Thunderbolt 3 (USB-C) port. You will have a quality 4K monitor that works seamlessly with your Mac without necessarily breaking your bank account. Though it doesn't have the Apple design aesthetic, the good stuff is all on the inside. Just like an Apple brand monitor, all of the monitor's controls are available in the settings section of your Mac.

This 24-inch display fits right into the pocket of reasonably priced and excellent quality if you don't mind the boxy black look. The display sits on a robust metallic base about 4.5 inches from the tabletop to the bottom of the screen. For a comfortable view, you can raise the height to eight inches. As for the price, especially if you prefer daisy-chaining displays together, you can get two of them for almost the price of one LG UltraFine 5K Display.

Pros:

  • Two Thunderbolt 3 ports
  • Dual-screen full 4K display support
  • Supports 85W charging
  • Easy to set up

Cons:

  • No camera or mic
  • No legacy ports

Best for daisy-chain

LG UltraFine 24MD4KL-B

Dual-screen full 4K support.

Hook up two for a beautiful, bright, and convenient workflow for your Mac laptop.

Best portable: ASUS ZenScreen

This monitor is a favorite around the iMore office for its incredible portability, as you can read about in our review of the ZenScreen. It's a 15.6-inch screen with a USB-C connector. You can rotate between landscape and portrait mode, and it's compatible with Thunderbolt 3. If you need a second screen when you're headed for the coffee shop, this takes up just the right amount of space without being a burden on your portability.

Pros:

  • Weighs less than 2 pounds
  • Ultra-slim at only 8mm thick
  • Comes with a cover
  • 60Hz refresh rate

Cons:

  • Does not charge your laptop
  • No HDMI support

Best portable

ASUS ZenScreen

As portable as it gets.

The ZenScreen is ASUS's very portable monitor with a USB-C port, a great-looking IPS panel, and more.

Best razor-thin bezels: Dell UltraSharp U2419HC

The Dell UltraSharp U2419HC monitor has a Full HD (1920x1080) resolution display with superb screen clarity that gives true-to-life color images and videos. You will enjoy vibrant visuals from a wide range of angles thanks to its In-Plane Switching (IPS) technology. The monitor's display is virtually borderless and features InfinityEdge technology with razor-thin bezels. As such, you can seamlessly pair two monitors for increased productivity.

With a stylish thin panel profile and a smaller base, the 23.8-inch Dell UltraSharp U2419HC is super compact leaving you sufficient desk space to set up other computer peripherals. With the convenience of a USB-C port, all you need is a single cable connector for both data and power transmission. In situations where you need to connect other devices, the monitor comes with additional ports, slots, and an improved cable management system for a clutter-free workstation. For added ergonomic comfort, you can pivot, tilt, swivel, or adjust the monitor's height to meet your specific needs.

Pros:

  • Allows height adjustment
  • Neat cable management system
  • 60Hz refresh rate and 5ms response time
  • IPS borderless display

Cons:

  • No speakers
  • You can't Daisy Chain

Best razor-thin bezels

Dell UltraSharp U2419HC

Get right back to work.

The Auto-restore feature on Dell Display Manager keeps applications in the same position after disconnection and reconnection.

Best premium: LG 34WK95U-W Nano-ISP UltraWide

Though LG's UltraFine 5K and UltraFine 4K were explicitly designed with Apple's MacBook Pro in mind, the 34WK95U-W wins our hearts as a game-changer. You can read more about why we love the LG 34WK95U-W in our dedicated review, but here are just a few specifics. This 5K monitor has a 5120 x 2160 resolution, 34-inch display, a Thunderbolt 3 port, an HDMI port, a DisplayPort port, and a couple of USB-A ports. It's more versatile than the UltraFine, and that's ultra-fine with us.

As much as you can create a wide display using multiple monitors. This monitor will give you a well-integrated display with no separation between applications. The display is enhanced with LG's Nano IPS to improve the accuracy and intensity of on-screen colors. Whatever magic that is, every creative professional will love working with this monitor.

Besides, the monitor has a gorgeous stand and thin bezels. The base is made from brushed aluminum bent to form a perfect arc — a perfect blend of elegance and performance.

Pros:

  • Pro-quality technology
  • Nano ISP color 5K display
  • USB hub
  • Versatile input options

Cons:

  • No built-in camera or microphone
  • Poor built-in speaker quality

Best premium

LG UltraWide 34WK95U 34-inch Monitor

From MacBook to iMac with LG and Thunderbolt 3.

Use LG's UltraWide monitor with your Mac laptop and daisy chain it with a second 4K monitor.

Best for multitasking: Dell UltraSharp U3818DW Monitor

The Dell U3818DW combines an expansive 38 -inch display and a virtually borderless InfinityEdge display to create incredible visuals with fewer distractions, a perfect fit for multitasking. Since the screen is ultra-wide and curved, you will enjoy 25 percent more screen real estate compared to 34-inch monitors. Besides, the monitor's display has a flicker-free screen with ComfortView, which filters out blue light to protect and optimize your eye comfort.

Pros:

  • Sufficient screen real estate
  • Inbuilt 9W speakers
  • VESA 100 mounting option

Cons:

  • Average contrast ratio
  • Lacks FreeSynch

Best for multitasking

Dell UltraSharp 38" Curved USB-C Monitor

Multitask like a pro.

Avid gamers and creative designers will benefit from the wide canvas, which is great for opening multiple windows.

Best for iPad Pro: LG UltraFine 5K

With LG's update to its UltraFine 5K monitor, you can use it along with your 2018 (or later) iPad Pro with USB-C. That's because the monitor now supports USB-C and Thunderbolt. The Thunderbolt 3 charges the MacBook Pro, and the three USB-C ports offer 5Gbps downstream. It's 27 inches big, which is about the size of Apple's larger iMac and has a similar P3 wide color gamut with 500 nits brightness. For full 5K resolution on a larger display, the UltraFine 5K is your perfect choice.

Our iMore reviewer concluded that the LG Ultrafine 5K's biggest downfall is that it doesn't quite have that Apple aesthetic. LG has designed an attractive Edge-Arcline base for some of its monitors, which looks better with Apple products. The UltraFine 5K, unfortunately, still has that big, boxy black base.

Pros:

  • Up to 5K resolution
  • Designed for Apple
  • Thunderbolt 3 and USB-C
  • Built-in speakers, camera, and mic

Cons:

  • No Apple aesthetic
  • No legacy ports

Best for iPad Pro

LG UltraFine 27MD5KL-B - LED monitor

Full 5K display plus support for USB-C.

If your workflow includes both a MacBook Pro and an iPad Pro, this is the monitor you want.

Best for creatives: BenQ PD2720U DesignVue 4K

Graphic designers, photographers, and videographers win big with BenQ's DesignVue 4K Display. It's built for you. When reviewing the BenQ PD2720U, we found that the variety of display modes are useful, and the incredibly easy way to switch between them, including split-screen, is an absolute pleasure to use.

The screen meets all your high-quality resolution needs. The blacks are deep, the reds are bright, and the whites are so bright you almost need sunglasses. I actually worked in Dark mode for a while, which reduced the brightness a bit, while still keeping the screen clear.

Pros:

  • Sharp picture
  • Two Thunderbolt 3 ports and Legacy ports
  • Multi-angle stand
  • Supports daisy-chain monitors
  • Comes with its own hotkey controller

Cons:

  • Connection ports are terribly positioned
  • Not as Mac-friendly as LG's UltraFine 4K display
  • Poor quality speakers

Best for creatives

BenQ PD2725U 27 Inch 4K Monitor

Space saver.

If you're a graphic designer, photographer, or videographer, you'll love the variety of display modes here.

Best curved: LG 38WK95C-W Curved UltraWide

The future is curved, and LG is the pioneer of bending the display rules. This 38-inch UltraWide monitor has a 21:9 ratio with split-screen support and is perfect for graphic designers and professional photo and video editors. The display has a USB-C data transfer port, two USB-A ports, plus a couple of HDMI ports, and a DisplayPort port.

Pros:

  • Well-designed
  • Easy setup
  • Versatile ports
  • Good built-in audio

Cons:

  • Not 4K
  • Plastic backside

Best curved

LG UltraWide 38WK95C 38 Inch Curved Monitor

Ahead of the curve.

If you need to charge your Mac laptop and transfer data at the same time, you're in luck.

Best budget: ASUS VZ279HE

The 27-inch ASUS VZ279HE monitor features a frameless design with an edge-to-edge brilliant view. Boasting a Full HD IPS LED display, a 16:9 aspect ratio, and a 178° ultra-wide viewing angle, you will enjoy minimal color shift on both vertical and horizontal modes. The monitor packs a whopping 75Hz refresh rate and 5ms response time perfect for playing your favorite games in crystal clarity and without jerky frame rates. Even better, the monitor has an affordable price tag without compromising visual qualities and overall performance.

Pros:

  • Perfect for tight budgets
  • Fast 75Hz refresh rate
  • Works great for gamers
  • Eye friendly display

Cons:

  • Too many extras in settings
  • Basic speakers

Best budget

ASUS VZ279HE 27 Inch Monitor, FHD (1920 x 1080)

Value for money

With an improved user experience and a flicker-free display, the ASUS VZ279HE is well priced and worth every pound.

More visual real estate

Picking the best USB-C monitor for your MacBook, MacBook Air, or MacBook Pro is a difficult one. It's important to consider how much room you have on your desk, what you plan to use your Mac laptop for, and how much you can afford. That's why the LG 27UK850-W is the perfect fit for most people. At 27-inches, it's big but not too big. It's got an incredible 4K screen resolution and a variety of versatile ports for connecting all manner of peripherals.

If the LG 27Uk850 is out of your range, the ASUS VZ279HE brings the best bang for buck. With a frameless LED display and 75Hz refresh rate, it's got everything you need to make your second screen work for you. Your most significant compromise is that there are fewer ports and lower resolution than the more expensive model, and the base isn't as sturdy.

Credits — The team that worked on this guide

Lory Gil is iMore's managing editor and spends more time in front of her monitors than she does anywhere else. She's constantly switching between desktop and mobile for work and knows how important an easy setup is.

Luke Filipowicz is iMore's gaming guru and knows how important a great monitor with zero lag is. If he had the room on his desk, he'd surround himself with 360-degrees of 4k displays.

Read the small print on your iPhone or iPad with Zoom

$
0
0

If you're visually impaired, make sure to use the handy Zoom Accessibility feature.

Some of us just don't have the best eyes. I mean, it happens, especially as we get older. But it seems like there's so much small print these days that it can definitely be challenging, even when you're using your best iPhone or iPad. Thankfully, Apple has a ton of Accessibility features that help make its devices easier to use for everyone, including those who are visually impaired.

In this instance, Zoom is an Accessibility feature that makes everything on your favorite iPhone or iPad screen larger, thus much easier to read. By default, it is set to 5x magnification, but you can easily adjust it between 1x to 15x, depending on your own personal needs and preferences. Once Zoom is enabled, you can use all of the familiar multitouch gestures, but you can also pair it with VoiceOver for even further assistance with visual impairments.

How to enable Zoom

To enable Zoom, you just need to head to the Zoom settings in the Accessibility settings menu. This is also where you'll access the option for tailoring the accessibility feature to your wants and needs.

  1. Open Settings on your iPhone or iPad.
  2. Tap Accessibility.
  3. Tap Zoom under the Vision section.

  4. Tap the switch to turn on Zoom.
  5. Tap and drag the slider under Maximum Zoom Level. Left decreases the maximum zoom level, right increases it.

Once you've got Zoom enabled, you can use it on the fly. Here's how to use it:

  • Double-tap with three fingers anywhere on the screen to enable and disable zoom. You can do this from pretty much anywhere.
  • Drag three fingers around the screen to pan around and move to another area of the screen.
  • Use one or two fingers to scroll in the particular section that is on the display.
  • Tap and hold the anchor to drag the magnifying glass up and down the screen.

That's it! You're good to go! If you ever decide you don't like zoom enabled, you can easily disable it by following the same steps.

How to enable/disable Follow Focus and Smart Typing

Follow Focus will make the Zoom window jump to the text you're typing and follow it along. With Follow Focus enabled, you won't be able to zoom in on the keyboard as you type. Like the other Zoom options, you can enable these in the Zoom settings menu under Accessibility in Settings.

  1. Tap the switch next to Follow Focus to enable or disable it. Green is on, white/gray is off.
  2. Tap the switch next to Smart Typing. The control will appear once you have Follow Focus enabled.

How to use and manage Zoom keyboard shortcuts

The Zoom settings also let you set up keyboard shortcuts to activate different Zoom features while attached to an external keyboard.

  1. Tap Keyboard Shortcuts.
  2. Tap the switch next to Keyboard Shortcuts to the green 'on' position. A lot of other switches will appear.
  3. Toggle the switches on or off to activate the ability to use keyboard commands for Adjust Zoom Level, Toggle Zoom, Move Zoom Window, Switch Zoom Region, and Temporarily Toggle Zoom.

The keyboard command for all of these options will be displayed directly underneath its place in the menu.

How to enable/disable the Zoom Controller

The Zoom Controller is a little joystick of sorts that lets you quickly access the Zoom menu, pan around a zoomed-in part of the screen, and quickly zoom in and out. Here's how to turn it on:

  1. Tap Zoom Controller
  2. Tap the switch next to Show Controller to the green 'on' position to activate the Zoom Controller, or gray/black 'off' position to disable it.
  3. Tap the Single-Tap, Double-Tap, and/or Triple-Tap options under Controller Actions.

  4. Tap None, Show Menu, Zoom In/Out, or Speak on Touch. You can choose from all of these options under Single-Tap, Double-Tap, and Triple-Tap except if one action is already assigned to one of the other two controller actions (if Show Menu is assigned to Single-Tap, you won't be able to select it under Double-Tap, for instance).
  5. Tap Back once you've decided what a single-, double-, or triple-tap does on the Zoom Controller to get back to the Zoom Controller menu.
  6. Tap the switch next to Adjust Zoom Level to allow a double-tap and slide on the Zoom Controller to adjust the zoom level.

  7. Tap Color.
  8. Tap the color that you want the Zoom Controller to be, either White, Blue, Red, Green, Yellow, or Orange.
  9. Tap Zoom Controller to move back to the Zoom Controller menu.

  10. Tap Idle Opacity.
  11. Tap and drag the slider left or right to determine the opacity of level of the Zoom Controller while it's idle.

How to change Zoom Region

You can choose to zoom in on the whole screen or just within a movable window.

  1. Tap Zoom Region.
  2. Tap either Full Screen Zoom or Window Zoom.

How to change the Zoom Filter

If you need the colors inverted on the zoomed-in area or if you need grayscale or low light, you can activate those options, and they'll only apply to what's in the Zoom area.

  1. Tap Zoom Filter.
  2. Tap an option:

    • None
    • Inverted
    • Grayscale
    • Grayscale Inverted
    • Low light

Zoom in and don't miss a beat

Even if you are not visually impaired, the Zoom feature is very useful for just making it easier to read all that small, hard-to-read print. And honestly, Apple has such great Accessibility features on all of their best devices, like the iPhone 13 Pro that make it more accessible for everyone and not just those with impairments.

Updated July 2022: These steps are current with the latest versions of iOS.

Make your iPhone easier to view by increasing contrast and reducing motion

$
0
0

How do I increase contrast on my iPhone? We'll show you how to do that and reduce motion right here.

Have you ever thought it was difficult to see text and other visuals on your current iPhone or iPad? While sometimes it's due to our aging eyes, others can also be visually impaired, which means certain things can be a little hard to see. Thankfully, Apple makes its devices very accessible to everyone, and not just the impaired, with a wide variety of Accessibility options. Some of these Accessibility features let you increase contrast and even reduce motion, in case all those animations aren't your thing (and it helps prolong your battery life).

No matter which device you're using, you're able to access these Accessibility options with ease. Here is how to increase contrast and reduce motion on your favorite iPhone and iPad.

How to increase contrast on iPhone and iPad

Sometimes it is just hard to see text and buttons on the screen, especially if they're lighter in color. Increasing the contrast will make some visual elements darker, thus easier to see.

  1. Launch Settings from your Home screen.
  2. Tap Accessibility.

  3. Tap Display & Text Size.
  4. Tap the switch next to Increase Contrast.

How to reduce motion on iPhone and iPad

As cool as animations are, they're not for everyone. Sometimes the perspective zoom on your wallpaper can make you motion sick if you're super sensitive, or maybe you just want to extend your battery life a little more. Reducing motion can help with that.

  1. Launch Settings from your Home screen.
  2. Tap Accessibility.

  3. Tap Motion.
  4. Tap the switch next to Reduce Motion.

You'll no longer see your Home Screen background moving behind your app icons, transition animations when going from an app back to the Home Screen, and certain other motions will be reduced as well (like flicking switches in Settings).

How to reduce transparency on iPhone and iPad

Transparency can affect things like legibility on certain backgrounds. Turning this option on will improve the contrast and reduce transparency and blurs on backgrounds, thus making text easier to read.

  1. Open Settings on your iPhone or iPad.
  2. Tap Accessibility.

  3. Tap Display & Text Size.
  4. Tap the switch next to Reduce Transparency to enable it.

See everything with Accessibility options

Despite being Accessibility features, increasing contrast and reducing motion have benefits for everyone, not just those who are visually impaired. Sometimes it's just hard to see things that are lighter colored, and motion sickness is very much a thing for a lot of people. Increasing the contrast and turning off all of the unnecessary animations can make life a lot easier when it comes to a device that you use very often. Plus, turning off the motion has secondary benefits, like improving overall battery life — after all, those animations need power.

Regardless, Apple's Accessibility features benefit everyone, no matter who you are.

Updated July 2022: Updated for the latest versions of iOS.


Latest Images